
Java控制GPIO
在樹莓派板子上使用Java控制樹莓派的GPIO, 需借助第三方SDK : Pi4j. Pi4j是使用wiringpi封裝而成, 不僅可操控GPIO, 還可以使用I2C及SPI協定來與硬体設備進行溝通
在樹莓派板子上運行的應用程式, 若要使用GPIO與各種零件互動, 就需要特別的函數庫. 通常是由C語言撰寫. 樹莓派的GPIO函數庫為 “WiringPi”, 由英格蘭的Gordon Hendersonm開發, 採用GNU LGPLv3授權. WiringPi的網站為http://wiringpi.com/。
若要使用Java控制GPIO, 需透過JNI與C語言WiringPi函數庫互動. 樹莓派使用Pi4J SDK. Pi4J是目前最常用的Java GPIO類別庫, 由Robert Savage與Chris Walzl共同開發. 官方網站是http://pi4j.com/。
Pi4J在2015/04/18發表1.0正式版本. 請注意, 1.0及1.1版本無法使用在Pi 2 及Pi 3型號的板子. 因為這二個型號使用 BCM2835以上的SOC, 1.0及1.1版本不認得這顆SOC. 目前最新的版本為1.2版, 此版才認得BCM2835以上的SOC.
Pi4J主要的功能與特性如下
Java App透過Pi4J提供的類別, 調用WiringPi函數庫與GPIO互動
設定GPIO針腳的控制方向(輸入或輸出)
控制與讀取GPIO針腳的狀態
監聽GPIO針腳狀態的改變
支援I²C與SPI通訊協定
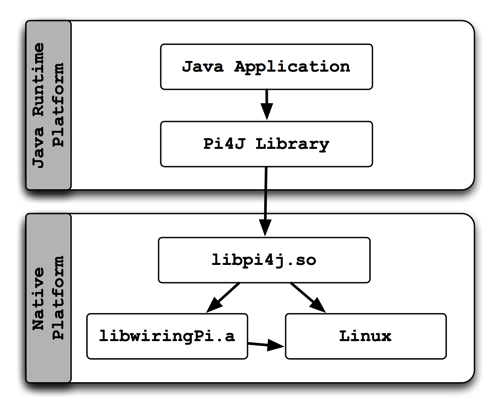
Pi4J SDK與WiringPi 函數庫的架構圖如下
安裝Jdk
sudo apt-get install openjdk-8-jdk
在Ubuntu中執行上述指令時, 會自動安裝openjdk-8-jre. 目前(2018/12/16)只有openjdk-8, 使用 8.0的版本即可, 不需要用到jdk 9.
另外, 請不要再用Oracle的版本了, Oracle的jdk11並沒有jre, 所以無法執行netbeans9
安裝netbeans 9.0
到如下網站下載 incubating-netbeans-java-9.0-bin.zip
https://netbeans.apache.org/download/nb90/nb90.html
解開 : unzip incubating-netbeans-java-9.0-bin.zip
執行 : gksu ~/netbeans/bin/netbeans (使用su啟動netbeans, 才能執行撰寫的程式)
安裝Pi4j
網路上大都說明安裝Pi4J 1.1版本, 此版會產生如下的錯誤(原因如上說明), 所以請不要跟著操作.
Unable to determine hardware version. I see: Hardware   : BCM2835,
 - expecting BCM2708 or BCM2709.
If this is a genuine Raspberry Pi then please report this
to projects@drogon.net. If this is not a Raspberry Pi then you
are on your own as wiringPi is designed to support the
Raspberry Pi ONLY.
正確安裝方式, 請先到如下網站下載1.2的版本
http://pi4j.com/download.html
pi4j-1.2-SNAPSHOT.deb 可直接安裝, 適用於文字模式下編譯執行
pi4j-1.2-SNAPSHOT.zip 解開後, jar 置於 lib目錄之下, 適用於netbeans下使用
netbeans設定
開啟netbeans, 新增一個專案, 然後於專案的Libraries按右鍵/Add Library
再按Create, 名稱改為Pi4j-Core. ClassPath選 pi4j-core.jar, Source選 pi4j-core-sources.jar, Javadoc選pi4j-core-javadoc.jar, 然後按ok
最後記得要選Pi4j-core, 再按Add Library
程式範例
package led1;
import com.pi4j.io.gpio.GpioController;
import com.pi4j.io.gpio.GpioFactory;
import com.pi4j.io.gpio.GpioPinDigitalOutput;
import com.pi4j.io.gpio.PinState;
import com.pi4j.io.gpio.RaspiPin;

public class Led1 {
    public static void main(String[] args) {
        System.out.println(" GPIO Control Example ... started.");

        // create gpio controller
        final GpioController gpio = GpioFactory.getInstance();

        // provision gpio pin #01 as an output pin and turn on
        GpioPinDigitalOutput pin0 = gpio.provisionDigitalOutputPin(RaspiPin.GPIO_00, "MyLED0", PinState.HIGH);
        GpioPinDigitalOutput pin1 = gpio.provisionDigitalOutputPin(RaspiPin.GPIO_01, "MyLED1", PinState.HIGH);
        GpioPinDigitalOutput pin2 = gpio.provisionDigitalOutputPin(RaspiPin.GPIO_02, "MyLED2", PinState.HIGH);

        // set shutdown state for this pin
        pin0.setShutdownOptions(true, PinState.LOW);
        pin1.setShutdownOptions(true, PinState.LOW);
        pin2.setShutdownOptions(true, PinState.LOW);

        System.out.println("--> GPIO state should be: ON");

        pin0.low();
        pin1.low();
        pin2.low();
        System.out.println("--> GPIO state should be: OFF");

        new Thread(() -> {
            boolean on = false;
            for (int i = 0; i < 200; i++) {
                on = !on;
                // toggle the current state of gpio pin #01 (should turn on)
                pin0.toggle();
                System.out.printf("pin0 GPIO state : %s\n", on);
                int time = (int) (Math.random() * 1000) + 100;
                try { Thread.sleep(time); } catch (InterruptedException e) {}
            }
        }).start();
        new Thread(() -> {
            boolean on = false;
            for (int i = 0; i < 200; i++) {
                on = !on;
                // toggle the current state of gpio pin #01 (should turn on)
                pin1.toggle();
                System.out.printf("pin1 GPIO state : %s\n", on);
                int time = (int) (Math.random() * 1000) + 100;
                try { Thread.sleep(time); } catch (InterruptedException e) {}
            }
        }).start();
        new Thread(() -> {
            boolean on = false;
            for (int i = 0; i < 200; i++) {
                on = !on;
                // toggle the current state of gpio pin #01 (should turn on)
                pin2.toggle();
                System.out.printf("pin 2 GPIO state : %s\n", on);
                int time = (int) (Math.random() * 1000) + 100;
                try { Thread.sleep(time); } catch (InterruptedException e) {}
            }
        }).start();
        // toggle the current state of gpio pin #01 (should turn off)
        //n.toggle(); //stem.out.println("--> GPIO state should be: OFF");
        //read.sleep(5000);
        // turn on gpio pin #01 for 1 second and then off
        //System.out.println("--> GPIO state should be: ON for only 1 second");
        //pin2.pulse(1000, true); // set second argument to 'true' use a blocking call
        // stop all GPIO activity/threads by shutting down the GPIO controller
        // (this method will forcefully shutdown all GPIO monitoring threads and scheduled tasks)
        //gpio.shutdown();
        //System.out.println("Exiting ControlGpioExample");
    }
}
使用vim編譯程式
使用下列指令將剛下載的deb檔進行安裝
sudo dpkg -i pi4j-1.2-SNAPSHOT.deb
安裝後, 官方文檔放在 /opt/pi4j/examples裏. 所以可以把如下幾個檔copy 到家目錄
cd
mkdir raspberry
cp raspberry
cp /opt/pi4j/examples/ControlGpioExample.java .
cp /opt/pi4j/run .
cp /opt/pi4j/build .
編譯及執行
sudo ./build
sudo ./run ControlGpioExample