
小工具
Android提供一種特別的元件AppWidget, 可以讓使用者在桌面上直接瀏覽資料, 或是執行一些簡單的操作. 例如在桌面上顯示時間, 行事曆或氣候資訊, 這種元件稱為小工具元件.
建立時鐘小工具
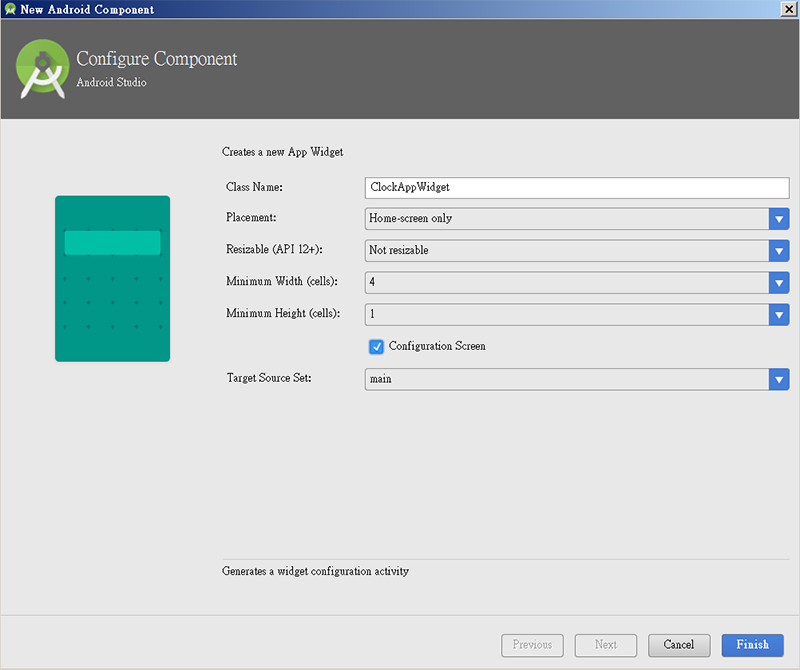
底下以一個時鐘小工具進行說明. 開啟新專案後, 選取Activity時選用 Add no Activity. 然後於App按右鍵/New/Widget/AppWidget, 然後依下面圖示說明修改.
此專案因為主Activity, 所以在工具列的App會有x的錯誤, 需點選Edit Configuration/Launch選Nothing
小工具畫面設計
小工具畫面可用的Layout只有FrameLayout, LinearLayout, RelativeLayout及GridLayout. 而能用的畫面元件也蠻少的, 如TextView, Button, ImageButton, ListView, ImageView等. 注意, EditText不可以使用
打開res/layout/clock_app_widget.xml, 設定如下
<LinearLayout xmlns:android="http://schemas.android.com/apk/res/android"
    android:layout_width="match_parent"
    android:layout_height="match_parent"
    android:background="#09C"
    android:padding="@dimen/widget_margin"
    android:orientation="vertical">
    <TextView
        android:id="@+id/now_text"
        android:layout_width="match_parent"
        android:layout_height="wrap_content"
        android:gravity="center"
        android:background="#09C"
        android:text="12:00"
        android:textColor="#ffffff"
        android:textSize="36sp"
        android:textStyle="bold|italic" />
    <TextView
        android:layout_width="match_parent"
        android:layout_height="wrap_content"
        android:id="@+id/textView"
        android:text="@string/app_name"
        android:gravity="center"
        android:textColor="#ffffff"
        android:textSize="12sp"/>
</LinearLayout>
小工具專用設定檔
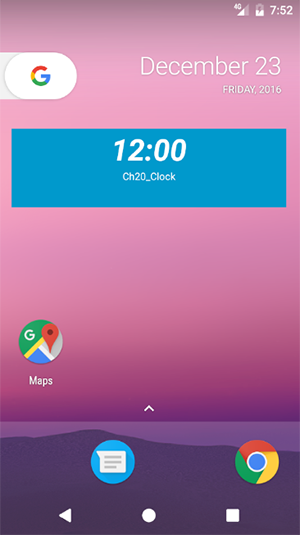
專用設定檔位於res/xml之下, 開啟clock_app_widget_info.xml, 可看到minHeight及minWidth. 桌面每格為70*70dp, 且建議周圍要有30dp的空間. 因為此例子為4*1格, 所以寬度為70*4-30=250, 高度為70*1-30=40.
updatePeriodMillis為多久會更新一次, 單位是ms, 因此例每分鐘要變更一次, 所以設定為60000ms. 修改如下
<?xml version="1.0" encoding="utf-8"?>
<appwidget-provider xmlns:android="http://schemas.android.com/apk/res/android"
    android:configure="com.asuscomm.mahaljsp.ch20_clock.ClockAppWidgetConfigureActivity"
    android:initialKeyguardLayout="@layout/clock_app_widget"
    android:initialLayout="@layout/clock_app_widget"
    android:minHeight="40dp"
    android:minWidth="250dp"
    android:previewImage="@drawable/example_appwidget_preview"
    android:updatePeriodMillis="60000"
    android:widgetCategory="home_screen"></appwidget-provider>
小工具元件類別
開啟ClockAppWidget.java, 此類別繼承了AppWidgetProvider, 而AppWidgetProvider又繼承了BroadcastReceiver類別. 此類別有如下的方法
onEnable() : 安裝第一個小工具到桌面時會調用, 且只調用一次, 也就是安裝第二個時, 就不會調用
onUpdate() : 每安裝一個小工具, 就會調用一次
onDelete() : 每刪除一個小工具, 就會調用一次
onDisable() : 刪除最後一個小工具時調用, 且只會調用一次
ClockAppWidget.java
public class ClockAppWidget extends AppWidgetProvider {

    static void updateAppWidget(Context context, AppWidgetManager appWidgetManager,
                                int appWidgetId) {

        CharSequence widgetText = ClockAppWidgetConfigureActivity.loadTitlePref(context, appWidgetId);
        // Construct the RemoteViews object
        RemoteViews views = new RemoteViews(context.getPackageName(), R.layout.clock_app_widget);
        views.setTextViewText(R.id.appwidget_text, widgetText);
        // Instruct the widget manager to update the widget
        appWidgetManager.updateAppWidget(appWidgetId, views);
    }
    @Override
    public void onEnabled(Context context) {
        // Enter relevant functionality for when the first widget is created
    }
    @Override
    public void onUpdate(Context context, AppWidgetManager appWidgetManager, int[] appWidgetIds) {
        // There may be multiple widgets active, so update all of them
        for (int appWidgetId : appWidgetIds) {
            updateAppWidget(context, appWidgetManager, appWidgetId);
        }
    }
    @Override
    public void onDeleted(Context context, int[] appWidgetIds) {
        // When the user deletes the widget, delete the preference associated with it.
        for (int appWidgetId : appWidgetIds) {
            ClockAppWidgetConfigureActivity.deleteTitlePref(context, appWidgetId);
        }
    }
    @Override
    public void onDisabled(Context context) {
        // Enter relevant functionality for when the last widget is disabled
    }
}
AndroidManifest.xml設定檔
在設定檔中, 需加入<receiver>標簽, 設定如下
<?xml version="1.0" encoding="utf-8"?>
<manifest xmlns:android="http://schemas.android.com/apk/res/android"
    package="com.asuscomm.mahaljsp.ch20_clock">
    <application
        android:allowBackup="true"
        android:icon="@mipmap/ic_launcher"
        android:label="@string/app_name"
        android:supportsRtl="true"
        android:theme="@style/AppTheme">
        <activity android:name=".MainActivity">
            <intent-filter>
                <action android:name="android.intent.action.MAIN" />
                <category android:name="android.intent.category.LAUNCHER" />
            </intent-filter>
        </activity>
        <receiver android:name=".ClockAppWidget">
            <intent-filter>
                <action android:name="android.appwidget.action.APPWIDGET_UPDATE" />
            </intent-filter>
            <meta-data
                android:name="android.appwidget.provider"
                android:resource="@xml/clock_app_widget_info" />
        </receiver>
        <activity android:name=".ClockAppWidgetConfigureActivity">
            <intent-filter>
                <action android:name="android.appwidget.action.APPWIDGET_CONFIGURE" />
            </intent-filter>
        </activity>
    </application>
</manifest>
上述編譯安裝後, 即可將小工具放於桌面上
更新畫面
小工具的專用設定檔中, updatePeriodMills 定義了 appWidget 的刷新頻率, 但是基於節約使用者電量的考慮, Android 系統預設最小更新週期是 30 分鐘, 也就是說, 如果程式需要即時更新資料, 設置這個更新週期是 2 秒, 那麼程式還是不會每隔 2 秒就收到更新通知的, 而是要等到 30 分鐘以上才會更新, 所以這個例子不能依靠onUpdate();
錯誤的寫法
那怎麼辦? 還好系統有一個ACTION_TIME_CLICK的廣播每隔一分鐘就廣播一次. 問題來了, 要在那裏註冊監聽這個廣播呢? 這個廣播不能使用靜態註冊, 所以只能使用動態註冊. 所以應該可以把動態註冊寫在AppWidget的onEnabled()裏, 而且AppWidget又是繼承了BroadcastReceiver類別, 所以可以覆寫onReceiver()來更改畫面, 如下程式碼. 但是經過實測, 這樣的寫法會在一段時間後莫名的失去註冊而無法接收到廣播, 時間就會停止更新. 在Google Play中下載經典Sense風格時鐘小工具就有這個Issue
以下是錯誤的程式碼
public void onEnabled(Context context) {
    context.getApplicationContext().registerReceiver(
            this, new IntentFilter(Intent.ACTION_TIME_TICK));
}
public void onReceive(Context context, Intent intent) {
    RemoteViews views=new RemoteViews(context.getPackageName(), R.layout.clock_app_widget);
    AppWidgetManager manager=AppWidgetManager.getInstance(context);
    ComponentName cn=new ComponentName(context, ClockAppWidget.class);
    views.setTextViewText(R.id.now_text, getTime());
    manager.updateAppWidget(cn, views);
    super.onReceive(context, intent);
}
private static String getTime(){
    Date d=new Date(System.currentTimeMillis());
    SimpleDateFormat sdf=new SimpleDateFormat("HH:mm");
    return sdf.format(d);
}
正確的寫法
AppWidget的onEnabled()在小工具第一次安裝到畫面時會被執行, 而且它還有一個特性, 就是在重新開機後, 會自動的執行一次. 所以, 可以利用這個特性使用下面的步驟
1. 在AppWidget的onEnabled()啟動一個Service.
2. 在這個Service註冊一個接收TIME_TICK的Receiver.
3. 在Receiver中更新AppWidget的畫面
AppWidget註冊Service
下面的程式碼說明啟動Service的方式. 請特別注意, 每次安裝一次小工具, 系統就會new 出ClockAppWidget的物件, 而每次new 出來後, 裏面的物件變數都是預設值. 所以intentService一定要使用static. 這觀念在張X裕的書中有嚴重的錯誤.
public class ClockAppWidget extends AppWidgetProvider {
    static Intent intentService;//一定要使用static
    /*
            請注意, 書上寫的有錯誤
            每次安裝一個小工具到桌面, 就會new 出此類別的物件.
            而onEnable只有在第一次安裝時才會執行
             所以如果把intentService寫成物件變數, 則第二個小工具開始, 此intentService都是null
        */
    static void updateAppWidget(Context context, AppWidgetManager appWidgetManager,
                                int appWidgetId) {
        CharSequence widgetText = ClockAppWidgetConfigureActivity.loadTitlePref(context, appWidgetId);
        RemoteViews views = new RemoteViews(context.getPackageName(), R.layout.clock_app_widget);
        views.setTextViewText(R.id.appwidget_text, widgetText);
        SimpleDateFormat sdf=new SimpleDateFormat("HH:mm");
        views.setTextViewText(R.id.now_text, sdf.format(new Date(System.currentTimeMillis())));
        appWidgetManager.updateAppWidget(appWidgetId, views);
    }
    @Override
    public void onEnabled(Context context) {
        intentService=new Intent(context, ClockService.class);
        context.startService(intentService);
    }
    @Override
    public void onUpdate(Context context, AppWidgetManager appWidgetManager, int[] appWidgetIds) {
        for (int appWidgetId : appWidgetIds) {
            updateAppWidget(context, appWidgetManager, appWidgetId);
        }
    }
    @Override
    public void onDeleted(Context context, int[] appWidgetIds) {
        for (int appWidgetId : appWidgetIds) {
            ClockAppWidgetConfigureActivity.deleteTitlePref(context, appWidgetId);
        }
    }
    @Override
    public void onDisabled(Context context) {
        context.stopService(intentService);
        intentService=null;
    }
}
TimeTickReceiver的寫法如下
public class TimeTickReceiver extends BroadcastReceiver {
    @Override
    public void onReceive(Context context, Intent intent) {
        RemoteViews views=new RemoteViews(context.getPackageName(), R.layout.clock_app_widget);
        SimpleDateFormat sdf=new SimpleDateFormat("HH:mm");
        views.setTextViewText(R.id.now_text, sdf.format(new Date(System.currentTimeMillis())));
        ComponentName cn=new ComponentName(context, ClockAppWidget.class);
        AppWidgetManager manager=AppWidgetManager.getInstance(context);
        manager.updateAppWidget(cn, views);
    }
}
至於Service就只是單純的註冊監聽即可. 不過請注意一下, 在設定檔中要如上<service>標簽
public class ClockService extends Service {
    TimeTickReceiver timeTickReceiver;
    @Nullable
    @Override
    public IBinder onBind(Intent intent) {
        return null;
    }
    @Override
    public void onCreate() {
        if(timeTickReceiver==null)timeTickReceiver=new TimeTickReceiver();
    }
    @Override
    public int onStartCommand(Intent intent, int flags, int startId) {
        registerReceiver(timeTickReceiver, new IntentFilter(Intent.ACTION_TIME_TICK));
        return Service.START_STICKY;
    }
    @Override
    public void onDestroy() {
        unregisterReceiver(timeTickReceiver);
    }
}
完整程式碼下載 : ClockWidget.rar
RemoteViews
上述程式碼中有一個RemoteViews物件, 此物件包含了小工具畫面layout裏的所有元件. 取得RemoteViews物件的建構子有二個參數. 第一個為context.getPackageName(), 是用來取得package的名稱, 第二個參數為R.layout.clock_app_widget, 即畫面配置檔. 取得後, 再使用setTextViewText(), setImageViewBitmap(), setProgressBar(), setViewVisiblity()等方法進行內容的變更
AppWidgetManager
上面利用RemoteViews設定每個元件的內容後, 並沒有馬上更改, 因為小工具可能被安裝了好幾個, 所以到底是要變更那一個呢, 就要使用此管理器來指定變更.
取得AppWidgetManager的方式為AppWidgetManager.getInstance(context). 再使用下面的方法變更內容
appWidgetManager.updateAppWidget(int, RemoteViews) : 變更指定的小工具
appWidgetManager.updateAppWidget(int[], RemoteViews) : 變更陣列中的小工具
appWidgetManager.updateAppWidget(ComponentName, RemoteViews) : 變更所有的小工具
ComponentName的取得方式為new ComponentName(context, ClockAppWidget.class);
小工具元件發送廣播
小工具裏的元件, 也可以送出廣播, 其步驟如下
1. 在 onUpdate() 中使用PendingIntent.getBroadcase()新增PendingIntent 物件, 指定要發送什麼訊號
2. 使用RemoteViews.setOnClickPendingIntent(R.id.xxx, pending)
public class ClockAppWidget extends AppWidgetProvider {
    public static final String ACTION_UPDATE="com.asuscomm.mahaljsp.ClockAppWidget.ACTION_UPDATE";
    static Intent intentService;//一定要使用static
    static void updateAppWidget(Context context, AppWidgetManager appWidgetManager,
                                int appWidgetId) {
        CharSequence widgetText = ClockAppWidgetConfigureActivity.loadTitlePref(context, appWidgetId);
        RemoteViews views = new RemoteViews(context.getPackageName(), R.layout.clock_app_widget);
        views.setTextViewText(R.id.appwidget_text, widgetText);
        SimpleDateFormat sdf=new SimpleDateFormat("HH:mm");
        views.setTextViewText(R.id.now_text, sdf.format(new Date(System.currentTimeMillis())));
        PendingIntent pending=PendingIntent.getBroadcast(context, 0, new Intent(ACTION_UPDATE),
                PendingIntent.FLAG_UPDATE_CURRENT);
        views.setOnClickPendingIntent(R.id.txtRefresh, pending);
        appWidgetManager.updateAppWidget(appWidgetId, views);
    }
發送廣播後, 當然, 就看誰要接收, 就實作onReceiver, 即可
小工具元件啟動Activity
同樣, 在在 onUpdate() 中使用PendingIntent.getActivity()新增PendingIntent 物件, 指定要發送什麼訊號
然後使用RemoteVies.setOnClickPendingIntent(R.id.xxx, pending)進行觸發