LCD 1602 點矩陣液晶
1602 LCD 是市面上最常看到的矩陣顯示器. 雖說只能顯示16*2=32個英文文字, 但對於一些只需顯示簡易訊息的工業機械控制已經是足夠超強的了. 且價格便宜, 不用台幣100元.
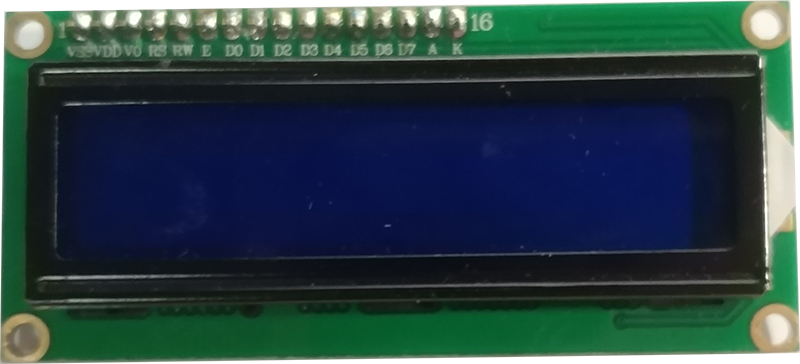
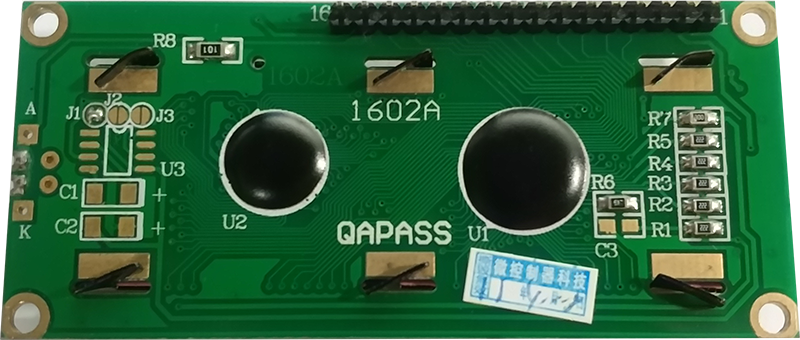
底下是1602A的正反面圖
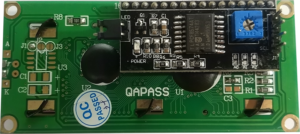
I2C轉接板
由上可見, 共有16支針腳, 實在太恐怖了, 這線是要怎麼拉啊. 再說了, 樹莓派的針腳也才40針, 接了這塊後, 其他東西都不用搞了. 所以市面上就有出一塊I2C轉接板, 簡化成只有四支針腳
接線法
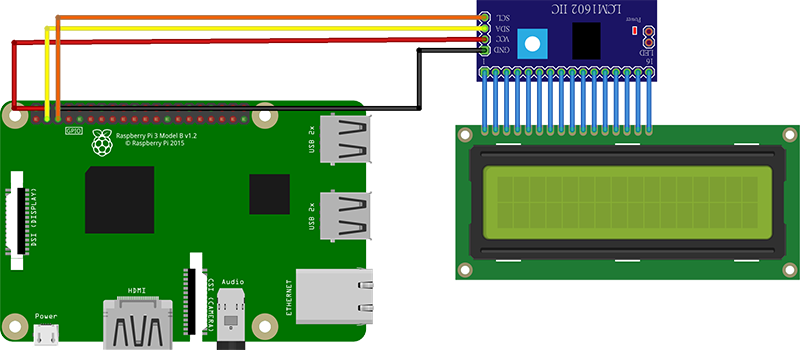
| LCM1602 IIC V1 接腳 | Raspberry Pi GPIO 腳位 |
| GND | 實體編號 6 (接地) |
| VCC | 實體編號 4 (+5V) |
| SDA | 實體編號 3 |
| SCL | 實體編號 5 |
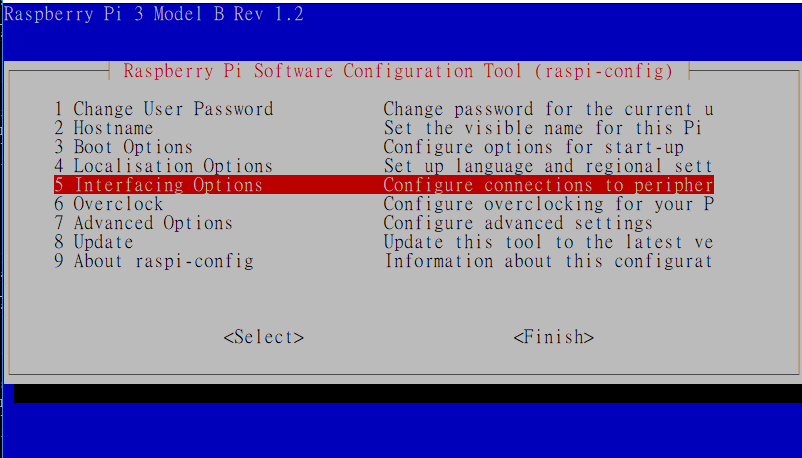
開啟RaspBerry I2C 功能
1. 在樹莓派需執行 sudo raspi-config, 然後選取Interfacing Option
2. 選取 P5 I2C
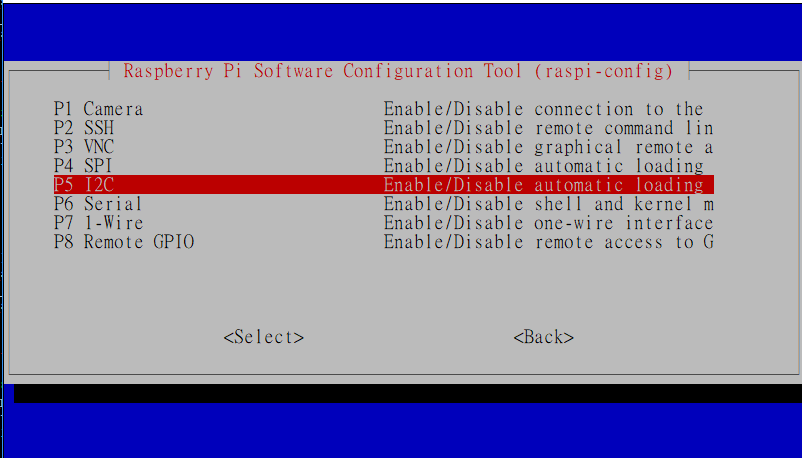
3. 依序選取YES/Finish後,記得重新開機
sudo reboot
程式碼
講到使用Java撰寫樹莓派程式碼, 實在是少的可憐. 實在搞不懂大家為什麼要用效能奇差的Python去寫了.
下面的程式碼是完全以Java實作出來, 小編試了超久所得到的結果.
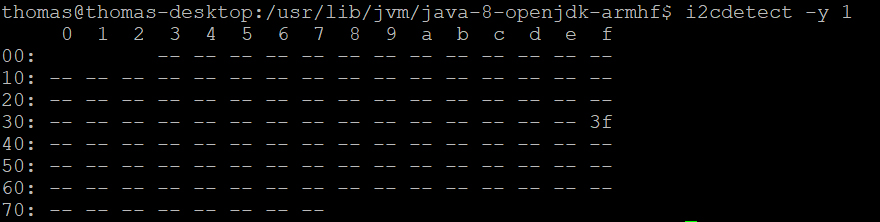
請注意下面的代碼中, 藍色的 0x3f 是I2C的位址, 需在樹莓派中使用由如下指令查詢
i2cdetect -y 1
下圖是執行後的結果, 位址為 0x3f
package i2cdemo;

import com.pi4j.component.lcd.LCDTextAlignment;
import com.pi4j.component.lcd.impl.I2CLcdDisplay;
import java.text.SimpleDateFormat;
import java.util.Date;
public class I2cDemo {
    public static final int LCD_ROW_1 = 0;
    public static final int LCD_ROW_2 = 1;
    public static final String DEMO_TITLE = "RaspberryPi 1602";
    public static void main(String[] args) throws Exception {
        // for 1602 LCD + PCF8574 I2C module
        I2CLcdDisplay lcd = new I2CLcdDisplay(2, 16, 1, 0x3f, 3, 0, 1, 2, 7, 6, 5, 4);

        lcd.write(LCD_ROW_1, DEMO_TITLE);
        Thread.sleep(3000);

        lcd.clear();
        Thread.sleep(1000);

        // show characters at specified positions
        lcd.setCursorHome();

        for (int column = 0; column < lcd.getColumnCount(); column++) { lcd.write((byte)0xFF); Thread.sleep(100); } for (int column = lcd.getColumnCount() - 1; column >= 0; column--) {
            lcd.write(LCD_ROW_2, column, (byte)0xFF);
            Thread.sleep(100);
        }

        lcd.setCursorHome();
        for (int column = 0; column < lcd.getColumnCount(); column++) { lcd.write(DEMO_TITLE.charAt(column)); Thread.sleep(100); } for (int column = lcd.getColumnCount() - 1; column >= 0; column--) {
            lcd.write(LCD_ROW_2, column, ' ');
            Thread.sleep(100);
        }

        // show text alignment
        lcd.writeln(LCD_ROW_2, "< LEFT", LCDTextAlignment.ALIGN_LEFT); Thread.sleep(2000); lcd.writeln(LCD_ROW_2, "RIGHT >", LCDTextAlignment.ALIGN_RIGHT);
        Thread.sleep(2000);

        lcd.writeln(LCD_ROW_2, "< CENTER >", LCDTextAlignment.ALIGN_CENTER);
        Thread.sleep(2000);

        // show clock
        SimpleDateFormat formatter = new SimpleDateFormat("HH:mm:ss");
        while (true) {
            lcd.writeln(LCD_ROW_2, formatter.format(new Date()), LCDTextAlignment.ALIGN_CENTER);
            Thread.sleep(1000);
        }
    }
}
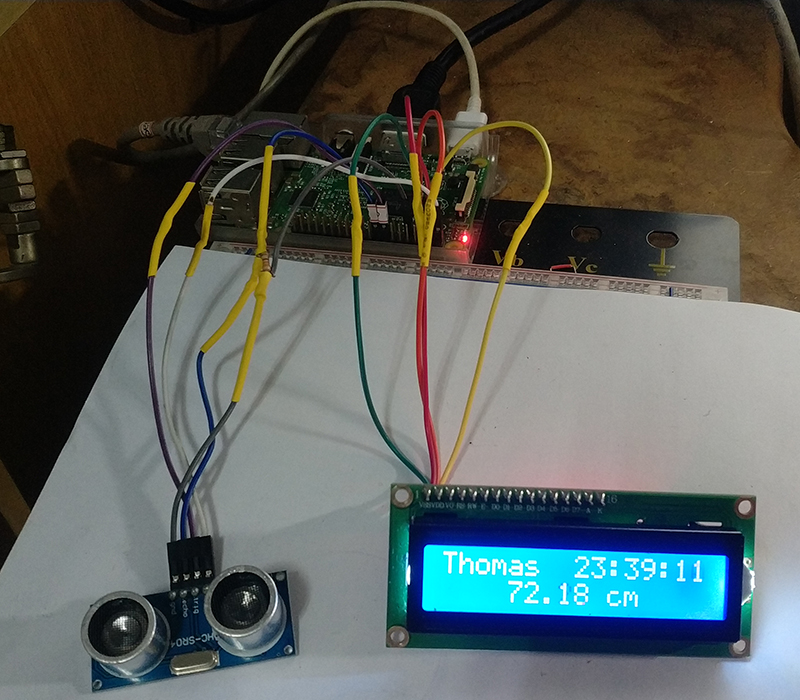
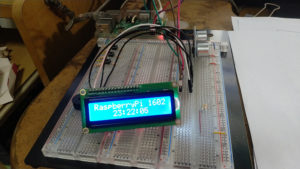
最後整個實驗照片如下
可攜式測距儀
將超音波測距模組所偵側到的資料, 顯示到LCD上, 就可以作成可攜式的測距儀了. 本程式亦會依距離遠近, 使蜂鳴器發出不同的聲音, 圖片及代碼如下
請注意幾個事項
1. 不可以使用 GpioInterrupt.addListener來偵測Echo針腳的變化. 因為addListener不是RTOS(即時系統), 從偵測事件到開始執行, 可能過了好幾百萬微秒. 而這幾百萬微秒對敏感的音速或光速而言, 都跑了好幾百公尺, 甚至是好幾百公里了.
2. 寫入LCD會耗費極大的時間, 所以只能有一個執行緒控制LCD. 若將時間及距離用不同的執行緒寫入LCD, 將會錯亂.
package lcdsonicspeaker;

import com.pi4j.component.lcd.LCDTextAlignment;
import com.pi4j.component.lcd.impl.I2CLcdDisplay;
import com.pi4j.wiringpi.Gpio;
import com.pi4j.wiringpi.GpioInterrupt;
import com.pi4j.wiringpi.GpioInterruptEvent;
import com.pi4j.wiringpi.GpioInterruptListener;
import java.text.SimpleDateFormat;
import java.util.Date;

public class LcdSonicSpeaker {
    public static final int LCD_ROW_1 = 0;
    public static final int LCD_ROW_2 = 1;
    public static final int GPIO_SPEAKER = 0;
    public static final int GPIO_TRIGGER = 4;
    public static final int GPIO_ECHO = 5;
    public static long startTime, endTime;
    public static I2CLcdDisplay lcd;
    public static double distance=1000;
    public static void main(String[] args) {
        try{
            lcd= new I2CLcdDisplay(2, 16, 1, 0x3f, 3, 0, 1, 2, 7, 6, 5, 4);
        }
        catch(Exception e){}
        lcd.clear();
        if (Gpio.wiringPiSetup() == -1) {
            System.out.println(" ==>> GPIO SETUP FAILED");
            return;
        }
        SimpleDateFormat sdf = new SimpleDateFormat("HH:mm:ss");

        //啟動LCD
        //請注意~~~寫入LCD會耗費極大的時間, 所以只能有一個執行緒控制LCD
        //使用一個執行緒寫入時間, 又啟用另一個執行緒寫入距離, 將會錯亂
        //所以時間及距離, 必需在同一個執行緒中完成寫入LCD
        new Thread(()->{
            while(true){
                lcd.writeln(LCD_ROW_1,String.format("Thomas %s", sdf.format(new Date())) , LCDTextAlignment.ALIGN_LEFT);
                lcd.writeln(LCD_ROW_2,String.format("%.1f cm", distance) , LCDTextAlignment.ALIGN_CENTER);
                try{Thread.sleep(100);}catch(InterruptedException e){}
            }
        }).start();

        //啟動蜂鳴器
        Gpio.pinMode(GPIO_SPEAKER, Gpio.OUTPUT);
        Gpio.digitalWrite(GPIO_SPEAKER, false);
        new Thread(()->{
            int delay=0;
            while(true){
                if(distance<=10)delay=0;
                else if(distance<=20)delay=100;
                else if(distance<=50)delay=220;
                else if(distance<=100)delay=340;
                else if(distance<=150)delay=460;
                else if(distance<=200)delay=580;
                if(distance<=10){
                    Gpio.digitalWrite(GPIO_SPEAKER, true);
                    try{Thread.sleep(500);}catch(InterruptedException e){}
                }
                else if(distance<=200){
                    Gpio.digitalWrite(GPIO_SPEAKER, true);
                    try{Thread.sleep(delay);}catch(InterruptedException e){}
                    Gpio.digitalWrite(GPIO_SPEAKER, false);
                    try{Thread.sleep(200);}catch(InterruptedException e){}
                }
                else{
                    Gpio.digitalWrite(GPIO_SPEAKER, false);
                    try{Thread.sleep(200);}catch(InterruptedException e){}
                }
            }
        }).start();
        //啟動超音波
        Gpio.pinMode(GPIO_TRIGGER, Gpio.OUTPUT);
        Gpio.pinMode(GPIO_ECHO, Gpio.INPUT);
        new Thread(()->{
            while(true){
                Gpio.digitalWrite(GPIO_TRIGGER, true);
                try{Thread.sleep(10);}catch(InterruptedException e){}
                Gpio.digitalWrite(GPIO_TRIGGER, false);

                while(Gpio.digitalRead(GPIO_ECHO)==0){}

                startTime= System.nanoTime();
                while(Gpio.digitalRead(GPIO_ECHO)==1){}
                endTime= System.nanoTime();
                distance=(endTime-startTime)/1000.0/2 * 0.034;
                try{Thread.sleep(100);}catch(InterruptedException e){}
            }
        }).start();
        while(true){
            try{Thread.sleep(500);}catch(InterruptedException e){}
        }
    }
}