
yolo26n.pt 模型可用來偵測圖片,這個模型包含了網路架構及訓練後的權重,此模型又稱為預訓練權重。
預設權重使用微軟的 COCO 資料集訓練而成的。COCO 收集了16萬4000張的圖片,共有 80 種物件。
yaml 及 pt
yolo26n.yaml 只是模型的設計圖(網路結構),沒有任何訓練資料;而 yolo26n.pt 則是已經訓練完成的模型,裡面包含結構和權重。換句話說,yolo26n.pt 就是用 yolo26n.yaml 這個架構訓練出來的成果。
安裝套件
請記得先安裝 Pytorch for cuda,然後才安裝 ultralytics。
pip install torch torchvision torchaudio --index-url https://download.pytorch.org/whl/cu130 --no-cache-dir

pip install ultralytics labelimg
COCO 資料集下載
COCO 資料集可以由如下網址下載
在 https://github.com/wongkinyiu/yolov7 網址往下拉,可以看到 train, val, test, labels 的下載網址,分別如下。
train : http://images.cocodataset.org/zips/train2017.zip
val : http://images.cocodataset.org/zips/val2017.zip
test : http://images.cocodataset.org/zips/test2017.zip
labels : https://github.com/WongKinYiu/yolov7/releases/download/v0.1/coco2017labels-segments.zip
請將上面的四個檔案下載到專案的根目錄下。
目錄結構
yolo 官方說明要有 images 及 labels 二個目錄,這二個目錄名稱不可以更改。然後 images 下有 train 及 val 二個目錄,而 labels 下也有 train 及 val 二個目錄。如下所顯示的目錄結構。
coco/
├── images/
│   ├── train/
│   │   ├── img1.jpg
│   │   ├── img2.jpg
│   ├── val/
│
├── labels/
│   ├── train/
│   │   ├── img1.txt
│   │   ├── img2.txt
│   ├── val/
先把 coco2017labels-segments.zip 解壓縮至此,產生 coco 目錄。
將 train2017.zip 移到 coco/images 下,並解壓縮至此,解開的圖片會置於 train2017 之下。
將 val2017.zip 移到 coco/images 下,並解壓縮至此,解開的圖片會置於 val2017 目錄之下。
另外如下的目錄架構也可以,只是一般人都採用上面的模式。
coco/
├── train/
│   ├── images/
│   │   ├── img1.jpg
│   │   ├── img2.jpg
│   ├── labels/
│
├── val/
│   ├── images/
│   │   ├── img1.txt
│   │   ├── img2.txt
│   ├── labels/
設定 data.yaml
在 coco 下新增 data.yaml,內容如下。請注意一定要寫絕對路徑。請注意,本專案根目錄為 e:\python\yolo。
train: e:/python/專案目錄/coco/images/train2017
val: e:/python/專案目錄/coco/images/val2017
# number of classes
nc: 80

# class names
names: [ 'person', 'bicycle', 'car', 'motorcycle', 'airplane', 'bus', 'train', 'truck', 'boat', 'traffic light',
         'fire hydrant', 'stop sign', 'parking meter', 'bench', 'bird', 'cat', 'dog', 'horse', 'sheep', 'cow',
         'elephant', 'bear', 'zebra', 'giraffe', 'backpack', 'umbrella', 'handbag', 'tie', 'suitcase', 'frisbee',
         'skis', 'snowboard', 'sports ball', 'kite', 'baseball bat', 'baseball glove', 'skateboard', 'surfboard',
         'tennis racket', 'bottle', 'wine glass', 'cup', 'fork', 'knife', 'spoon', 'bowl', 'banana', 'apple',
         'sandwich', 'orange', 'broccoli', 'carrot', 'hot dog', 'pizza', 'donut', 'cake', 'chair', 'couch',
         'potted plant', 'bed', 'dining table', 'toilet', 'tv', 'laptop', 'mouse', 'remote', 'keyboard', 'cell phone',
         'microwave', 'oven', 'toaster', 'sink', 'refrigerator', 'book', 'clock', 'vase', 'scissors', 'teddy bear',
         'hair drier', 'toothbrush' ]
從零開始訓練
由「yolo26n.yaml」取得網路架構模型,再由 model.train() 重頭訓練,這種稱為 training from scratch。yolo26n.yaml 存放在專案下的 .venv\Lib\site-packages\ultralytics\cfg\models\26
從零開始訓練這種方法很硬,會持續數周的時間,而且訓練出來的不一定比官方出的預訓練好,一般人不會這麼作。
import os
import shutil
import time
from ultralytics import YOLO
#訓練模型時,一定要放在 __name__ 區塊內
#否則會出現需使用 fork來執行子行程的錯誤
if __name__=='__main__':
    path="./runs/detect/train"
    if os.path.exists(path):
        shutil.rmtree(path)
    files=[
        "./coco/labels/train2017.cache",
        "./coco/labels/val2017.cache"
    ]
    for file in files:
        if os.path.exists(file):
            os.remove(file)
    #model = YOLO("yolo26n.pt")
    model = YOLO("yolo26n.yaml")
    print(model.model.yaml)
    print("開始訓練 .........")
    t1=time.time()
    model.train(data="./coco/data.yaml", epochs=10, imgsz=640)
    t2=time.time()
    print(f'訓練花費時間 : {t2-t1}秒')
    print(f'模型匯出路徑 : {model.export()}')
本人使用 epochs=10,就需花費4 個多小時,顯示結果如下
10 epochs completed in 4.715 hours.
訓練花費時間 : 17187.354389190674秒
圖片偵測
上述訓練 epochs 10 次的模型,請由如下網址下載
將 best.pt 置於 runs/detect/train/weights 之下,偵測圖片代碼如下。
import numpy as np
from cv import cv
from ultralytics import YOLO
import cv2
import pylab as plt

# 載入模型
model = YOLO("./runs/detect/train/weights/best.pt")

# 讀取圖片
img = cv.read("dog.jpg")[...,::-1].copy()

# 辨識圖片
result = model(img)[0]  # 取得第一個結果

# 取得辨識結果
boxes = result.boxes  # 邊界框
#probs = result.probs  # 各類別機率
#classes = result.names  # 類別名稱映射

# 繪制邊框
for box in boxes:
    x1, y1, x2, y2 = box.xyxy[0].cpu().numpy().astype(int)
    conf = box.conf[0].cpu().numpy()
    cls = int(box.cls[0].cpu().numpy())
    name = result.names[cls]
    img=cv.rectangle(img, (x1, y1), (x2, y2), (0,255,0), 3)
    img=cv.text(img, (x1, y1-10), f"{name}\n{conf:.2f}", color=(255,0,0), size=70)
plt.axis("off")
plt.imshow(img)
plt.show()
偵測結果如下所示
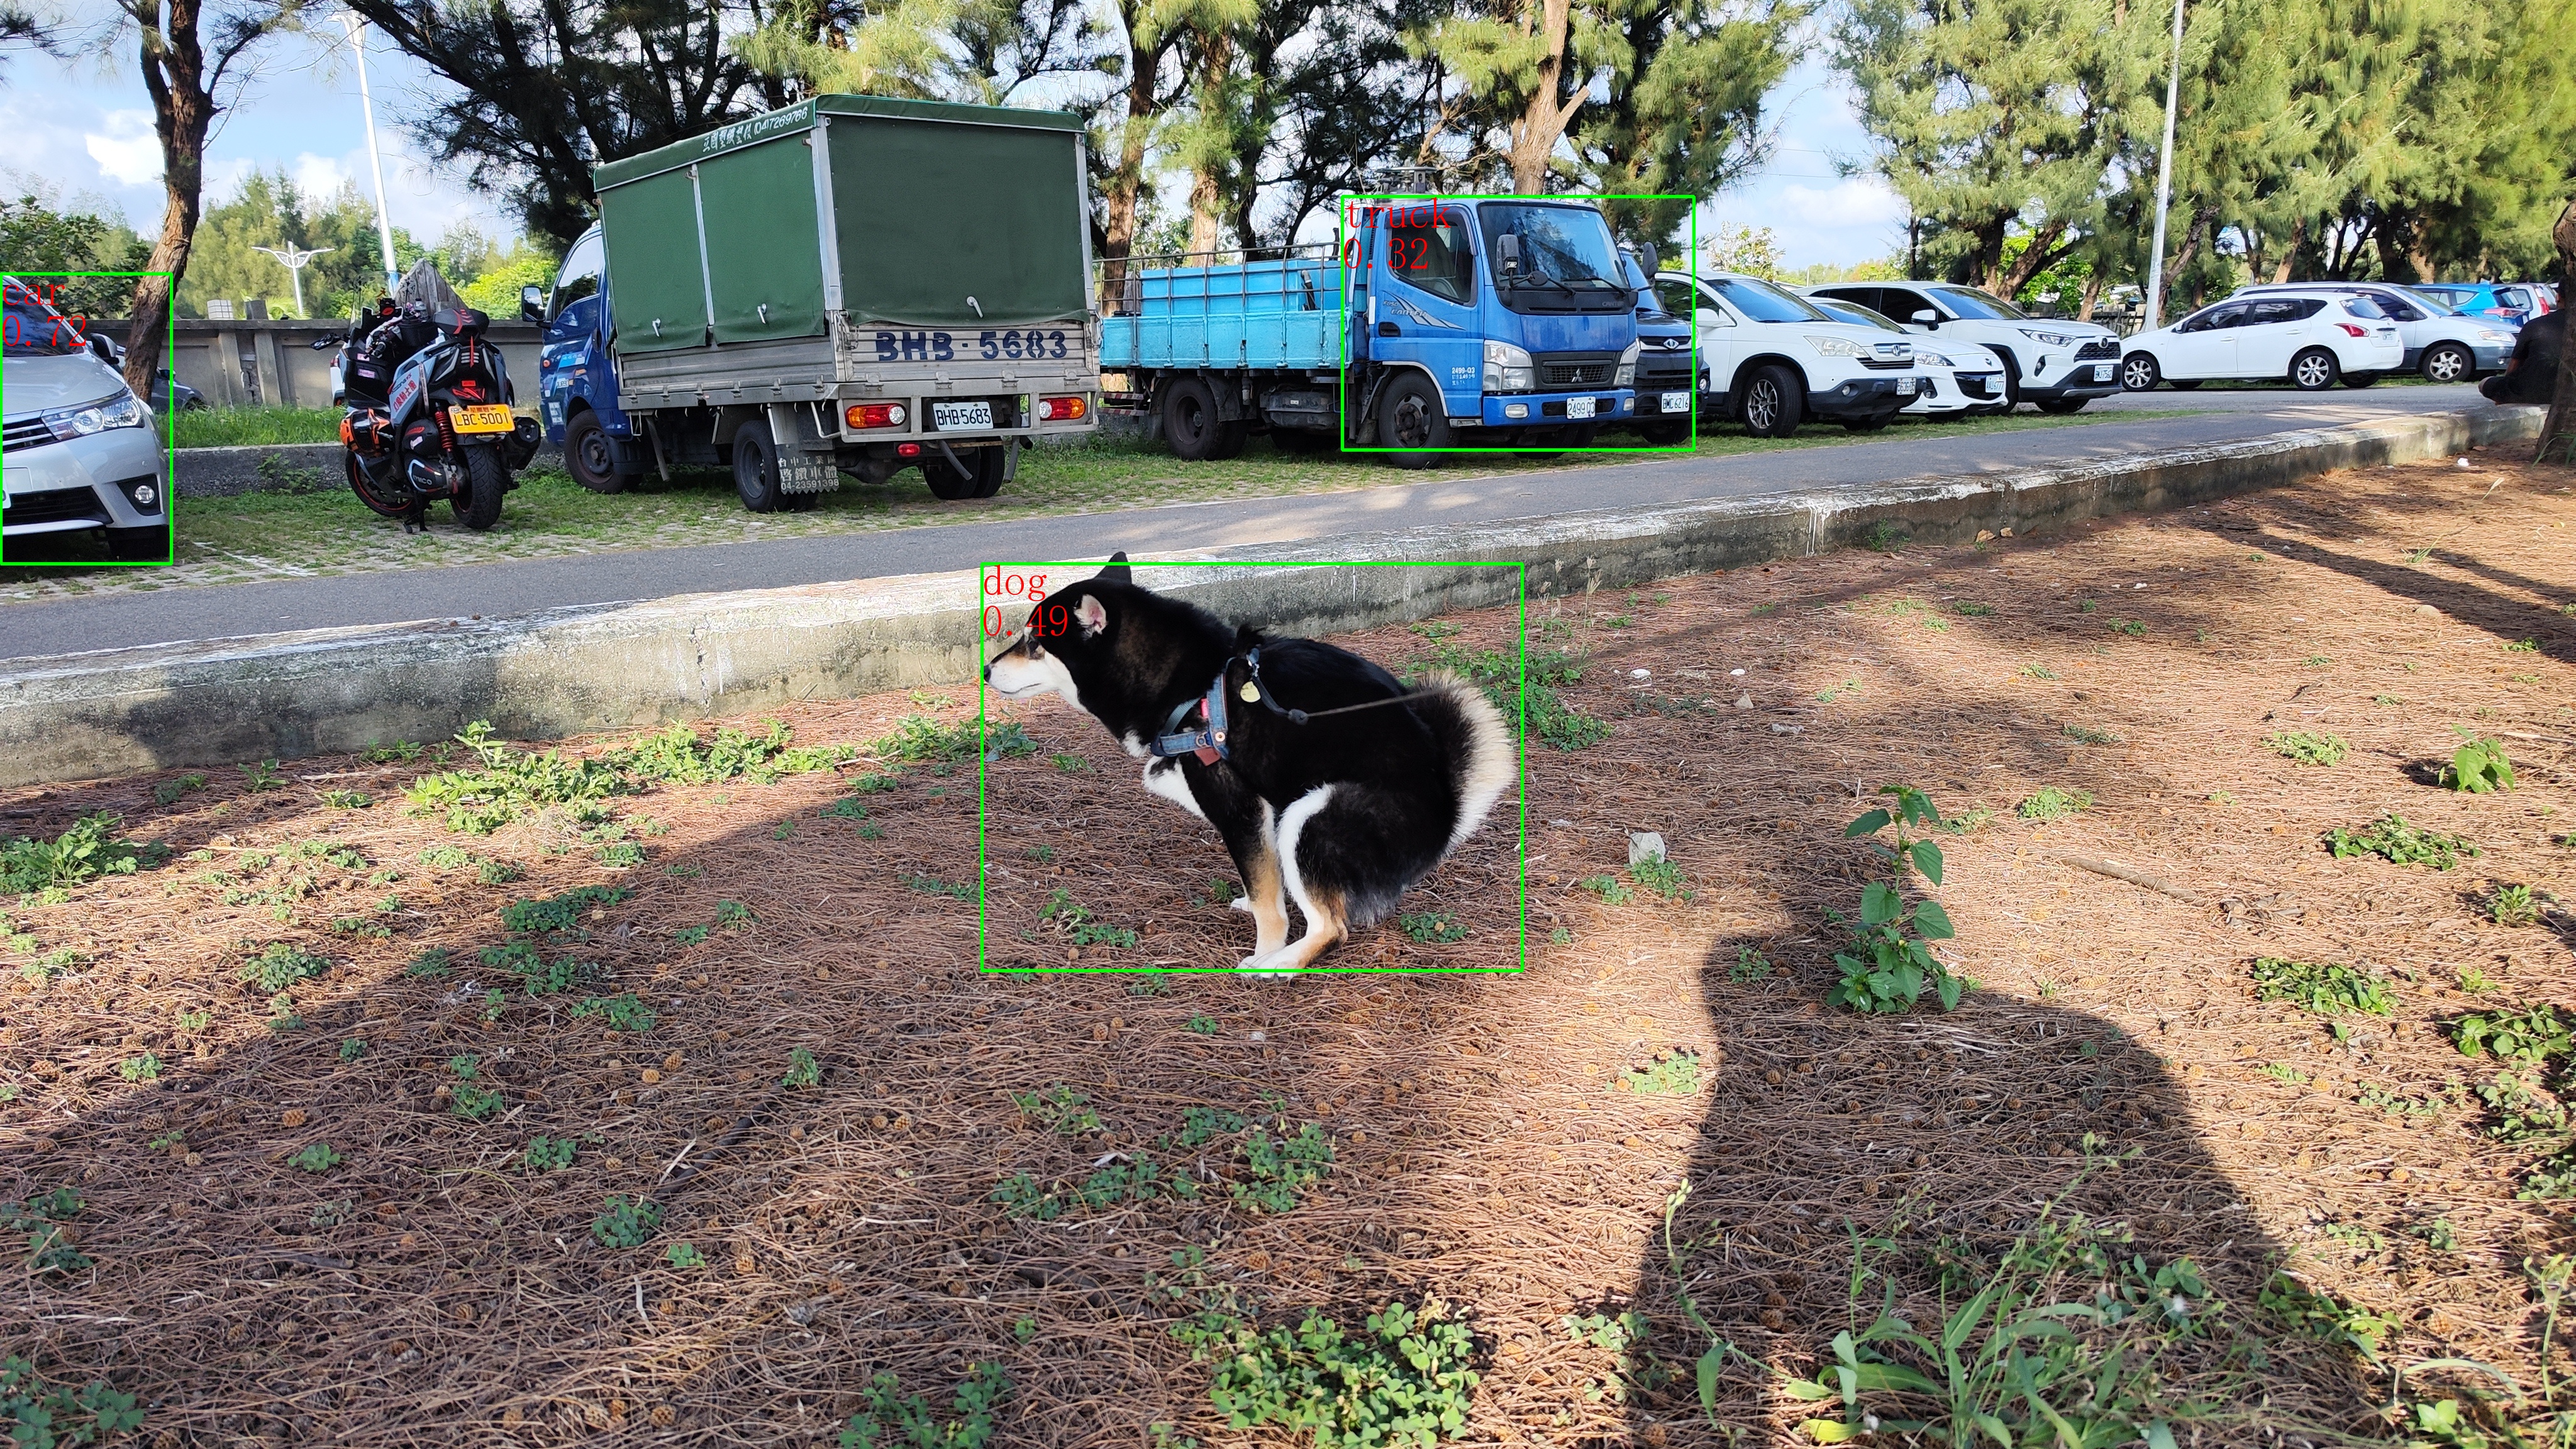
由上圖可見,只訓練 10 epochs 的準確度還是不足。
yolo26n.yaml 查詢
yolo26n.yaml 亦可由如下方式查詢。
model = YOLO("yolo26n.yaml")
print(model.model.yaml)
結果如下
{'nc': 80, 'end2end': True, 'reg_max': 1, 'scales': {'n': [0.5, 0.25, 1024], 's': [0.5, 0.5, 1024], 'm': [0.5, 1.0, 512], 'l': [1.0, 1.0, 512], 'x': [1.0, 1.5, 512]}, 'backbone': [[-1, 1, 'Conv', [64, 3, 2]], [-1, 1, 'Conv', [128, 3, 2]], [-1, 2, 'C3k2', [256, False, 0.25]], [-1, 1, 'Conv', [256, 3, 2]], [-1, 2, 'C3k2', [512, False, 0.25]], [-1, 1, 'Conv', [512, 3, 2]], [-1, 2, 'C3k2', [512, True]], [-1, 1, 'Conv', [1024, 3, 2]], [-1, 2, 'C3k2', [1024, True]], [-1, 1, 'SPPF', [1024, 5, 3, True]], [-1, 2, 'C2PSA', [1024]]], 'head': [[-1, 1, 'nn.Upsample', ['None', 2, 'nearest']], [[-1, 6], 1, 'Concat', [1]], [-1, 2, 'C3k2', [512, True]], [-1, 1, 'nn.Upsample', ['None', 2, 'nearest']], [[-1, 4], 1, 'Concat', [1]], [-1, 2, 'C3k2', [256, True]], [-1, 1, 'Conv', [256, 3, 2]], [[-1, 13], 1, 'Concat', [1]], [-1, 2, 'C3k2', [512, True]], [-1, 1, 'Conv', [512, 3, 2]], [[-1, 10], 1, 'Concat', [1]], [-1, 1, 'C3k2', [1024, True, 0.5, True]], [[16, 19, 22], 1, 'Detect', ['nc']]], 'scale': 'n', 'yaml_file': 'yolo26n.yaml', 'channels': 3}
yolo.exe 訓練權重
在 Terminal 執行如下指令,epochs 設定為 200 次。
yolo task=detect mode=train model=./yolov8n.pt data=./coco/data.yaml epochs=200 imgsz=640
中斷接續訓練
上面訓練要花費二、三天的時間,中途若中斷,可以由中斷點再接續訓練,指令如下
from ultralytics import YOLO
if __name__=='__main__':
    model = YOLO('path/to/last.pt')  # load a partially trained model
    # Resume training
    results = model.train(resume=True)