
VGG19可以分辨1000個種類,但如果我們要辨識的,並不在這1000個之內,就要自已訓練。訓練的步驟為 :
收集圖片資料,訓練,偵測。開始之前,請先安裝如下套件
pip install tensorflow==2.10.1 matplotlib opencv-python
訓練圖片
收集圖片是一項大工程,還好 tensorflow 幫我們收集了一大堆圖片。請到 http://download.tensorflow.org/example_images/flower_photos.tgz 下載圖片。下載後置於專案之下並解開,就會多一個 flower_photos 目錄。
flower_photos 裏面 有 5 個資料夾,分別是 daisy(雛菊),dandelion(蒲公英),roses(玫瑰),sunflowers(向日葵),tulips(鬱金香)
測試圖片
要進行辨識測試的圖片,請由如下網址下載,存儲在專案下的 images 目錄
Dense 層
Dense 層只會出現在全連接層,也就是輸出層。Dense 的作用就是由原本的 x 種狀況 (特徵),經過某種演算後,變成下一層的 y 種狀況。
剛剛講的某種演算,通常就是用捲積的方式來計算下一層的結果。
訓練模型
把每張圖片讀入縮小後放入 data 中,並同時由目錄名稱記錄每張圖的類別放在 labels 中。然後將VGG19前三個連接層抽出,再加入自已的全連接層。
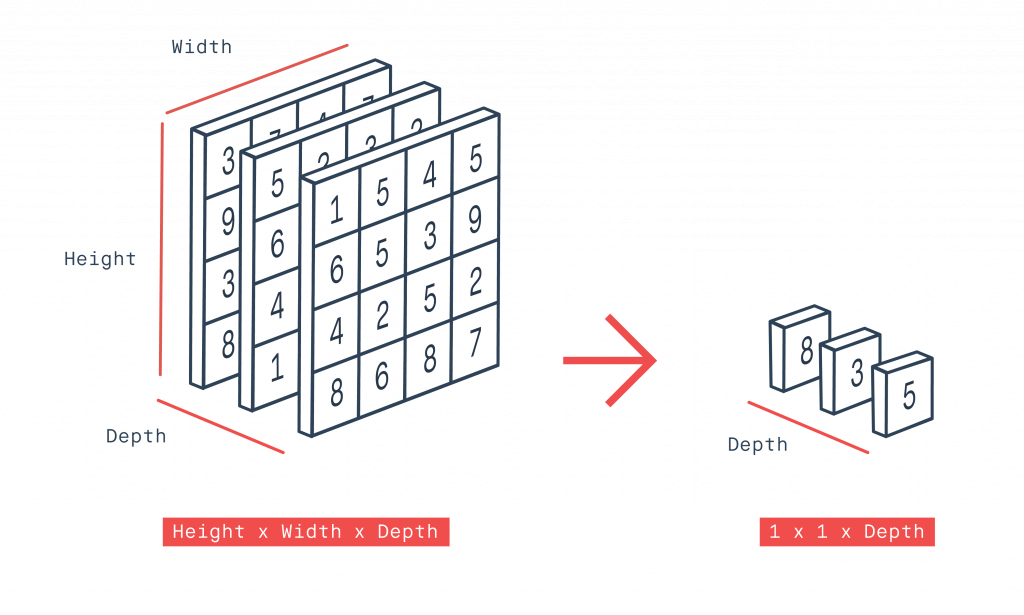
一開始始用 GlobalAveragePooling2D 將 (長*寬*通道) 轉換成 (1*1*通道),其方法是將每個通道中的權重作平均值。如下圖所示,最前面的通道中,(1+5+4+5+6+5+3+9+4+2+5+2+8+6+8+7)/16 = 5
Dense 種類為 256 及 64 種,激活方式為 relu (線性整流, 將負值變為0),最後的輸出層激活含數為 softmax (轉換為機率,總合為1)。
在每個連接層( Dense) 之後,都需作 BatchNormalization。BN 層的作用是把一個 batch 內的所有數據,從不規則的分佈拉到常態分佈,將數字集中在平均為 0,標準差為 1 的範圍。這樣作的好處是使得數據能夠分佈在激活函數的敏感區域,敏感區域即為梯度較大的區域,因此在反向傳播時能夠較快反饋誤差傳播。BN的運作方式又是一篇論文,裏面有著複雜的數學運算,所以只需了解其功能即可。
模型中所加入的各層,不一定要按這個方式,也可以改用其它層,可自行測試看看。
訓練時要注意 batch_size,如果太大會造成顯卡記憶体不足,就需往下調整。訓練的時間依硬体等級有所不同。訓練好的模型會儲存在 flower 目錄中。
下述代碼若使用 CPU 訓練,每個 epoch 約要 2 分鐘,共需 100 分鐘。若使用 GPU 訓練,每個 epoch 約 4 秒,共需 200 秒。
#!./.venv/bin/python3
import os
import random
from keras import Sequential
from keras.src.applications.vgg19 import VGG19, preprocess_input
from keras.src.layers import GlobalAveragePooling2D, Dense, BatchNormalization, Dropout
from keras.src.optimizers import Adam
from MahalSdk.cv import cv
import cv2
import numpy as np
import pylab as plt
imgs=[]
labels=[]
path="./flower_photos"
flowers=[]
for flower in os.listdir(path):
    flowers.append(flower)
    for file in os.listdir(os.path.join(path, flower)):
        img=cv.read(os.path.join(path, flower, file))[:,:,::-1].copy()
        img=cv2.resize(img,(224, 224) , interpolation=cv2.INTER_LINEAR)
        # 作不作預處理都沒差
        #imgs.append(preprocess_input(img))
        imgs.append(img)
        labels.append(flower)

#Linux 讀取目錄的順序不會按字母排序,所以要手動排序
flowers=sorted(flowers)

upset=list(zip(imgs, labels))
random.seed(1)
random.shuffle(upset)
imgs, labels=zip(*upset)
train=int(len(imgs)*0.9)
train_img=np.array(imgs[:train])
train_label=np.array(labels[:train])
test_img=np.array(imgs[train:])
test_label=np.array(labels[train:])
train_onehot=np.zeros([len(train_label), 5])
test_onehot=np.zeros([len(test_label), 5])
for i in range(len(train_label)):
    train_onehot[i][flowers.index(train_label[i])] = 1
for i in range(len(test_label)):
    test_onehot[i][flowers.index(test_label[i])]=1
print(test_onehot)
#建立模型
model_base=VGG19(
    weights='imagenet',
    include_top=False,
    input_shape=(224,224,3)
)
for layer in model_base.layers:
    layer.trainable=False

model=Sequential()
model.add(model_base)
model.add(GlobalAveragePooling2D())
model.add(Dense(256,activation='relu'))
model.add(BatchNormalization())
model.add(Dense(64,activation='relu'))
model.add(BatchNormalization())
model.add(Dropout(0.2))
model.add(Dense(5, activation='softmax'))

#編譯模型
model.compile(
    optimizer=Adam(learning_rate=0.0001),
    loss='categorical_crossentropy',
    metrics=['accuracy']
)

#開始訓練模型
history=model.fit(
    train_img,
    train_onehot,
    batch_size=128,
    epochs=50,
    validation_data=(test_img, test_onehot)
)
model.save("./flower.keras")

p1=plt.plot(history.history['accuracy'], label='training acc')#訓練時的準確度
p2=plt.plot(history.history['val_accuracy'], label='val acc')#測試時的準確度
p3=plt.plot(history.history['loss'], label='training loss')#訓練時的損失率
p4=plt.plot(history.history['val_loss'], label='val loss')#測試時的損失率
plt.legend()
plt.show()
辨識圖片
如果無法訓練模型,可下載人本已訓練好的模型 : flower5.zip
載入模型後,再載入圖片即可辨識。記得圖片需縮小為 224*224,然後擴展為4維。
#!./.venv/bin/python3
import os
from keras.src.applications.convnext import preprocess_input
os.environ['TF_CPP_MIN_LOG_LEVEL'] = '2'
import keras
import pylab as plt
import cv2, numpy as np
model=keras.models.load_model('./flower.keras')
path="./images"
flowers=sorted(os.listdir("./flower_photos"))
for i, file in enumerate(os.listdir(path)):
    full=os.path.join(path, file)
    img=cv2.imdecode(np.fromfile(full, dtype=np.uint8), cv2.IMREAD_COLOR)
    img=img[:,:,::-1].copy()
    x=cv2.resize(img, (224,224), interpolation=cv2.INTER_LINEAR)
    x=np.expand_dims(x, axis=0)

    #不作預處理也沒差
    #x=preprocess_input(x)

    out=model.predict(x)
    idx=out[0].argmax()
    name=flowers[idx]
    ax=plt.subplot(3,5,i+1)
    ax.set_title(name)
    ax.imshow(img)
    ax.axis("off")
plt.show()
