
VGG19 總共有 16個捲積層及3個全連接層。詳細圖示如下
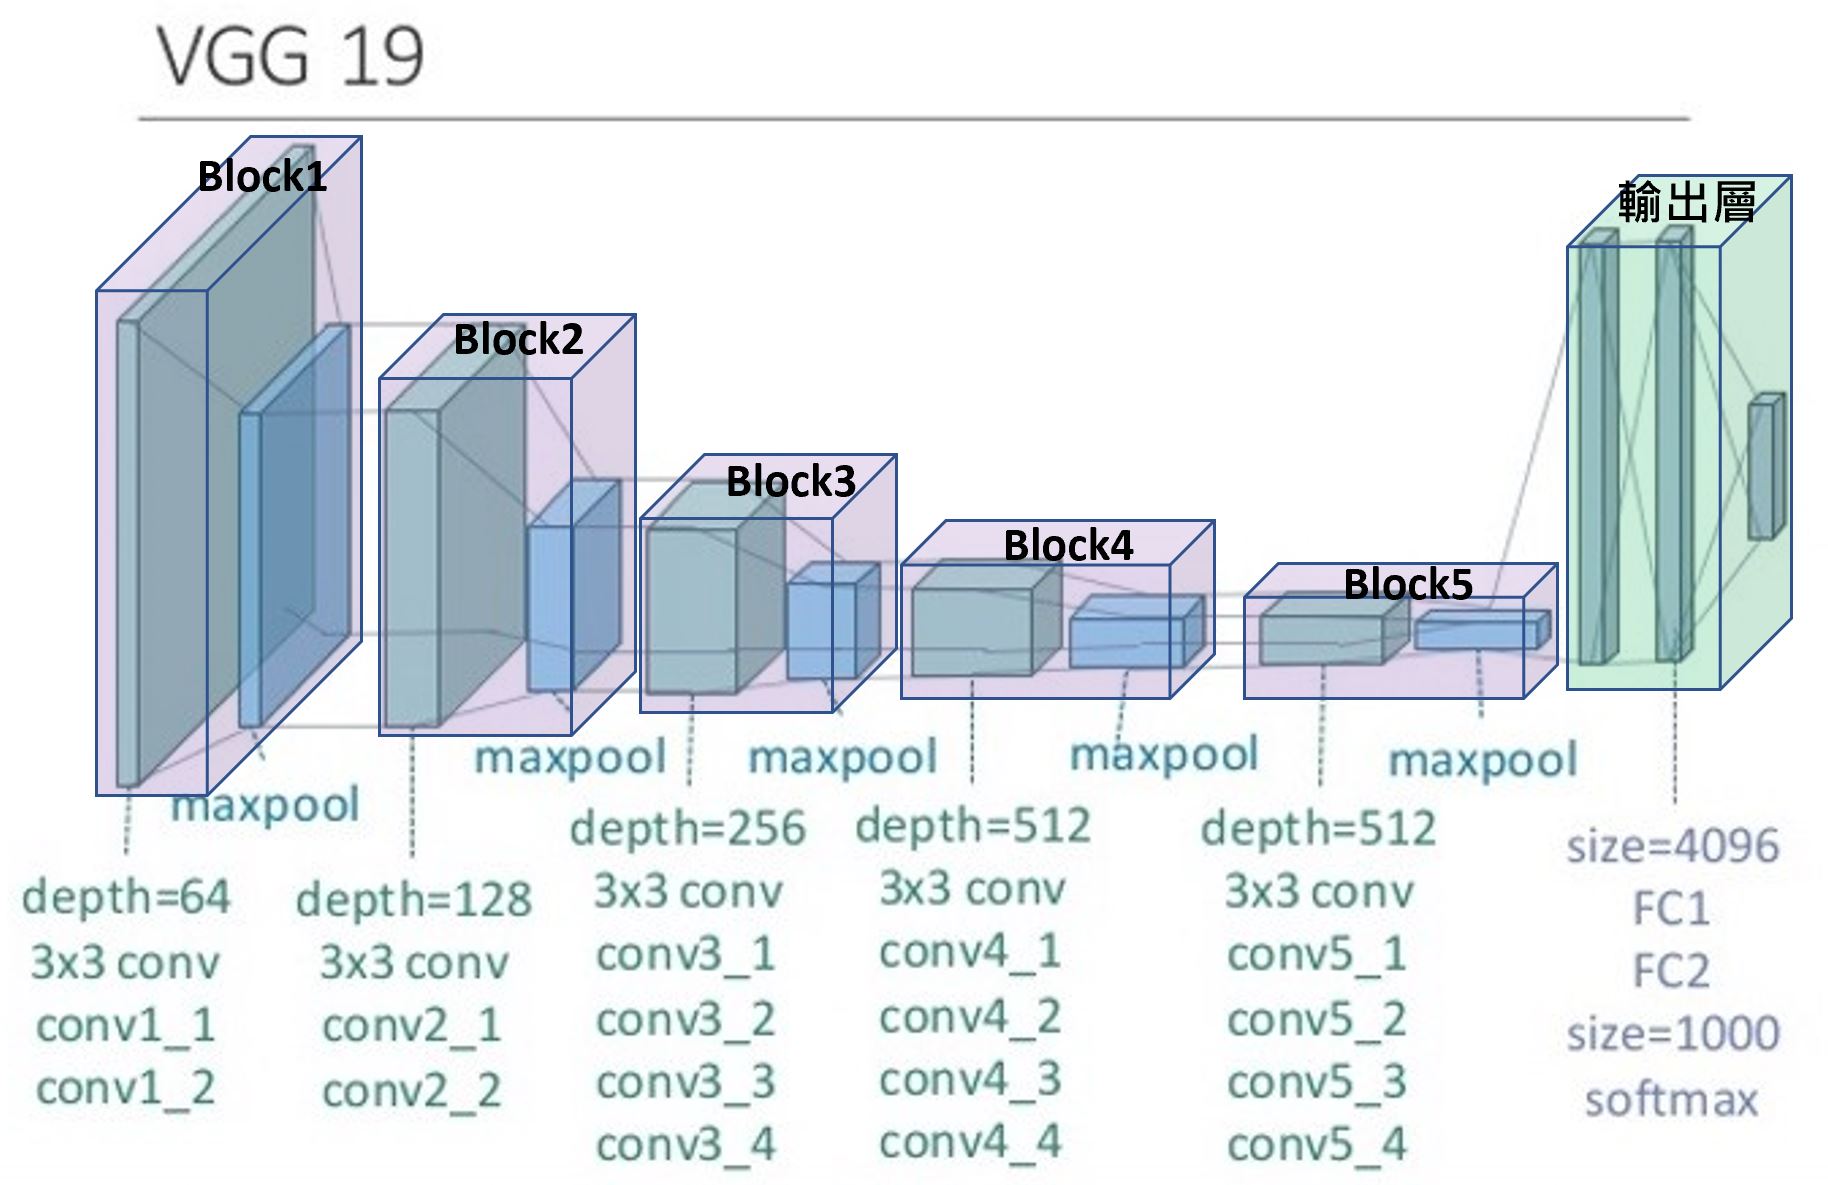
上圖中,共有 5 個 block, 分別為 block1~5 ,這 5 個 block 就是以前所稱的隱藏層。block1及 block2 分別有 2 個conv(捲積層)及1個maxpool,block3~5 分別有 4 個捲積層及 1 個 maxpool。最後還有 FC1, FC2, softmax 三個輸出層。另外還有一個上圖沒畫出來的,也就是最前面的輸入層 (input_1)。
5 個 block 隱藏層的作用,就是在取得每張圖片的特徵,本篇的目的就是要探討什麼叫特徵,特徵長什麼樣子。
底下代碼,使用 model.layers 可以印出輸入層,隱藏層,及輸出層共有 26 層的名稱。model.output 是使用Tensorflow 格式印出輸出層,model.outputs 則是使用字典格式印出輸出層,二者皆是同一個物件,而且只印出最後的 predictions 層。
from keras import applications
model = applications.vgg19.VGG19(weights="imagenet", include_top=True)
for i, layer in enumerate(model.layers):
    print(i+1, layer.name, layer)
print("input",model.inputs)
print("outputs",model.outputs)
print("output",model.output)
結果 :
1 input_1
2 block1_conv1
3 block1_conv2
4 block1_pool
5 block2_conv1
6 block2_conv2
7 block2_pool
8 block3_conv1
9 block3_conv2
10 block3_conv3
11 block3_conv4
12 block3_pool
13 block4_conv1
14 block4_conv2
15 block4_conv3
16 block4_conv4
17 block4_pool
18 block5_conv1
19 block5_conv2
20 block5_conv3
21 block5_conv4
22 block5_pool
23 flatten
24 fc1
25 fc2
26 predictions
input [<KerasTensor: shape=(None, 224, 224, 3) dtype=float32 (created by layer 'input_1')>]
outputs [<KerasTensor: shape=(None, 1000) dtype=float32 (created by layer 'predictions')>]
output KerasTensor(type_spec=TensorSpec(shape=(None, 1000), dtype=tf.float32, name=None), name='predictions/Softmax:0', description="created by layer 'predictions'")
如果 model = applications.vgg19.VGG19(weights=”imagenet”, include_top=False) 將 include_top 設為 False 時,則 23~26 的輸出層就不會產生。
from keras import applications
model = applications.vgg19.VGG19(weights="imagenet", include_top=False)
for i, layer in enumerate(model.layers):
    print(i+1, layer.name, layer)
print("input",model.inputs)
print("outputs",model.outputs)
print("output",model.output)
結果 :
1 input_1
2 block1_conv1
3 block1_conv2
4 block1_pool
5 block2_conv1
6 block2_conv2
7 block2_pool
8 block3_conv1
9 block3_conv2
10 block3_conv3
11 block3_conv4
12 block3_pool
13 block4_conv1
14 block4_conv2
15 block4_conv3
16 block4_conv4
17 block4_pool
18 block5_conv1
19 block5_conv2
20 block5_conv3
21 block5_conv4
22 block5_pool
outputs [<KerasTensor: shape=(None, None, None, 512) dtype=float32 (created by layer 'block5_pool')>]
output KerasTensor(type_spec=TensorSpec(shape=(None, None, None, 512), dtype=tf.float32, name=None), name='block5_pool/MaxPool:0', description="created by layer 'block5_pool'")
output KerasTensor(type_spec=TensorSpec(shape=(None, None, None, 512), dtype=tf.float32, name=None), name='block5_pool/MaxPool:0', description="created by layer 'block5_pool'")
每層的結構
每個區塊中的每一層,比如 block1_conv1 又有 “輸入” 及 “輸出”單元。請注意,這只是每一層的接收神經元及傳遞神經元,跟整個模型最前面的輸入層及整個模型最後的輸出層,是完全不一樣的。底下代碼可印出input/output 的型態,只是目前還沒送進圖片,所以維度類似像 (None, None, None, 64) 等 4 維格式。
from keras import applications
model = applications.vgg19.VGG19(weights="imagenet", include_top=False)
for layer in model.layers:
    print(layer.name)
    print("input:", layer.input)
    print("output:", layer.output)
結果 :
input_1
input: KerasTensor(type_spec=TensorSpec(shape=(None, None, None, 3), dtype=tf.float32, name='input_1'), name='input_1', description="created by layer 'input_1'")
output: KerasTensor(type_spec=TensorSpec(shape=(None, None, None, 3), dtype=tf.float32, name='input_1'), name='input_1', description="created by layer 'input_1'")
block1_conv1
input: KerasTensor(type_spec=TensorSpec(shape=(None, None, None, 3), dtype=tf.float32, name='input_1'), name='input_1', description="created by layer 'input_1'")
output: KerasTensor(type_spec=TensorSpec(shape=(None, None, None, 64), dtype=tf.float32, name=None), name='block1_conv1/Relu:0', description="created by layer 'block1_conv1'")
block1_conv2
.........
特徵存取
將圖片使用 model(img),即可取得最後輸出層的特徵。不過在原本的模型中,輸出層只有 predictions 這1000 種狀況,無法取得中間 5 個 block 隱藏層所計算出來的結果。所以如果要取得中間隱藏層的資料,就必需把 block 隱藏層中的 output 傳遞神經元移到輸出層。
import keras
import tensorflow as tf
import cv2
import numpy as np
from keras import applications
model = applications.vgg19.VGG19(weights="imagenet", include_top=False)

#將隱藏層移到輸出層
outputs_dict = dict([(layer.name, layer.output) for layer in model.layers])
model = keras.Model(inputs=model.inputs, outputs=outputs_dict)
開始計算特徵
模型調整好後,就可以將圖片傳入 model(img) 或是 model.predict(img),然後特徵就會儲存到輸出層中每一捲積層的 output 中,由下面代碼可印出每一層 output 的維度。
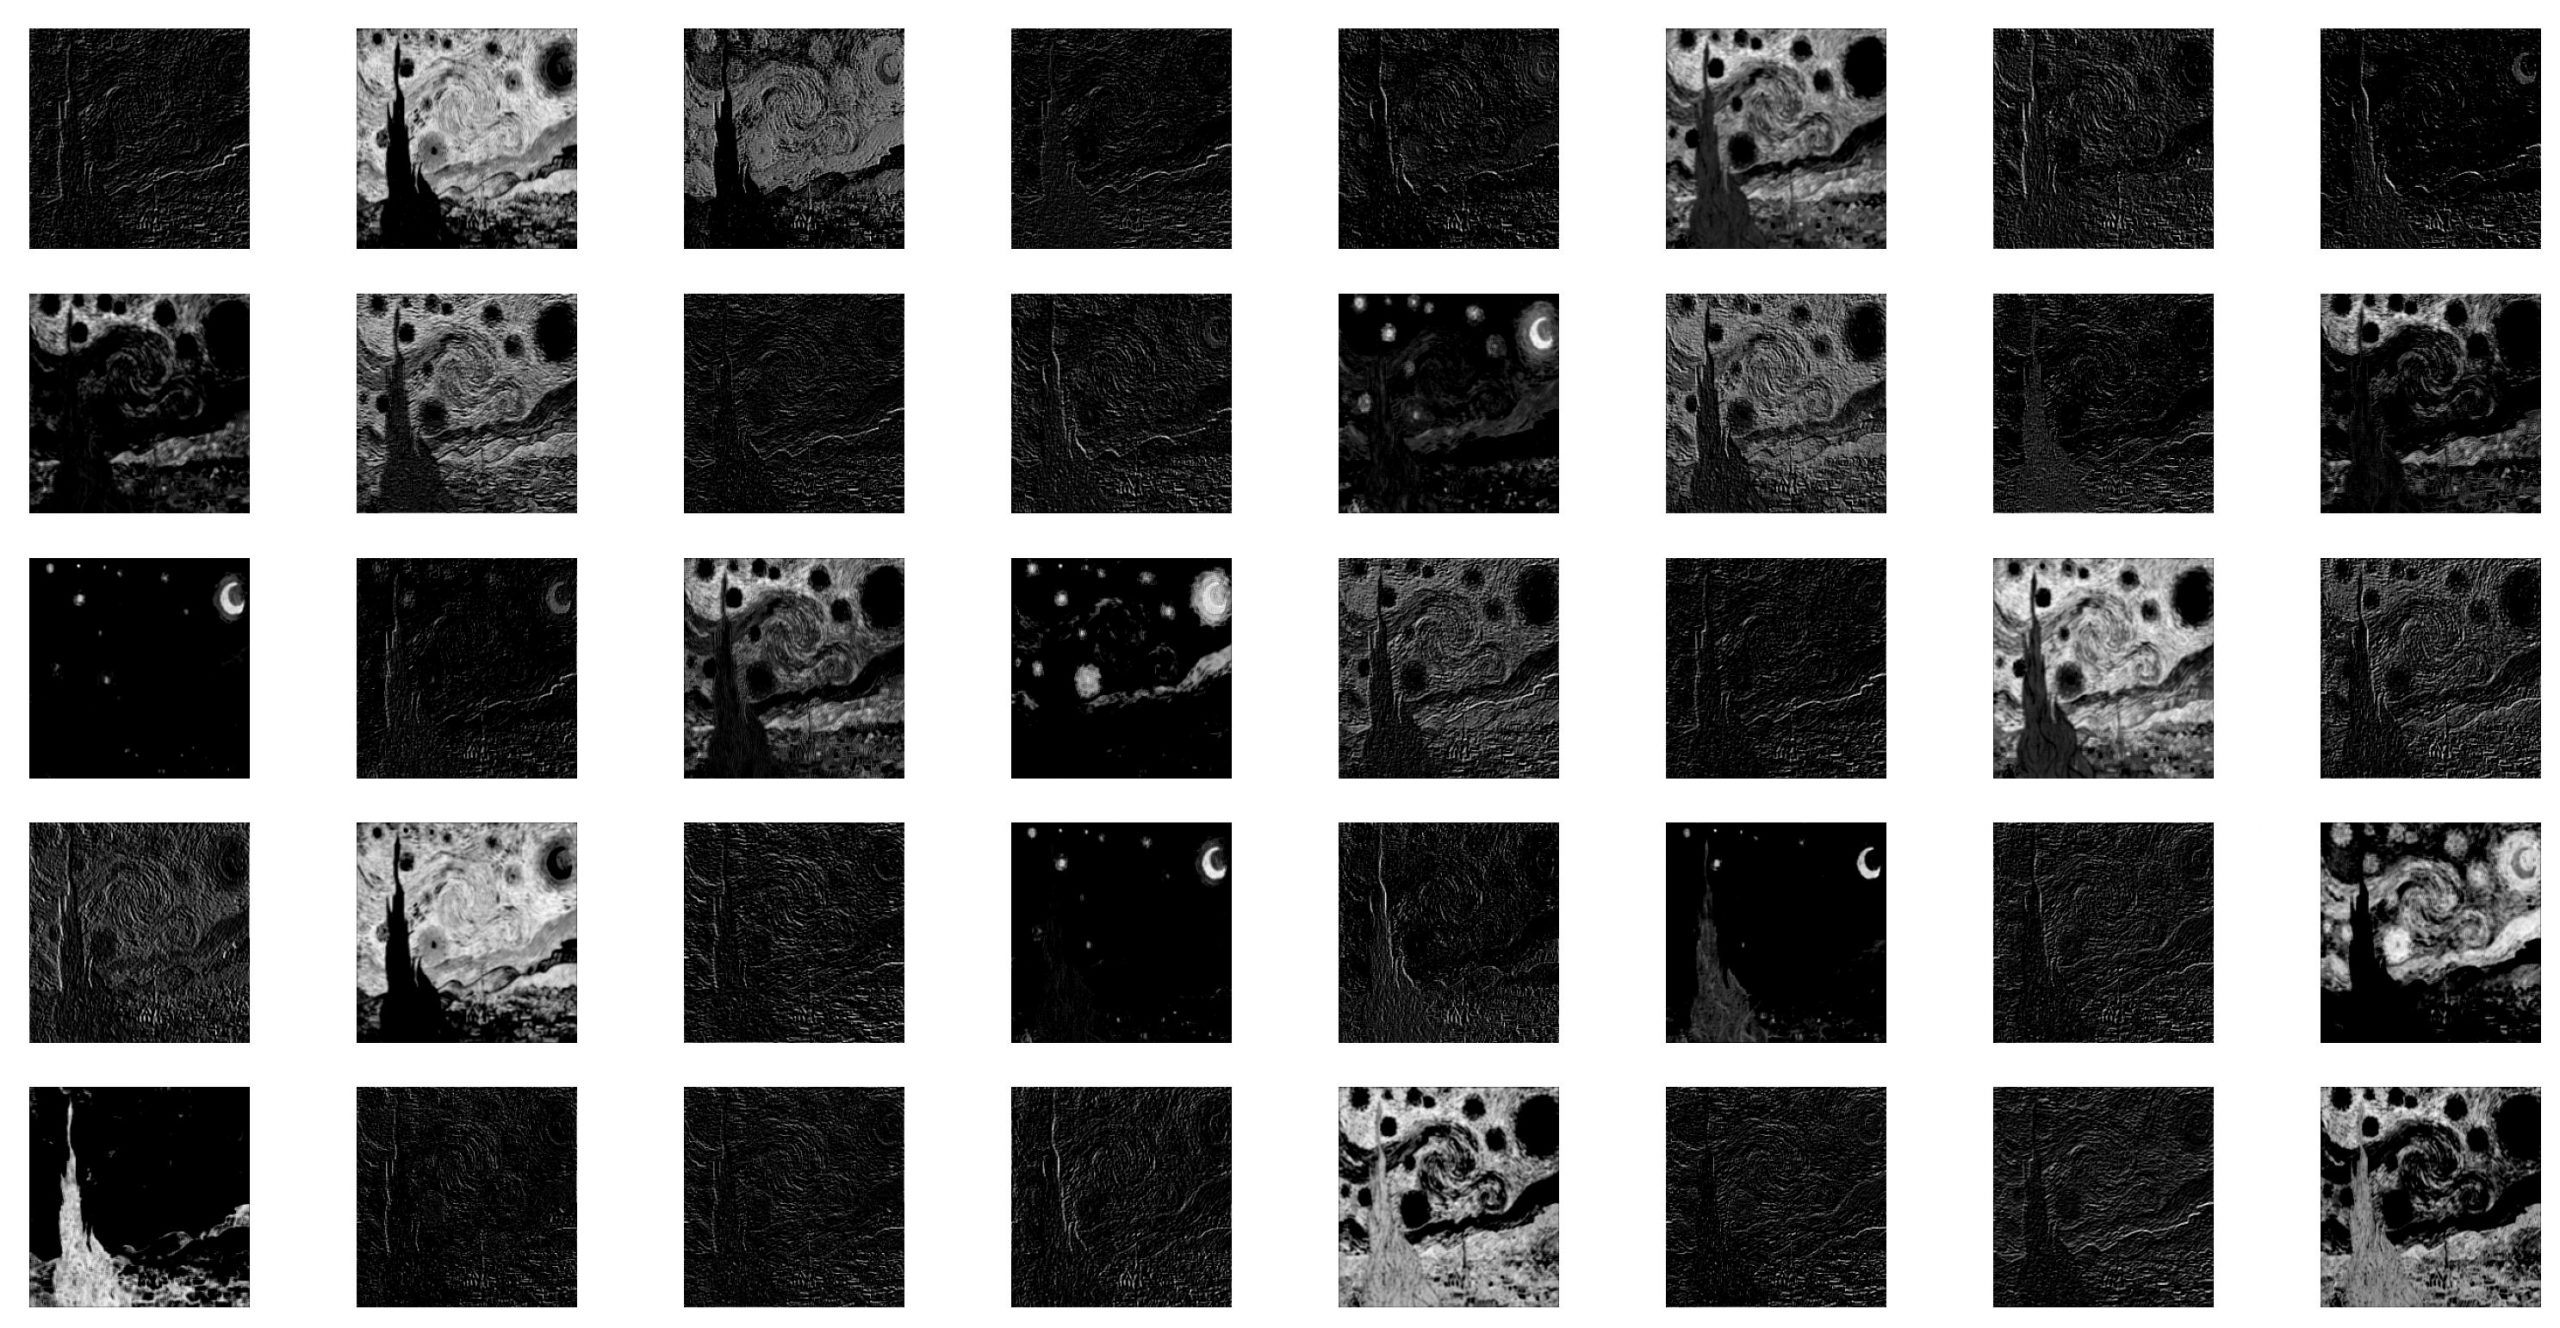
以 block1_conv1 這層來說,其維度為 (1, 224,224,64),表示這一層的每一個特徵大小為 224*224 圖片,然後共有 64 種特徵,也就是說這一層共有 64 張 224*224 的圖片。
最後需注意一件事,將圖片傳入 model 前,需先將圖片擴展成 4 維,並進行預處理。圖片最前維加入一空白維度後,再用 preprocess_input() 對圖片預處理,將RGB 轉成 BGR格式,然後將所有點的B值減掉B的平均數,G及R亦同。如此就可以讓每個點的每個顏色值分佈在 0 的左右二邊。
底下是我們用來測試的圖片。

import keras
import tensorflow as tf
import cv2
import numpy as np
from keras import applications
model = applications.vgg19.VGG19(weights="imagenet", include_top=False)

#將隱藏層移到輸出層
outputs_dict = dict([(layer.name, layer.output) for layer in model.layers])
model = keras.Model(inputs=model.inputs, outputs=outputs_dict)

style_path='./images/starry_night.jpg'
style_image = cv2.imdecode(np.fromfile(style_path, dtype=np.uint8), cv2.IMREAD_UNCHANGED)
height=224
width= 224
style_image = cv2.resize(style_image, (width, height))
style_image = cv2.cvtColor(style_image, cv2.COLOR_BGR2RGB)
style_image = np.expand_dims(style_image, axis=0)
style_image = keras.applications.vgg19.preprocess_input(style_image)

#傳入圖片, 即可取得輸出層的特徵
outputs = model(style_image)
for layer_name in outputs:
    print(layer_name, outputs[layer_name].shape)
結果 :
input_1 (1, 224, 224, 3)
block1_conv1 (1, 224, 224, 64)
block1_conv2 (1, 224, 224, 64)
block1_pool (1, 112, 112, 64)
block2_conv1 (1, 112, 112, 128)
block2_conv2 (1, 112, 112, 128)
block2_pool (1, 56, 56, 128)
block3_conv1 (1, 56, 56, 256)
block3_conv2 (1, 56, 56, 256)
block3_conv3 (1, 56, 56, 256)
block3_conv4 (1, 56, 56, 256)
block3_pool (1, 28, 28, 256)
block4_conv1 (1, 28, 28, 512)
block4_conv2 (1, 28, 28, 512)
block4_conv3 (1, 28, 28, 512)
block4_conv4 (1, 28, 28, 512)
block4_pool (1, 14, 14, 512)
block5_conv1 (1, 14, 14, 512)
block5_conv2 (1, 14, 14, 512)
block5_conv3 (1, 14, 14, 512)
block5_conv4 (1, 14, 14, 512)
block5_pool (1, 7, 7, 512)
顯示特徵
outputs = model(img) 即可取得輸出層中每一捲積層的特徵,我們使用 outputs[‘block1_conv1’] 取得 block1_conv1 這一層的特徵。這一層有 64 張圖,所以使用 block1_conv1[ : , : , i].numpy() 將每一張特徵抓出,然後再 reshape 成 (h, w, 1) 三維維度,如此就可以顯示出圖型了。
底下因螢幕解析度的關係,所以只列出前面的 40 張。
import keras
import tensorflow as tf
import cv2
import numpy as np
import pylab as plt
from keras import applications
from keras.applications.vgg19 import preprocess_input, VGG19
model = VGG19(weights="imagenet", include_top=False)

#將隱藏層移到輸出層
outputs_dict = dict([(layer.name, layer.output) for layer in model.layers])
model = keras.Model(inputs=model.inputs, outputs=outputs_dict)

style_path='./images/starry_night.jpg'
img = cv2.imdecode(np.fromfile(style_path, dtype=np.uint8),
            cv2.IMREAD_COLOR)[:,:,::-1].copy()
img = cv2.resize(img, (224, 224))
img = np.expand_dims(img, axis=0)
img = preprocess_input(img)

#傳入圖片, 即可取得輸出層的特徵
outputs = model(img)

layer = outputs['block1_conv1']
r, h, w, c = layer.shape
layer = tf.reshape(layer, (h, w, c))

for i in range(40):
    plt.subplot(5, 8, i+1)
    img = layer[:,:,i].numpy()
    plt.axis('off')
    plt.imshow(img, cmap='gray')
plt.show()
結論
原來每一層的特徵,就是圖片中的邊緣,紋理,顏色,點,線……等等。抓取的特徵共有
(64 * 2 + 128 * 2 + 256 * 4 + 512 * 4 + 512 * 4) = 5504 個,也就是有 5504 張圖。如果有上萬張,就5504 張圖 * 10000 個權重,計算之頻繁,實非人類可以想像,所需之記憶体亦極為龐大。
每一個特徵,都是由 3*3 的捲積核所捲來的,至於捲積核裏面的值,由 VGG16/19 定義。也就是說,VGG16/19 幫我們定義了 5504 個捲積核,分別代表要找邊緣啦,紋理啦….,其工程相當龐大,我們只需使用,不需煩腦怎麼定義捲積核。
老師您好
我最近上您聯成電腦的深度學習課程
是使用錄影檔回放的方式學習
請問老師能否提供您網站上內容的密碼
以利學生學習
謝謝老師
我的聯成電腦學號為 105724356