資源檔簡介
置於res目錄下的檔案, 都為資源檔(Resource). 裏面存放著可以適合不同螢幕大小裝置的圖片及Layout, 也存在著不同國家語言的字串.
為了通用性, 讓程式能大小通吃適用在不同的裝置上, 所以就需把會變動的部份寫在資源檔裏, 再由系統決定要選取那一個項目. 比如一個按鈕上的文字, 其文字就需寫在資源檔裏, 再由系統判斷是要選取美系語言字串或是中系語言字串, 如此就可以達成多國語系的目的. 若直接把字串寫死在程式碼裏, 那就會變成單一語系, 無法適用於其他國家.
Android Studio 會自動將res底下的資源檔, 全部轉成R.java這個檔案. 而且這個檔案是不允許被手動修改的, 如果不小心改到, 問題就大條了.
不同的資源需要放置在相對應的目錄下, 如下為各種資源種類的目錄
anim : 動畫資源, 為xml的格式
color : 顏色資源, 為xml的格式
drawable : 圖形檔, 可為一般圖形格式或xml
layout : 畫面配置資源, 為xml格式
menu : 選單資源, 為xml格式
raw : 檔案資源, 如mp3音樂, mp4影片
values : 一般資源, 包含文字, 顏色, 尺寸, 陣列, 樣式, 為xml格式
在程式碼中, 若要取用資源檔, 可用R.xxx.xxx(R.資源種類.資源名稱), 比如
R.layout.activity_main, R.id.button
系統內建資源檔
Android系統也有內建好一些常用的資源, 在程式碼中使用, 則要使用android.R.資源種類.資源名稱. 若是在xml裏使用, 則要使用 @android:資源種類/資源名稱. 常用的系統資源如下
android.R.anim
android.R.color
android.R.dimen
android.R.drawable
android.R.layout
android.R.menu
android.R.string
android.R.style
比如在xml 裏要設定文字, 可使用如下
<Button
    android:id="@+id/btOk"
    android:text="@android:string/ok" />
<Button
    android:id="@+id/btCancel"
    android:text="@android:string/cancel" />
在程式碼中設定文字, 使用如下
dialog.setPositiveButton(android.R.string.ok, ......);
dialog.setNegativeButton(android.R.string.cancel, ....);
res/values
在values之下的, 都是一般的資源檔, 裏面又分為strings, colors, dimens, styles, arrays等 5個xml. 每個檔案最外層都使用<resources>標簽, 裏面再包含各個檔案相對應的標簽, 如string, color, dimen, array, style
strings.xml
如下使<string>標簽
<resources>
    <string name="app_name">Ch08_05_Progress</string>
    <string name="btUpdate">Update</string>
</resources>
在Layout 畫面配置檔使用的方法
<Button
    android:id="@+id/btUpdate"
    android:text="@string/btUpdate" />
在程式碼中的使用方法
//在支援int的方法中, 可直接使用
dialog.setTitle(R.string.app_name);
//在不支援int的情況下, 要使用Activity所提供的getString()方法
String str=getString(R.string.app_name);
colors.xml
使用<color>標簽, 而內容可以為如下任何一種
#RGB : 16進位, 每個為4bit, 共12bit, 可顯示4096色
#RRGGBB : 24bit, 1677萬色
#ARGB : 16bit, 可顯示65536色
#AARRGGBB : 32bit, 可顯示4G色
<resources>
    <color name="colorPrimary">#3F51B5</color>
    <color name="colorPrimaryDark">#303F9F</color>
    <color name="colorAccent">#FF4081</color>
</resources>
在Layout 畫面配置檔使用的方法
<Button
    android:id="@+id/btUpdate"
    android:text="@string/btUpdate"
    android:textColor="@color/colorAccent" />
在程式碼中的使用方法
要使用Activity所提供的getResources()方法取得Resource物件, 再由此物件的getColor()方法取得
Resource r=getResource();
btUpdate.setTextColor(r.getColor(R.color.colorAccent));
上述己取消, 請使用如下方式取得
ContextCompat.getColor(R.color.colorAccent);
dimens.xml
使用<dimen>標簽, 尺寸單位有 px, dp, sp, in, mm
<resources>
    <dimen name="btUpdate">16dp</dimen>
</resources>
在Layout 畫面配置檔使用的方法
<Button
    android:id="@+id/btUpdate"
    android:text="@string/btUpdate"
    android:textColor="@color/colorAccent"
    android:textSize="@dimen/btUpdate" />
在程式碼中的使用方法
使用Activity所提供的getResources()方法取得Resource物件, 再由此物件的getDimension()方法取得
Resource r=getResource();
btUpdate.setTextSize(r.getDimension(R.dimen.btUpdate));
styles.xml
樣式資源, 就是把一些設定寫在styles.xml裏, 如下所示. 使用<style>標簽標示, 再將每一項設定使用<item>標簽標示出來
<resource>
    <style name="button_style">
        <item name="android:layout_width">150dp</item>
        <item name="android:layout_height">50dp</item>
        <item name="android:textSize">@dimen/button_text_size</item>
        <item name="android:textColor">#ff00ff</item>
    </style>
</resources>
style通常用於畫面配置, 在畫面配置的使用方式如下所示
<Button
    style="@style/button_style"
    android:text="Button"
    android:id="@+id/button" />
arrays.xml
陣列亦可置於資源檔內, 且不建議直接寫死在程式碼中. array標簽有
<string-array> : 存放字串陣列
<integer-array> : 存放整數陣列
<array> : 存放顏色, 尺寸等
<?xml version="1.0" encoding="utf-8"?>
<resources>
    <string-array name="solar">
        <item>水星</item>
        <item>金星</item>
        <item>地球</item>
        <item>火星</item>
        <item>木星</item>
        <item>土星</item>
        <item>天王星</item>
        <item>海王星</item>
        <item>冥王星</item>
    </string-array>
    <integer-array name="planet_size">
        <item>1</item>
        <item>5</item>
        <item>10</item>
    </integer-array>
    <array name="planet_color">
        <item>#880000</item>
        <item>#00ffcc</item>
        <item>#0000cc</item>
    </array>
</resources>
xml中取得陣列
使用@array/資源名稱
程式中取得陣列
string及int分別使用getStringArray() 及getIntArray()方法. 而顏色及尺寸比較麻煩, 由obtainTypedArray()取得TypedArray ta物件後, 再由ta.getColor(), ta.getDimension()取得裏面的值
getResources().getStringArray(R.array.solar);
getResources().getIntArray(R.array.planet_size);
TypedArray ta=getResources().obtainTypedArray(R.array.planet_color);
int []color=new int[ta.length()];
for (int i=0;i<ta.length();i++){
    color[i]=ta.getColor(i, Color.RED);
}
Spinner及ListView都必需使用Adapter, 而Adapter需取得選項項目. 所以Adapter類別提供createFromResources(Context, array資源, layout)方法, 如下所示
ArrayAdapter adapter=ArrayAdapter.createFromResource(
        this, R.array.solar, android.R.layout.simple_list_item_1);
res/drawable
圖形資源, 圖檔皆放置於res/drawable之下, 可支援的圖檔有png, jpg, gif. 亦可用xml建立圖形資源, 使用簡單的幾何圖形和繪圖效果, 如漸層色彩等.
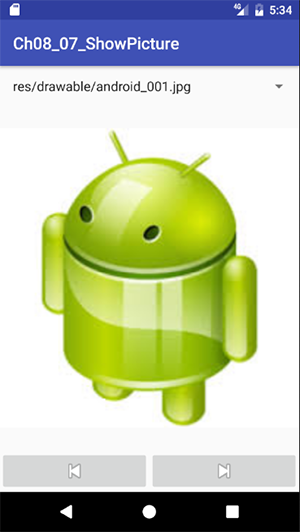
如下範例說明圖形資源之使用方式.

先copy 幾張圖片到res/drawable之下. 然後建立arrays.xml, 將drawable之下的圖片全放入陣列之中, 陣列標簽需為 <array>, 引用方式為 @drawable/資源名稱
<?xml version="1.0" encoding="utf-8"?>
<resources>
    <array name="android_icons">
        <item>@drawable/android_001</item>
        <item>@drawable/android_002</item>
        <item>@drawable/android_003</item>
        <item>@drawable/android_004</item>
        <item>@drawable/android_005</item>
    </array>
</resources>
在畫面配置檔activity_main.xml 中, 放入一個Spinner, 中間使用ImageView, 然後於最下方放置二個ImageButton
<?xml version="1.0" encoding="utf-8"?>
<LinearLayout xmlns:android="http://schemas.android.com/apk/res/android"
    xmlns:app="http://schemas.android.com/apk/res-auto"
    xmlns:tools="http://schemas.android.com/tools"
    android:id="@+id/activity_main"
    android:layout_width="match_parent"
    android:layout_height="match_parent"
    android:orientation="vertical">
    <Spinner
        android:layout_width="match_parent"
        android:layout_height="wrap_content"
        android:id="@+id/spinner" />
    <ImageView
        android:layout_width="match_parent"
        android:layout_height="match_parent"
        app:srcCompat="@drawable/android_001"
        android:id="@+id/imageView"
        android:layout_weight="1" />
    <LinearLayout
        android:orientation="horizontal"
        android:layout_width="match_parent"
        android:layout_height="50dp">
        <ImageButton
            android:layout_width="wrap_content"
            android:layout_height="wrap_content"
            android:layout_weight="1"
            app:srcCompat="@android:drawable/ic_media_previous"
            android:id="@+id/btPrev"/>
        <ImageButton
            android:layout_width="wrap_content"
            android:layout_height="wrap_content"
            android:layout_weight="1"
            app:srcCompat="@android:drawable/ic_media_next"
            android:id="@+id/btNext"/>
    </LinearLayout>
</LinearLayout>
在Java程式碼中, 設置ImageView之圖片可使用
imageView.setImageResource(R.drawable.android_001) 設定其圖片.
另亦可使用imageView.setImageDrawable(Drawable)設定圖片. Drawable為所有圖形之父類別. 先使用getResources().obtainTypedArray(R.array.android_icons) 取得icons之圖形陣列, 再由 getDrawable(index)取得Drawable物件, 則此Drawable物件即可塞入ImageView之中.
public class MainActivity extends AppCompatActivity {
    Spinner spinner;
    ImageView imageView;
    ImageButton btPrev, btNext;
    TypedArray icons;
    int index=0;
    @Override
    protected void onCreate(Bundle savedInstanceState) {
        super.onCreate(savedInstanceState);
        setContentView(R.layout.activity_main);
        processViews();
        processControllers();
    }
    private void processViews(){
        spinner=(Spinner)findViewById(R.id.spinner);
        btPrev=(ImageButton)findViewById(R.id.btPrev);
        btNext=(ImageButton)findViewById(R.id.btNext);
        imageView=(ImageView)findViewById(R.id.imageView);
        icons=getResources().obtainTypedArray(R.array.android_icons);
    }
    private void processControllers(){
        spinner.setAdapter(ArrayAdapter.createFromResource(
            this,R.array.android_icons, android.R.layout.simple_list_item_1));
        spinner.setOnItemSelectedListener(new AdapterView.OnItemSelectedListener() {
            @Override
            public void onItemSelected(AdapterView<?> adapterView, View view, int position, long id) {
                Drawable icon=icons.getDrawable(position);
                index=position;
                imageView.setImageDrawable(icon);
            }
            @Override
            public void onNothingSelected(AdapterView<?> adapterView) {}
        });
        btPrev.setOnClickListener(new View.OnClickListener() {
            @Override
            public void onClick(View view) {
                index=(index-1+icons.length())%icons.length();
                //imageView.setImageDrawable(icons.getDrawable(index));
                spinner.setSelection(index);
            }
        });
        btNext.setOnClickListener(new View.OnClickListener() {
            @Override
            public void onClick(View view) {
                index=(index+1)%icons.length();
                //imageView.setImageDrawable(icons.getDrawable(index));
                spinner.setSelection(index);
            }
        });
    }
}
繪圖資源檔
以下說明當成字典查詢即可, 因為不同的狀況有不同的設定方式, 只需記得其架構, 不需銘記所有細節
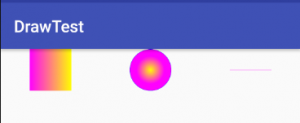
在res/drawable裏, 除了存放一般的圖片外, 還可以用xml來撰寫簡易的圖形.
在此繪圖資源中, 最外層為<shape>標簽, 在<shape>裏, 使用<android:shape>決定繪圖的種類, 如 rectangle[rɛkˋtæŋg!] 矩形, oval[ˋov!]橢圓, line[laɪn]線.
而每一個繪圖種類下, 可設定如下的樣式
<corners> : 設定圓角角度
android:radius, android:topLeftRadius, android:topRightRadius, android:bottomLeftRadius, android:bottomRightRadius
<gradient> : 顏色效果
android:type : linear(線性漸變), radial(放射狀漸變), sweep(掃瞄漸變)
android:startColor, android:endColor, androidCenterColor
android:centerX, android:centerY
android:angle : 45度角的倍數
<padding> : 與其他元件的間隔
android:top, android:left, android:right, android:bottom
<size> : 大小
android:width, android:height
<solid> : 填滿顏色
android:color
<stroke>
android:width : 線條寬度
android:dashGap : 虛線間隙
android:dashWidth : 虛線寬度
新增資源檔
在res/drawable按右鍵, new/drawable resource file, 然後填入檔案名. 此時新的檔案開頭會是
<selector xmlns:android=”http://schemas.android.com/apk/res/android”>
因為selector是動態元件的呈現, 所以請將上述的selector 改為sharp
ps : 動態元件, 即元件在一般狀態下是某種形狀, 按下又是某種形狀, 放開後又是另一種形狀

/res/drawable/rectangle.xml
<?xml version="1.0" encoding="utf-8"?>
<shape xmlns:android="http://schemas.android.com/apk/res/android"
    android:shape="rectangle">
    <size
        android:width="50dp"
        android:height="50dp"/>
    <gradient
        android:startColor="#ff00ff"
        android:endColor="#ffff00" />
</shape>
res/drawable/oval.xml
<?xml version="1.0" encoding="utf-8"?>
<shape xmlns:android="http://schemas.android.com/apk/res/android"
    android:shape="oval">
    <size
        android:width="50dp"
        android:height="50dp"/>
    <gradient
        android:type="radial"
        android:gradientRadius="50"
        android:startColor="#ffff00"
        android:endColor="#ff00ff"
        />
    <stroke
        android:color="#0000ff"
        android:width="1px"/>
</shape>
res/drawable/line.xml
<?xml version="1.0" encoding="utf-8"?>
<shape xmlns:android="http://schemas.android.com/apk/res/android"
    android:shape="line">
    <size
        android:width="50dp"
        android:height="20dp"/>
    <stroke
        android:width="0.01dp"
        android:color="#ff00ff"
        android:dashWidth="10dp"
        android:dashGap="10dp"
        />
</shape>
activity_main.xml
<?xml version="1.0" encoding="utf-8"?>
<LinearLayout xmlns:android="http://schemas.android.com/apk/res/android"
    xmlns:app="http://schemas.android.com/apk/res-auto"
    xmlns:tools="http://schemas.android.com/tools"
    android:id="@+id/activity_main"
    android:layout_width="match_parent"
    android:layout_height="match_parent"
    tools:context="com.asuscomm.mahaljsp.drawtest.MainActivity"
    android:orientation="vertical">
    <LinearLayout
        android:orientation="horizontal"
        android:gravity="center"
        android:layout_width="match_parent"
        android:layout_height="wrap_content">
        <ImageView
            android:layout_width="wrap_content"
            android:layout_height="wrap_content"
            android:src="@drawable/rectangle"
            android:id="@+id/imageView1"
            android:layout_weight="1" />
        <ImageView
            android:layout_width="wrap_content"
            android:layout_height="wrap_content"
            android:src="@drawable/oval"
            android:id="@+id/imageView2"
            android:layout_weight="1" />
        <ImageView
            android:id="@+id/imageView3"
            android:layout_width="wrap_content"
            android:layout_height="wrap_content"
            android:src="@drawable/line"
            android:layout_weight="1" />
    </LinearLayout>
</LinearLayout>
多國語系 – 動態資源
動態資源可依裝置不同的大小, 不同的語系作不同的選擇. 比如中文語系國家的裝置則顯示中文, 英文語系的國家顯示英文
在res/values按右鍵/new/Values resource file, File name填入strings.xml, 再選Locale, 在Language選zh:Chinese, Specific Region Only : TW:Taiwan, 則res/values裏就會多一個strings.xml(zh-rTW)的資源檔, 就可以把中文字串寫在這個資源檔中
其他亦可選Orientation(Landscape, Portrait), Size(Small, Normal, Large, X-Large)
系統會依上述的設定, 選擇最適合的資源檔
