
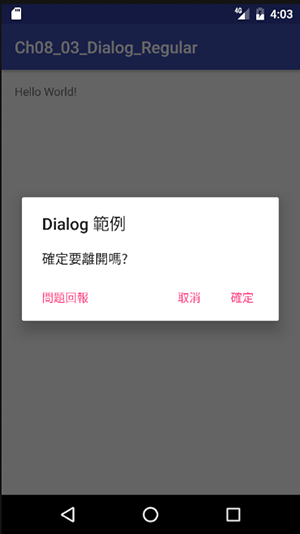
應用程式若需要顯示一些訊息, 詢問接下來的動作, 或是要求使用者選擇多個項目, 則可以使用彈出式對話方框與使用者互動, 如下圖為詢問使用者是否確定要離開的話面
建立AlertDialog
建立AlertDialog的語法如下 :
AlertDialog.Build dialog=new AlertDialog.Build(Context);
由上可知, 在AlertDialog類別裏, 有一個內部static Builder類別
Dialog物件產生之後, 提供如下方法
setTitle(CharSequence) : 設定標題
setMessage(CharSequence) : 設定訊息
setCancelable(boolean) : 是否能取消
setPositiveButton(CharSequence, OnClickListener) : 最右邊的按鈕, 如上圖的 “確定”
setNegativeButton(CharSequence, OnClickListener) : 中間的按鈕, 如上圖的 “取消”
setNeutralButton(CharSequence, OnClickListener) : 最右邊的按鈕, 如上圖的 “問題回報”
show() : 顯示Dialog
一般對話方框
將上面所述, 寫成如下程式碼
public class MainActivity extends AppCompatActivity {
    @Override
    protected void onCreate(Bundle savedInstanceState) {
        super.onCreate(savedInstanceState);
        setContentView(R.layout.activity_main);
        AlertDialog.Builder dialog=new AlertDialog.Builder(this);
        dialog.setTitle("Dialog 範例")
                .setMessage("確定要離開嗎?")
                .setPositiveButton("確定", new DialogInterface.OnClickListener() {
                    @Override
                    public void onClick(DialogInterface dialogInterface, int i) {}
                })
                .setNeutralButton("問題回報", new DialogInterface.OnClickListener() {
                    @Override
                    public void onClick(DialogInterface dialogInterface, int i) {}
                })
                .setNegativeButton("取消", new DialogInterface.OnClickListener() {
                    @Override
                    public void onClick(DialogInterface dialogInterface, int i) {}
                })
                .show();
    }
}
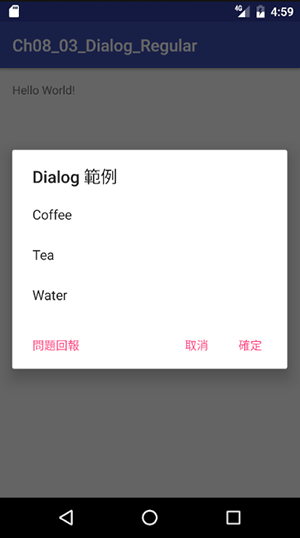
選單對話框
單選對話框
1. 先設定一個字串陣列
2. 使用setItems(字串陣列, OnClickListener)
3. 刪除 setMessage : 若不刪除此設定, 則選單不會出現
public class MainActivity extends AppCompatActivity {
    @Override
    protected void onCreate(Bundle savedInstanceState) {
        super.onCreate(savedInstanceState);
        setContentView(R.layout.activity_main);
        String[] items={"Coffee", "Tea","Water"};
        boolean[] selection={false, false, false};
        AlertDialog.Builder dialog=new AlertDialog.Builder(this);
        dialog.setTitle("Dialog 範例")
                //.setMessage("確定要離開嗎?")
                .setItems(items, new DialogInterface.OnClickListener() {
                    @Override
                    public void onClick(DialogInterface dialogInterface, int i) {
                    }
                })
                .setPositiveButton("確定", new DialogInterface.OnClickListener() {
                    @Override
                    public void onClick(DialogInterface dialogInterface, int i) {}
                })
                .setNeutralButton("問題回報", new DialogInterface.OnClickListener() {
                    @Override
                    public void onClick(DialogInterface dialogInterface, int i) {}
                })
                .setNegativeButton("取消", new DialogInterface.OnClickListener() {
                    @Override
                    public void onClick(DialogInterface dialogInterface, int i) {}
                })
                .show();
    }
}
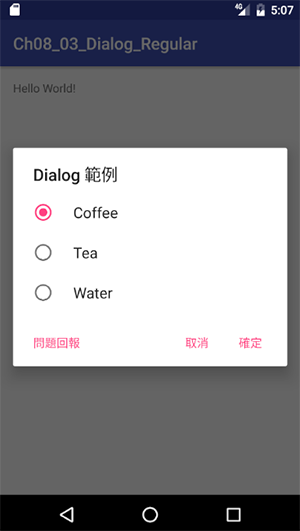
RadioButton 單選對話框
1. 先設定一個字串陣列
2. 使用setSingleChoiceItems(字串陣列, int, OnClickListener) :第二個int參教為預設選取項目
3. 刪除 setMessage : 若不刪除此設定, 則選單不會出現
.setSingleChoiceItems(items, 0, new DialogInterface.OnClickListener() {
    @Override
    public void onClick(DialogInterface dialogInterface, int i) {
    }
})
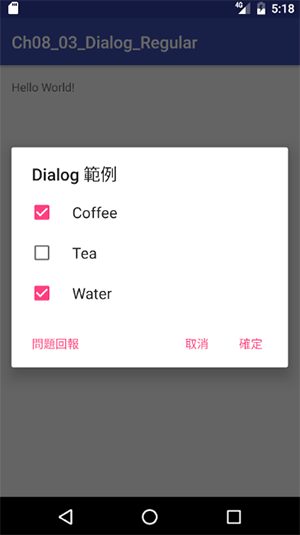
多選對話框
1. 先設定一個字串陣列
2. 設定一個boolean陣列, 用來存放選取的狀態
3. 使用setMultiChoiceItems(字串陣列, boolean[], OnMultiChoiceClickListener)
3. 刪除 setMessage : 若不刪除此設定, 則選單不會出現
設定字串陣列及boolean陣列
String[] items={"Coffee", "Tea","Water"};
boolean[] selection={false, false, false};
setMultiChoiceItems
.setMultiChoiceItems(items, selection, new DialogInterface.OnMultiChoiceClickListener() {
   @Override
   public void onClick(DialogInterface dialogInterface, int i, boolean b) {}
})
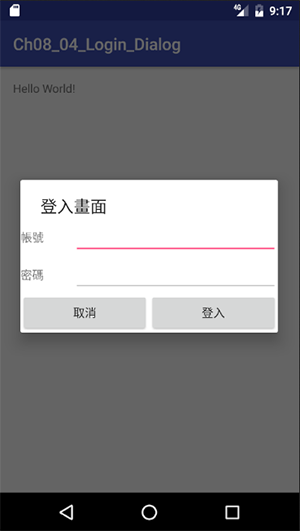
自訂對話方框
自訂對話方框也蠻簡單的, 先設計一個layout.xml再使用dialog的setView(View)即可
但要注意的是, 資源檔的layout, 需使用Activity的方法getLayoutInflater(), 取得LayoutInflater物件, 再使用LayoutInflater物件的inflater方法把資源檔的Layout轉成View物件, 如下所述
LayoutInflater inflater=getLayoutInflater();
View view=inflater.inflate(R.layout.login_dialog, null);
login_dialog.xml
<?xml version="1.0" encoding="utf-8"?>
<LinearLayout xmlns:android="http://schemas.android.com/apk/res/android"
    xmlns:tools="http://schemas.android.com/tools"
    android:orientation="vertical" android:layout_width="match_parent"
    android:layout_height="match_parent">
    <LinearLayout
        android:orientation="horizontal"
        android:layout_width="match_parent"
        android:layout_height="wrap_content">
        <TextView
            android:text="帳號"
            android:layout_width="wrap_content"
            android:layout_height="wrap_content"
            android:id="@+id/textView"
            android:layout_weight="1" />
        <EditText
            android:layout_width="wrap_content"
            android:layout_height="wrap_content"
            android:inputType="textPersonName"
            android:ems="10"
            android:id="@+id/edAccount"
            android:layout_weight="1" />
    </LinearLayout>
    <LinearLayout
        android:orientation="horizontal"
        android:layout_width="match_parent"
        android:layout_height="wrap_content">
        <TextView
            android:text="密碼"
            android:layout_width="wrap_content"
            android:layout_height="wrap_content"
            android:id="@+id/textView2"
            android:layout_weight="1" />
        <EditText
            android:layout_width="wrap_content"
            android:layout_height="wrap_content"
            android:inputType="textPassword"
            android:ems="10"
            android:id="@+id/edPassword"
            android:layout_weight="1" />
    </LinearLayout>
    <LinearLayout
        android:orientation="horizontal"
        android:layout_width="match_parent"
        android:layout_height="match_parent">
        <Button
            android:text="取消"
            android:onClick="onCancel"
            android:layout_width="wrap_content"
            android:layout_height="wrap_content"
            android:id="@+id/btCancel"
            android:layout_weight="1" />
        <Button
            android:text="登入"
            android:onClick="onOk"
            android:layout_width="wrap_content"
            android:layout_height="wrap_content"
            android:id="@+id/btOk"
            android:layout_weight="1" />
    </LinearLayout>
</LinearLayout>
Java程式碼
public class MainActivity extends AppCompatActivity {
    AlertDialog.Builder dialogBuilder;
    AlertDialog dialog;
    @Override
    protected void onCreate(Bundle savedInstanceState) {
        super.onCreate(savedInstanceState);
        setContentView(R.layout.activity_main);
        LayoutInflater inflater=getLayoutInflater();
        View view=inflater.inflate(R.layout.login_dialog, null);
        dialogBuilder=new AlertDialog.Builder(this);
        dialogBuilder.setTitle("登入畫面")
                .setView(view);
        dialog=dialogBuilder.show();
    }
    public void onOk(View v){

    }
    public void onCancel(View v){
        dialog.dismiss();
        this.finish();
    }
}
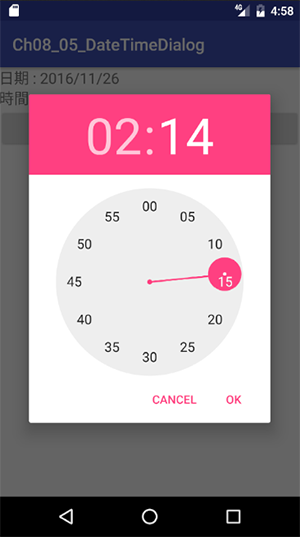
日期時間對話方框
設定時間及日期的對話框, 可以使用DatePickerDialog及TimePickerDialog二個類別. 如下的程式完整說明了使用方式
activity_main.xml
<?xml version="1.0" encoding="utf-8"?>
<LinearLayout xmlns:android="http://schemas.android.com/apk/res/android"
    xmlns:tools="http://schemas.android.com/tools"
    android:id="@+id/activity_main"
    android:layout_width="match_parent"
    android:layout_height="match_parent"
    tools:context="com.asuscomm.mahaljsp.ch08_05_datetimedialog.MainActivity"
    android:orientation="vertical">
    <LinearLayout
        android:orientation="horizontal"
        android:layout_width="match_parent"
        android:layout_height="wrap_content">
        <TextView
            android:text="日期 : "
            android:layout_width="wrap_content"
            android:layout_height="wrap_content"
            android:id="@+id/textView"
            android:textSize="18sp" />
        <TextView
            android:layout_width="match_parent"
            android:layout_height="wrap_content"
            android:id="@+id/txtDate"
            android:textSize="18sp" />
    </LinearLayout>
    <LinearLayout
        android:orientation="horizontal"
        android:layout_width="match_parent"
        android:layout_height="wrap_content">
        <TextView
            android:text="時間 : "
            android:layout_width="wrap_content"
            android:layout_height="wrap_content"
            android:id="@+id/textView3"
            android:textSize="18sp" />
        <TextView
            android:layout_width="match_parent"
            android:layout_height="wrap_content"
            android:id="@+id/txtTime"
            android:textSize="18sp" />
    </LinearLayout>
    <LinearLayout
        android:orientation="horizontal"
        android:layout_width="match_parent"
        android:layout_height="wrap_content">
        <Button
            android:text="設定日期"
            android:layout_width="wrap_content"
            android:layout_height="wrap_content"
            android:id="@+id/btDate"
            android:layout_weight="1" />
        <Button
            android:text="設定時間"
            android:layout_width="wrap_content"
            android:layout_height="wrap_content"
            android:id="@+id/btTime"
            android:layout_weight="1" />
    </LinearLayout>
</LinearLayout>
Java 程式碼
public class MainActivity extends AppCompatActivity {
    TextView txtDate, txtTime;
    private int mYear, mMonth, mDay, mHour, mMinute;
    @Override
    protected void onCreate(Bundle savedInstanceState) {
        super.onCreate(savedInstanceState);
        setContentView(R.layout.activity_main);
        Calendar calendar = Calendar.getInstance();
        mYear = calendar.get(Calendar.YEAR);
        mMonth = calendar.get(Calendar.MONTH);
        mDay = calendar.get(Calendar.DAY_OF_MONTH);
        mHour=calendar.get(Calendar.HOUR);
        mMinute=calendar.get(Calendar.MINUTE);

        txtDate=(TextView)findViewById(R.id.txtDate);
        txtTime=(TextView)findViewById(R.id.txtTime);
        Button btDate=(Button)findViewById(R.id.btDate);
        Button btTime=(Button)findViewById(R.id.btTime);

        btDate.setOnClickListener(new View.OnClickListener() {
            @Override
            public void onClick(View view) {
                DatePickerDialog dialogDate=new DatePickerDialog(MainActivity.this,
                    new DatePickerDialog.OnDateSetListener() {
                        @Override
                        public void onDateSet(DatePicker datePicker, int year, int month, int day) {
                            mYear = year;
                            mMonth = month+1;//month為年的第幾月, 第一個月為0
                            mDay = day;
                            txtDate.setText(mYear+"/"+mMonth+"/"+mDay);
                        }
                    }, mYear, mMonth, mDay);
                dialogDate.show();
            }
        });
        btTime.setOnClickListener(new View.OnClickListener() {
            @Override
            public void onClick(View view) {
                TimePickerDialog dialogTime=new TimePickerDialog(MainActivity.this,
                    new TimePickerDialog.OnTimeSetListener(){
                        @Override
                        public void onTimeSet(TimePicker timePicker, int hour, int minute) {
                            mHour=hour;
                            mMinute=minute;
                            txtTime.setText(mHour+":"+mMinute);
                        }
                    }, mHour, mMinute, true);
                dialogTime.show();
            }
        });
    }
}
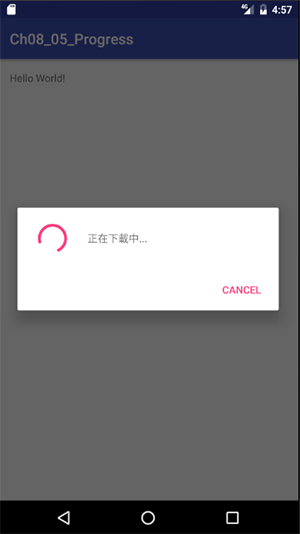
進度對話方框
應用程式在執行某一工作時, 可能需要花費較長的時間, 比如從記憶卡讀取資料. 此時若沒有顯示一個進度條, 使用者就會覺的不知要等多久, 甚至懷疑這程式是不是寫的太爛而當機了.
無法預估進度
自己寫的程式, 卻不知什麼時候會執行完成, 看來這程式設計師的功力應該蠻爛的才是. 但這現像卻常常會出現. 比如從網路下載資料時, 網路快慢影響下載的時間, 何時完成, 只有神才知道.
不過說歸說, 上面的問題還是可以解決的. 比如要下載的資料大小, 是可以事先知道的, 而目前下載了多少的資料, 也是絕對清楚的, 下載的大小跟總大小一除, 這完成的比例, 不就出來了嗎!!
ProgressDialog為一類別, 由此類別產生出物件dialog後, 就可以從dialog設定相關的屬性, 使用dialog.show()即可彈出進度對話框. 以下為執行的結果及完整的程式碼
public class MainActivity extends AppCompatActivity {
    @Override
    protected void onCreate(Bundle savedInstanceState) {
        super.onCreate(savedInstanceState);
        setContentView(R.layout.activity_main);
        ProgressDialog dialog=new ProgressDialog(this);
        dialog.setButton(DialogInterface.BUTTON_NEGATIVE, "Cancel", new DialogInterface.OnClickListener() {
            @Override
            public void onClick(DialogInterface dialogInterface, int whichButton) { }
        });
        dialog.setMessage("正在下載中...");
        dialog.show();
    }
}
dialog.setButton()可以設定的按鈕, 同樣有BUTTON_POSITIVE, BUTTON_NEUTRAL, BUTTON_NEGATIVE
己知執行進度
每當執行進度有變更, 就需使用Handler來設定dialog的目前進度, 因這牽涉到執行緒及Handler的使用法, 所以目前先不講解, 待日後說明