
前一篇的人臉辨識中,其步驟為 : 載入圖片 -> 取得臉部區域 -> 取得特微 -> 辨識取得描述子。光一張圖片就要經過4個步驟,耗費了好多秒。然後如果有1000張圖片呢,就再乘以1000倍。
每次要驗証一張新的臉孔,就要先耗費上述的幾千秒,然後再驗証,這乾脆把電腦丟掉好了。但如果把上述耗費幾千秒計算所得到的描述子存在資料庫,需要時由資料庫取回,不就是秒殺級的了嗎!!
請注意,目前 dlib 19.22.01版本,千萬不要使用dlib.cnn_face_detection_model_v1 來取得人臉偵測位置。因為圖片只要超過4000*3000=12,000,000相素,就算是 RTX 3080Ti 12G的 Ram,都會發生 out of memory的錯誤,而且誤判會更嚴重。
訓練模型
一樣要下載人臉外型68個特徵訓練模型 shape_predictor_68_face_landmarks.dat.bz2 及ResNet人臉辨識訓練模型 dlib_face_recognition_resnet_model_v1.dat.bz2 ,將上面二個下載解開後, 置於跟程式碼同一目錄。
資料表欄位
人臉辨識描述子是numpy的array格式,有128個 float32 數字,要如何存到資料庫中呢? 其實不論有多少個浮點數,在資料表中只要有二個欄位即可
name : varchar(20)
feature : blob
blob是長文字資料形態。所以請先在MySQL中建立一個資料庫(cloud),再建立一個資料表(face),然後建立上述二個欄位即可
blob可以建立 unique, 但長度好像只能設定在3000個字元以下。反正我們的描述子長度不會超過2000個字元,所以把unique設為2500即可。
numpy轉換
描述子是numpy的array格式,裏面的資料是float32形態,那又要怎麼存入資料庫的blob欄位呢? 此時需先使用 numpy.dumps()。請注意,因為資料格式為 blob,所以需使用 cursor.execute(cmd, args),這樣就不會去檢查字元碼而出現非unicode的錯誤。args必需為tuple,如下所示
npDescriptor = numpy.array(face_descriptor)
dump= npDescriptor.dumps()
cmd = "insert into face (name, descriptor) values (%s, %s)"
cursor.execute(cmd, (name, dump))
那怎麼由資料庫的blob還原成 numpy的array呢? 網路上大都是教你使用 np.loads(),但這方式已被捨棄了,所以正確的方式是要使用 pickle.loads()。請記得需先 import pickle, 如下所示
import pickle
feature=pickle.loads(row[1])
寫入資料庫
底下代碼,可以把photodb資料夾內的圖片,取得描述子數位化後,將描述子寫入資料庫。
注意 : 寫入資料庫的 name 欄位是抓取照片檔名而來,所以照片只能是單獨照,也就是只能有一張臉。
另外本人將資料庫描述子欄位 “descriptor” 設定為 Unique(唯一),所以要用 try-except 防止描述子重複,這是為了防止同樣的照片但使用不同檔名。
import os
import dlib
import numpy as np
import cv2
import mysql.connector as mysql

path_face_landmarks_pattern = "shape_predictor_68_face_landmarks.dat"
path_face_recognition_pattern = "dlib_face_recognition_resnet_model_v1.dat"
path_facedb = "./photodb"

detector_face = dlib.get_frontal_face_detector()
detector_shape = dlib.shape_predictor(path_face_landmarks_pattern)
detector_recognition= dlib.face_recognition_model_v1(path_face_recognition_pattern)
conn=mysql.connect(host="ip", user="account", password="passwd", database="db")
cursor=conn.cursor()
files=os.listdir(path_facedb)
for file in files:
    if file.endswith(".jpg") or file.endswith("png"):
        print('處理 : '+path_facedb+"/"+file)
        name=file.split('.')[0].split('_')[0]
        img=cv2.imdecode(np.fromfile(os.path.join(path_facedb, file), dtype=np.uint8), cv2.IMREAD_COLOR)

        #圖片太大,會導致取得描述子花費太多時間,所以把圖片縮小到 2000 相素之下
        h, w = img.shape[:2]
        if w > 2000:
            rate = w / h
            w = 2000
            h = int(w / rate)
            img = cv2.resize(img, (w, h), cv2.INTER_LINEAR)
        img=cv2.cvtColor(img, cv2.COLOR_BGR2RGB)
        faces=detector_face(img, 1)
        print(f'faces : {len(faces)}')
        if not faces:#沒偵測到臉型,會傳回空List
            continue
        face=faces[0]
        face_shape=detector_shape(img, face)
        face_descriptor=detector_recognition.compute_face_descriptor(img, face_shape)
        dump=np.array(face_descriptor).dumps()
        print(len(dump))
        cmd="insert into face (name, descriptor) values (%s, %s)"

        #資料庫描述子設定為 unique, 所以要用 try-except 防止描述子重複
        try:
            cursor.execute(cmd, (name, dump))
            conn.commit()
        except Exception as e:
            print(e)
conn.close()
應用
上述的資料庫都寫好了,那麼就可以由下面的代碼來測試新圖片的辨識效能。請將要偵測的圖片置於專案目錄下的 ./images目錄
import dlib
import pickle
import numpy as np
import cv2
import mysql.connector as mysql
import os
from PIL import Image, ImageFont, ImageDraw
import G

path_test='./images'
detector_face = dlib.get_frontal_face_detector()
detector_shape = dlib.shape_predictor('shape_predictor_68_face_landmarks.dat')
detector_recognition= dlib.face_recognition_model_v1('dlib_face_recognition_resnet_model_v1.dat')
def text(img, str, x, y, size, color):
    pil = Image.fromarray(cv2.cvtColor(img, cv2.COLOR_BGR2RGB))
    font = ImageFont.truetype('simsun.ttc', size)
    if not isinstance(str, np.compat.unicode):
        str = str.decode('utf-8')
    color = color[::-1]
    ImageDraw.Draw(pil).text((x, y), str, font=font, fill=color)
    return cv2.cvtColor(np.asarray(pil), cv2.COLOR_RGB2BGR)
def getDatabaseInfo():
    conn = mysql.connect(host=G.dbHost, user=G.dbAccount, password=G.dbPassword, database="cloud")
    cursor = conn.cursor()
    cursor.execute('select * from face')
    rows = cursor.fetchall()
    descriptors = []
    candidate = []
    for row in rows:
        candidate.append(row[1])
        descriptor = pickle.loads(row[2])
        descriptors.append(descriptor)
    return candidate,descriptors
def getDescriptor(img, face):
    return np.asarray(
        detector_recognition.compute_face_descriptor(
            img, detector_shape(img, face)
        )
    )
candidate,descriptors=getDatabaseInfo()
for file in os.listdir(path_test):
    img = cv2.imdecode(np.fromfile(os.path.join(path_test, file), dtype=np.uint8), cv2.IMREAD_COLOR)
    h, w=img.shape[:2]
    if w>1280:
        rate=w/h
        w=1280
        h=int(w/rate)
        img=cv2.resize(img,(w,h), cv2.INTER_LINEAR)
    print(file)
    faces = detector_face(img, 1)

    for face in faces:
        x1=face.left();y1=face.top();x2=face.right();y2=face.bottom()
        cv2.rectangle(img, (x1, y1), (x2, y2), (0, 255, 0), 2, cv2.LINE_AA)
        target=getDescriptor(img, face)
        distances=[np.linalg.norm(d-target) for d in descriptors]
        min_index=np.argmin(distances)
        if distances[min_index] <0.45:
            name=f'{candidate[min_index]} :{distances[min_index]:.2f}'
        else:
            name=''
        img = text(img, name, x1, y1 - 20, size=20, color=(0, 255, 0))
        cv2.imshow('recognition', img)
    key=cv2.waitKey(0)
    if key==ord('q') or key==27:
        break;
cv2.destroyAllWindows()
後話
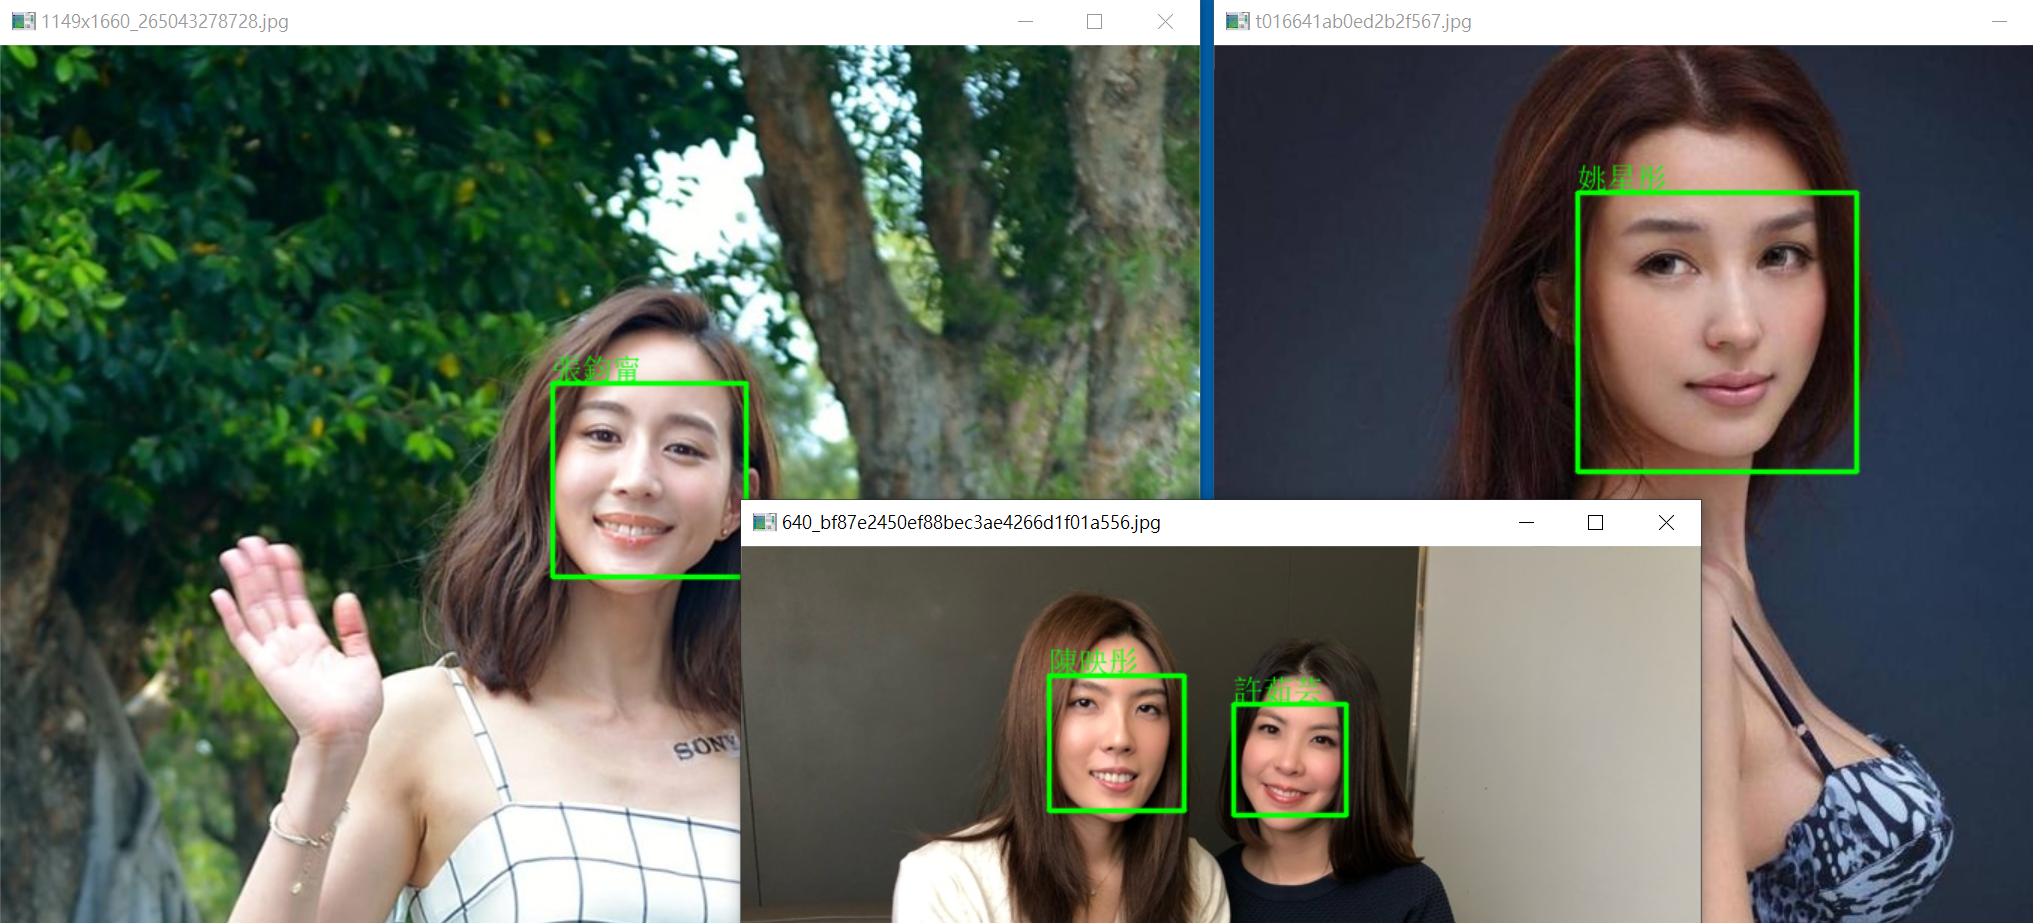
理科太太(陳映彤) 與許茹芸長的實在太像,我真的分不出來,但上述的人臉辨識,可以輕易的辨識出來。
辛芷蕾現代及古裝照,完全是不同的二種人,但騙不過上面的人臉辨識,劉亦菲也是如此。
Web Cam 人臉辨識
底下代碼,可以使用 Web Cam 拍攝影像並辨識人臉
import cv2
import numpy as np
import dlib
import mysql.connector as mysql
import pickle
from PIL import Image, ImageFont, ImageDraw
detector_face=dlib.get_frontal_face_detector()
detector_shape=dlib.shape_predictor('shape_predictor_68_face_landmarks.dat')
detector_recognition=dlib.face_recognition_model_v1('dlib_face_recognition_resnet_model_v1.dat')
def text(img, str, x, y, size, color):
    pil = Image.fromarray(cv2.cvtColor(img, cv2.COLOR_BGR2RGB))
    font = ImageFont.truetype('simsun.ttc', size)
    if not isinstance(str, np.compat.unicode):
        str = str.decode('utf-8')
    color = color[::-1]
    ImageDraw.Draw(pil).text((x, y), str, font=font, fill=color)
    return cv2.cvtColor(np.asarray(pil), cv2.COLOR_RGB2BGR)
def getDescription(img, face):
    return np.asarray(
        detector_recognition.compute_face_descriptor(img, detector_shape(img, face))
    )

conn=mysql.connect(host='ip', user='account', password='passwd', database='db')
cursor=conn.cursor()
cursor.execute("select name, descriptor from face")
rs=cursor.fetchall()
conn.close()
candidate=[]
descriptors=[]
for r in rs:
    candidate.append(r[0])
    descriptors.append(pickle.loads(r[1]))
cam=cv2.VideoCapture(0)
while True:
    success, img=cam.read()
    faces=detector_face(img, 1)
    for face in faces:
        x1=face.left();y1=face.top();x2=face.right();y2=face.bottom()
        target = getDescription(img, face)
        distances=[np.linalg.norm(d-target) for d in descriptors]
        min_index=np.argmin(distances)
        if distances[min_index]<0.45:
            name=candidate[min_index]
        else:
            name=''
        cv2.rectangle(img, (x1, y1), (x2, y2), (0,255,255), 1, cv2.LINE_AA)
        img=text(img, name, x1, y1-40, 40, (0,255,0))
    cv2.imshow('Video', img)
    key=cv2.waitKey(1)
    if key==ord('q') or key==27:
        break
cv2.destroyAllWindows()