上一篇Google Object Detection,使用了預定的模型進行物件辨識,但只能辨識100種物件。如果想要辨識自行新增的種類,那就要進行自定模型訓練。
網路上有關這方面的教學,大部份都已經過時且都是錯誤無法運行,甚至連官方網站的教學,也是亂七八糟。網址如下
https://tensorflow-object-detection-api-tutorial.readthedocs.io/en/latest/install.html 。
官網的說明除了全是英文外,講述的工作目錄(workspace)完全對不上。另外官網雖使用 tf2 版本,但其實是使用 import tensorflow.compal.v1 as tf,也就是在tf2 切換到 tf1,骨子裏完全是 tf1 的語法。但tensorflow 2.4開始,就取消 .compal.v1的功能了,所以官網裏的程式,完全無法執行,讓人看到直吐血。
本篇是本人踩了很多坑後的記錄,全部改寫操作說明及程式碼。本專案全部都是在PyCharm中完成。
套件安裝
1. GOD 官網文件說明只能適用於 CUDA 11.2的版本,如果使用 CUDA 11.3及以上的版本,會出現 JIT Compile Error,所以一定要降版到11.2。
2. 使用 Pycharm開啟新專案
3. pip install tensorflow tf2-tensorflow-object-detection-api tf-models-official Pillow。
自訂模型的步驟大網
1. 建立工作目錄
2. 收集圖片
3. 標識影像資料
4. 建立標簽地圖
5. 產生TFRrecord檔
6. 下載預先模型及設定訓練管線
7. 開始訓練模型及監控訓練進度
8. 預測圖片應用
下載訓練資料
由上可知,要收集圖片,標識影像,這些資料都是要自已動手作出來的。為了省麻煩,在些提供一組本人專案所作出來的資料,下載如下。
god_images.zip : 解開後,將 images及 xml 置於 workspace\trainning_road之下
另外有的人因沒有高階顯卡,所以無法訓練建模,或是建模需花好幾天。在此亦提供本人訓練後的模型,下載如下
god_models.zip : 解開後將models置於 workspace\trainning_road之下
建立工作目錄
專案
├─ venv #專案虛擬環境
├─ workspace
│  ├─ trainning_road #訓練的種類 -- 動物模型訓練
│  │  ├─ annotations #標識區,包含 TFRecord檔,csv檔,label_map.pbtxt
│  │  ├─ images #訓練圖片,全都是 .jpg檔
│  │  ├─ models #自訂模型訓練儲存的位置,訓練時會自動建立
│  │  ├─ pre-trained-models #Google預訓練完整的模型
│  │  ├─ xml #訓練圖片之xml檔
├─ 建模.py
├─ 匯出建模.py
├─ 偵測圖片.py
└─ xml_to_tfrecord.py
收集圖片
要訓練自已想要的物件,當然是先收集圖片。請依序將圖片放置在如下目錄
訓練圖片 : workspace/trainning_road/images
圖片有幾個先決條件。
1. 圖像中的物件盡量隨機位置
2. 訓練的背景盡量多樣化
3. 可以讓物件被遮擋,或是與其他東西重疊
4. 每個類別的樣本盡量均勻出現
5. 圖像檔案不要太大,保持在200KB以下,其解析度不超過720×1280。圖像越大,訓練時間越長
標識圖片資料 — LabelImg
收集的圖片,需先標示為那一個種類。標識的工具目前最常用的就是LabelImg,這是一支由Python寫成的GUI程式,然後封裝成 exe檔。請先於DOS命令模式下使用系統級安裝 pip install LabelImg,然後在DOS執行 LabelImg 即可。
開啟LabelImg,選取 OpenDir, 選取有圖片的目錄 workspace\trainning_road\images 後,再設定Change Save Dir 到 workspace\trainning_road\xml 目錄。
然後在右下角的圖示列表中,一張一張的選取,使用 RectBox 開始選取物件的矩型方塊,然後按Save (Ctrl+S),輸入labelimage的種類(比如 dog),切記一件事,labelimage的名稱只能為英文,不可輸入中文。最後記得要存檔(Save),而且是每標識一張就要Save一次。
存檔之後,就會在 workspace\trainning_road\xml 之下,產生與原圖同檔名的 .xml檔案。這個.xml裏的path 標簽會記錄原圖的路徑。
建立標簽地圖 – Label Map
請在workspace\trainning_road\annotations 目錄下建立 label_map.pbtxt檔案,把上述的所有種類依如下語法建立
item {
    id: 1
    name: "crack"
    display_name: "crack"
}

item {
    id: 2
    name: "manhole"
    display_name: "manhole"
}
item{
    id: 3
    name: "pothole"
    display_name: "pothole"
}
產生TFRecord檔
TFRecord檔是等會要進行圖片訓練的重要檔案,為一個二進位檔,裏面的資訊是由所有的 .jpg 原圖片檔資料及由LabelImg 所產生的所有 xml 檔組合而成,我們將此檔置於 workspace\trainning_road\annotation之下,並命名為train.record。
官網有提供製作TFRecord的代碼,但無法執行。底下的代碼已經由本人改寫,可正確執行。
請在專案之下,新增 xml_to_tfrecord.py。其中csv_path可以填入None,就不會產生csv檔(其實此檔日後不會用到,只當參考用)。
xml_to_tfrecord.py 的完整代碼如下
#官網使tensorflow v1.0的版本,沒法用
import os
os.environ['TF_CPP_MIN_LOG_LEVEL'] = '2'
import glob
import io
from collections import namedtuple
from PIL import Image
from object_detection.dataset_tools.create_coco_tf_record import create_tf_example
from object_detection.utils import label_map_util, dataset_util
import xml.etree.ElementTree as ET
import tensorflow as tf
import pandas as pd

#底下路徑錯誤,會出現 utf8編碼錯誤
xml_dir='workspace/trainning_road/xml'
labels_path='workspace/trainning_road/annotations/label_map.pbtxt'
output_path='workspace/trainning_road/annotations/train.record'
image_dir='workspace/trainning_road/images'
csv_path='workspace/trainning_road/annotations/train.csv'

label_map = label_map_util.load_labelmap(labels_path)
label_map_dict = label_map_util.get_label_map_dict(label_map)
def xml_to_csv(path):
    xml_list = []
    for xml_file in glob.glob(path + '/*.xml'):
        tree = ET.parse(xml_file)
        root = tree.getroot()
        filename = root.find('filename').text
        width = int(root.find('size').find('width').text)
        height = int(root.find('size').find('height').text)
        for member in root.findall('object'):
            bndbox = member.find('bndbox')
            value = (filename,
                     width,
                     height,
                     member.find('name').text,
                     int(bndbox.find('xmin').text),
                     int(bndbox.find('ymin').text),
                     int(bndbox.find('xmax').text),
                     int(bndbox.find('ymax').text),
                     )
            xml_list.append(value)
    column_name = ['filename', 'width', 'height',
                   'class', 'xmin', 'ymin', 'xmax', 'ymax']
    xml_df = pd.DataFrame(xml_list, columns=column_name)
    return xml_df
def class_text_to_int(row_label):
    return label_map_dict[row_label]
def split(df, group):
    data = namedtuple('data', ['filename', 'object'])
    gb = df.groupby(group)
    return [data(filename, gb.get_group(x)) for filename, x in zip(gb.groups.keys(), gb.groups)]
def create_tf_example(group, path):
    with tf.io.gfile.GFile(os.path.join(path, '{}'.format(group.filename)),
            'rb') as fid:
        encoded_jpg = fid.read()
    encoded_jpg_io = io.BytesIO(encoded_jpg)
    image = Image.open(encoded_jpg_io)
    width, height = image.size

    filename = group.filename.encode('utf8')
    image_format = b'jpg'
    xmins = []
    xmaxs = []
    ymins = []
    ymaxs = []
    classes_text = []
    classes = []
    for index, row in group.object.iterrows():
        xmins.append(row['xmin'] / width)
        xmaxs.append(row['xmax'] / width)
        ymins.append(row['ymin'] / height)
        ymaxs.append(row['ymax'] / height)
        classes_text.append(row['class'].encode('utf8'))
        classes.append(class_text_to_int(row['class']))
    tf_example = tf.train.Example(features=tf.train.Features(feature={
        'image/height': dataset_util.int64_feature(height),
        'image/width': dataset_util.int64_feature(width),
        'image/filename': dataset_util.bytes_feature(filename),
        'image/source_id': dataset_util.bytes_feature(filename),
        'image/encoded': dataset_util.bytes_feature(encoded_jpg),
        'image/format': dataset_util.bytes_feature(image_format),
        'image/object/bbox/xmin': dataset_util.float_list_feature(xmins),
        'image/object/bbox/xmax': dataset_util.float_list_feature(xmaxs),
        'image/object/bbox/ymin': dataset_util.float_list_feature(ymins),
        'image/object/bbox/ymax': dataset_util.float_list_feature(ymaxs),
        'image/object/class/text': dataset_util.bytes_list_feature(classes_text),
        'image/object/class/label': dataset_util.int64_list_feature(classes),
    }))
    return tf_example
def main():
    writer = tf.io.TFRecordWriter(output_path)
    path = os.path.join(image_dir)
    examples = xml_to_csv(xml_dir)
    grouped = split(examples, 'filename')
    for group in grouped:
        tf_example = create_tf_example(group, path)
        writer.write(tf_example.SerializeToString())
    writer.close()
    print('Successfully created the TFRecord file: {}'.format(output_path))
    if csv_path is not None:
        examples.to_csv(csv_path, index=None)
        print('Successfully created the CSV file: {}'.format(csv_path))
if __name__ == '__main__':
    main()
執行完畢後,會在 workspace\trainning_road\annotations之下產生 train.record及train.csv。
請注意,train.record的檔案非常的大,是等會要訓練圖片的重要資料。
下載模型
所謂的模型,就是由好幾種演算法疊加而成的,網路上有很多已建構好的模型,而且也使用專業的TPU伺服器訓練了常用的資料。這種有模型也有訓練好的資料,稱為預先訓練模型,我們不用重頭開始訓練。但也可以只使用模型,資料由我們重頭開始訓練。請到 TensorFlow 2 Detection Model Zoo 下載所需的模型,在此我們下載 SSD ResNet101 V1 FPN 640×640 模型來測試。
將上述的 tar.gz檔案解開後,把 ssd_resnet101_v1_fpn_640x640_coco17_tpu-8 copy 到 pre-trained-models目錄之下。
修改 workspace\pre-trained-models\ssd_resnet101_v1_fpn_640x640_coco17_tpu-8\pipeline.config 如下藍色部份。
請注意,batch_size愈大的話,速度愈大。如果顯卡是 nVidia 1050Ti,因為Ram只有 4G, 需把batch_size 由的 8 調成 3,才不會因為 ran out of memory 造成當機。RTX3080Ti 12G的Ram 可以調到 8。
model {
  ssd {
    num_classes: 3 #設定要辨識的數量
    image_resizer {
      fixed_shape_resizer {
        height: 640
        width: 640
      }
    }
    feature_extractor {
      type: "ssd_resnet101_v1_fpn_keras"
      depth_multiplier: 1.0
      min_depth: 16
      conv_hyperparams {
        regularizer {
          l2_regularizer {
            weight: 0.00039999998989515007
          }
        }
        initializer {
          truncated_normal_initializer {
            mean: 0.0
            stddev: 0.029999999329447746
          }
        }
        activation: RELU_6
        batch_norm {
          decay: 0.996999979019165
          scale: true
          epsilon: 0.0010000000474974513
        }
      }
      override_base_feature_extractor_hyperparams: true
      fpn {
        min_level: 3
        max_level: 7
      }
    }
    box_coder {
      faster_rcnn_box_coder {
        y_scale: 10.0
        x_scale: 10.0
        height_scale: 5.0
        width_scale: 5.0
      }
    }
    matcher {
      argmax_matcher {
        matched_threshold: 0.5
        unmatched_threshold: 0.5
        ignore_thresholds: false
        negatives_lower_than_unmatched: true
        force_match_for_each_row: true
        use_matmul_gather: true
      }
    }
    similarity_calculator {
      iou_similarity {
      }
    }
    box_predictor {
      weight_shared_convolutional_box_predictor {
        conv_hyperparams {
          regularizer {
            l2_regularizer {
              weight: 0.00039999998989515007
            }
          }
          initializer {
            random_normal_initializer {
              mean: 0.0
              stddev: 0.009999999776482582
            }
          }
          activation: RELU_6
          batch_norm {
            decay: 0.996999979019165
            scale: true
            epsilon: 0.0010000000474974513
          }
        }
        depth: 256
        num_layers_before_predictor: 4
        kernel_size: 3
        class_prediction_bias_init: -4.599999904632568
      }
    }
    anchor_generator {
      multiscale_anchor_generator {
        min_level: 3
        max_level: 7
        anchor_scale: 4.0
        aspect_ratios: 1.0
        aspect_ratios: 2.0
        aspect_ratios: 0.5
        scales_per_octave: 2
      }
    }
    post_processing {
      batch_non_max_suppression {
        score_threshold: 9.99999993922529e-09
        iou_threshold: 0.6000000238418579
        max_detections_per_class: 100
        max_total_detections: 100
        use_static_shapes: false
      }
      score_converter: SIGMOID
    }
    normalize_loss_by_num_matches: true
    loss {
      localization_loss {
        weighted_smooth_l1 {
        }
      }
      classification_loss {
        weighted_sigmoid_focal {
          gamma: 2.0
          alpha: 0.25
        }
      }
      classification_weight: 1.0
      localization_weight: 1.0
    }
    encode_background_as_zeros: true
    normalize_loc_loss_by_codesize: true
    inplace_batchnorm_update: true
    freeze_batchnorm: false
  }
}
train_config {
  batch_size: 3 #GPU記憶体太小,就要調小
  data_augmentation_options {
    random_horizontal_flip {
    }
  }
  data_augmentation_options {
    random_crop_image {
      min_object_covered: 0.0
      min_aspect_ratio: 0.75
      max_aspect_ratio: 3.0
      min_area: 0.75
      max_area: 1.0
      overlap_thresh: 0.0
    }
  }
  sync_replicas: true
  optimizer {
    momentum_optimizer {
      learning_rate {
        cosine_decay_learning_rate {
          learning_rate_base: 0.03999999910593033
          total_steps: 25000
          warmup_learning_rate: 0.013333000242710114
          warmup_steps: 2000
        }
      }
      momentum_optimizer_value: 0.8999999761581421
    }
    use_moving_average: false
  }
  #設定預先訓練的目錄,不用加 .index
  fine_tune_checkpoint: "workspace/trainning_road/pre-trained-models/ssd_resnet101_v1_fpn_640x640_coco17_tpu-8/checkpoint/ckpt-0"
  num_steps: 25000
  startup_delay_steps: 0.0
  replicas_to_aggregate: 8
  max_number_of_boxes: 100
  unpad_groundtruth_tensors: false
  fine_tune_checkpoint_type: "detection" #設定為全偵測模式
  use_bfloat16: false #true : false:使用本機設備。true: 使用Google TPU伺服器
  fine_tune_checkpoint_version: V2
}
train_input_reader {
  label_map_path: "workspace/trainning_road/annotations/label_map.pbtxt" #設定 Label map 檔
  tf_record_input_reader {
    input_path: "workspace/trainning_road/annotations/train.record" #設定 TFRecord檔
  }
}
eval_config {
  metrics_set: "coco_detection_metrics"
  use_moving_averages: false
}
eval_input_reader {
  label_map_path: "workspace/trainning_road/annotations/label_map.pbtxt" #設定 Label map 檔
  shuffle: false
  num_epochs: 1
  tf_record_input_reader {
    input_path: "workspace/trainning_road/annotations/test.record" #設定 TFRecord檔
  }
}
訓練模型
經過一番的努力,可以開始訓練模型了。官網提供訓練模型的代碼檔名為 train.py,此檔骨子裏也是屬於 tf1 的版本,完全無法執行。所以底下的代碼也已由本人完全改寫過,可以正確執行, 檔名為建模.py
#import tensorflow.compat.v2 as tf
import os
os.environ['TF_CPP_MIN_LOG_LEVEL'] = '2'
import tensorflow as tf
from object_detection import model_lib_v2
import time
#batch_size : 6
pipeline_config_path='workspace/trainning_road/pre-trained-models/ssd_resnet101_v1_fpn_640x640_coco17_tpu-8/pipeline.config'
model_dir='workspace/trainning_road/models/ssd_resnet101_v1_fpn_640x640_coco17_tpu-8'

checkpoint_dir=None
num_train_steps=None
sample_1_of_n_eval_examples=None
sample_1_of_n_eval_on_train_examples=5
eval_on_train_data=False
use_tpu=False
eval_timeout=3600
record_summaries=True
tpu_name=None
num_workers=1
checkpoint_every_n=1000
record_summaries=True
def main():
    tf.config.set_soft_device_placement(True) #預設使用GPU,沒有才用CPU
    #gpus = tf.config.list_physical_devices(device_type='GPU')
    #cpus = tf.config.list_physical_devices('CPU')  # device_type可以不用打
    # #tf.config.set_visible_devices (devices=cpus)
    #tf.config.set_visible_devices(devices=gpus[0], device_type='GPU')
    if checkpoint_dir:#是否從中途開始訓練
        model_lib_v2.eval_continuously(
            pipeline_config_path=pipeline_config_path,
            model_dir=model_dir,
            train_steps=num_train_steps,
            sample_1_of_n_eval_examples=sample_1_of_n_eval_examples,
            sample_1_of_n_eval_on_train_examples=(
                sample_1_of_n_eval_on_train_examples),
            checkpoint_dir=checkpoint_dir,
            wait_interval=300, timeout=eval_timeout)
    else:
        if use_tpu:
            # TPU is automatically inferred if tpu_name is None and
            # we are running under cloud ai-platform.
            resolver = tf.distribute.cluster_resolver.TPUClusterResolver(tpu_name)
            tf.config.experimental_connect_to_cluster(resolver)
            tf.tpu.experimental.initialize_tpu_system(resolver)
            strategy = tf.distribute.experimental.TPUStrategy(resolver)
        elif num_workers > 1:#具二塊以上的顯卡時
            print("Thomas : ==========================num_workers : {0}".format(num_workers))
            strategy = tf.distribute.experimental.MultiWorkerMirroredStrategy()
        else:
            print("Thomas : ==========================num_workers : {0}".format(num_workers))
            strategy = tf.compat.v2.distribute.MirroredStrategy()
    with strategy.scope():#開始訓練,會很久
        model_lib_v2.train_loop(
            pipeline_config_path=pipeline_config_path,
            model_dir=model_dir,
            train_steps=num_train_steps,
            use_tpu=use_tpu,
            checkpoint_every_n=checkpoint_every_n,
            record_summaries=record_summaries)
if __name__ == '__main__':
    t1 = time.time()
    main()
    t2 = time.time()
    total = t2 - t1
    hrs = total // 3600
    mins = (total - hrs * 3600) // 60
    seconds = total - (hrs * 3600 + mins * 60)
    print(f"訓練時間 : {hrs}時{mins}分{seconds}秒")
Tensorflow 2.6版本問題
Tensorflow 2.6及以上的版本,在訓練模型時,會出現
ModuleNotFoundError: No module named ‘tensorflow.python.keras.applications’ 的例外,需修改
venv\Lib\site-packages\object_detection\models\keras_models\resnet_v1.py 檔案,如下
#from tensorflow.python.keras.applications import resnet
import keras.applications.resnet
另外會出現 No Module official.vision.image_classification.efficientnet問題,修改venv\Lib\site-packages\object_detection\models\ssd_efficientnet_bifpn_feature_extractor.py檔,如下
#from official.vision.image_classification.efficientnet import efficientnet_model
from official.legacy.image_classification.efficientnet import efficientnet_model
開始訓練時,會在 workspace之下自動建立 models目錄。
訓練時, 會停留在 “Use fn_output_signature instead” 這個訊息非常久的時間。使用CPU訓練,會動用到機器上所有的CPU,每顆CPU所消耗的資源都會高達70%以上。等等,這就有點奇怪了,Python不是只能使用一顆CPU嗎,怎麼所有CPU都能用上??? 這是因為TensorFlow 是使用 C/C+++寫成的,所以才能啟動全部的CPU。若使用GPU的話,那麼CPU大概只使用16%左右,GPU約40%~90%左右。
測試本人的專案訓練450張圖片,如果使用nVidia GForce 1050 Ti,大約需花23小時。若使用RTX 3080 Ti, 花費時間大約是3.5小時。
Instructions for updating:
Use fn_output_signature instead
[07/14 00:37:17] tensorflow WARNING: From D:\project\god\god4\venv\lib\site-packages\tensorflow\python\util\deprecation.py:602: calling map_fn_v2 (from tensorflow.python.ops.map_fn) with dtype is deprecated and will be removed in a future version.
Instructions for updating:
Use fn_output_signature instead
執行此代碼會花費相當久的時間,其Log如下
2021-07-12 01:11:17.808268: I tensorflow/core/common_runtime/bfc_allocator.cc:1046] InUse at 13055b3000 of size 1024 by op AssignVariableOp action_count 5999980386611784067 step 0 next 620
2021-07-12 01:11:17.808425: I tensorflow/core/common_runtime/bfc_allocator.cc:1046] InUse at 13055b3400 of size 1024 by op AssignVariableOp action_count 5999980386611784069 step 0 next 621
2021-07-12 01:11:17.808582: I tensorflow/core/common_runtime/bfc_allocator.cc:1046] InUse at 13055b3800 of size 1024 by op AssignVariableOp action_count 5999980386611784049 step 0 next 623
2021-07-12 01:11:17.808739: I tensorflow/core/common_runtime/bfc_allocator.cc:1046] InUse at 13055b3c00 of size 1024 by op AssignVariableOp action_count 5999980386611784047 step 0 next 624
2021-07-12 01:11:17.808899: I tensorflow/core/common_runtime/bfc_allocator.cc:1046] InUse at 13055b4000 of size 1024 by op AssignVariableOp action_count 5999980386611784051 step 0 next 625
2021-07-12 01:11:17.809062: I tensorflow/core/common_runtime/bfc_allocator.cc:1046] InUse at 13055b4400 of size 1024 by op AssignVariableOp action_count 5999980386611784053 step 0 next 626

Instructions for updating:
Use fn_output_signature instead <==此處會執行很久
訓練時間 : 5.0時18.0分58.18075227737427秒

Process finished with exit code 0
另外也可以在workspace/trainning_road/models/ssdxxxx…../之下,看到新增了 ckpt-1.data-0000-of-oooo1,ckpt-2.data-0000-of-oooo1,ckpt-3.data-0000-of-oooo1……的檔案,這些檔案也非常的大。
監控訓練進度
訓練的時間,少則好幾個小時,多則好幾天,何時能結束呢,這需等到訓練的TotalLoss(總体損失值)收斂到一定的值,就會自動結束。官網有提及只要訓練到TotalLoss(總体損失值)少於 2 就可以手動結束,不過建議是低於 1 或者是讓程式自動結束。如果中途手動停止訓練,可於往後再度執行,而再度執行會重上一次停止的check point開始繼續訓練,不會重頭開始。
也請注意TotalLoss過低的話,會造成過度擬合(OverFitting)。過度擬合的意思是指要跟樣本原圖一模一樣才算符合,這就會導致在評估新圖片時效能過低,且準確率大幅下降。
那要如何看到目前訓練的TotalLoss值呢? 請在DOS模式下,先 pip install tensorflow,然後進入workspace目錄下,輸入如下指令。
tensorboard --logdir=models\ssd_resnet101_v1_fpn_640x640_coco17_tpu-8
然後開啟瀏覽器,輸入如下網址
http://localhost:6006
此時就可以看到如下的網頁了。這個網頁右上角的設定,勾選Reload data,就可以設置多久更新一次,最小是30秒。
2:07:21 41m9s : 4.397
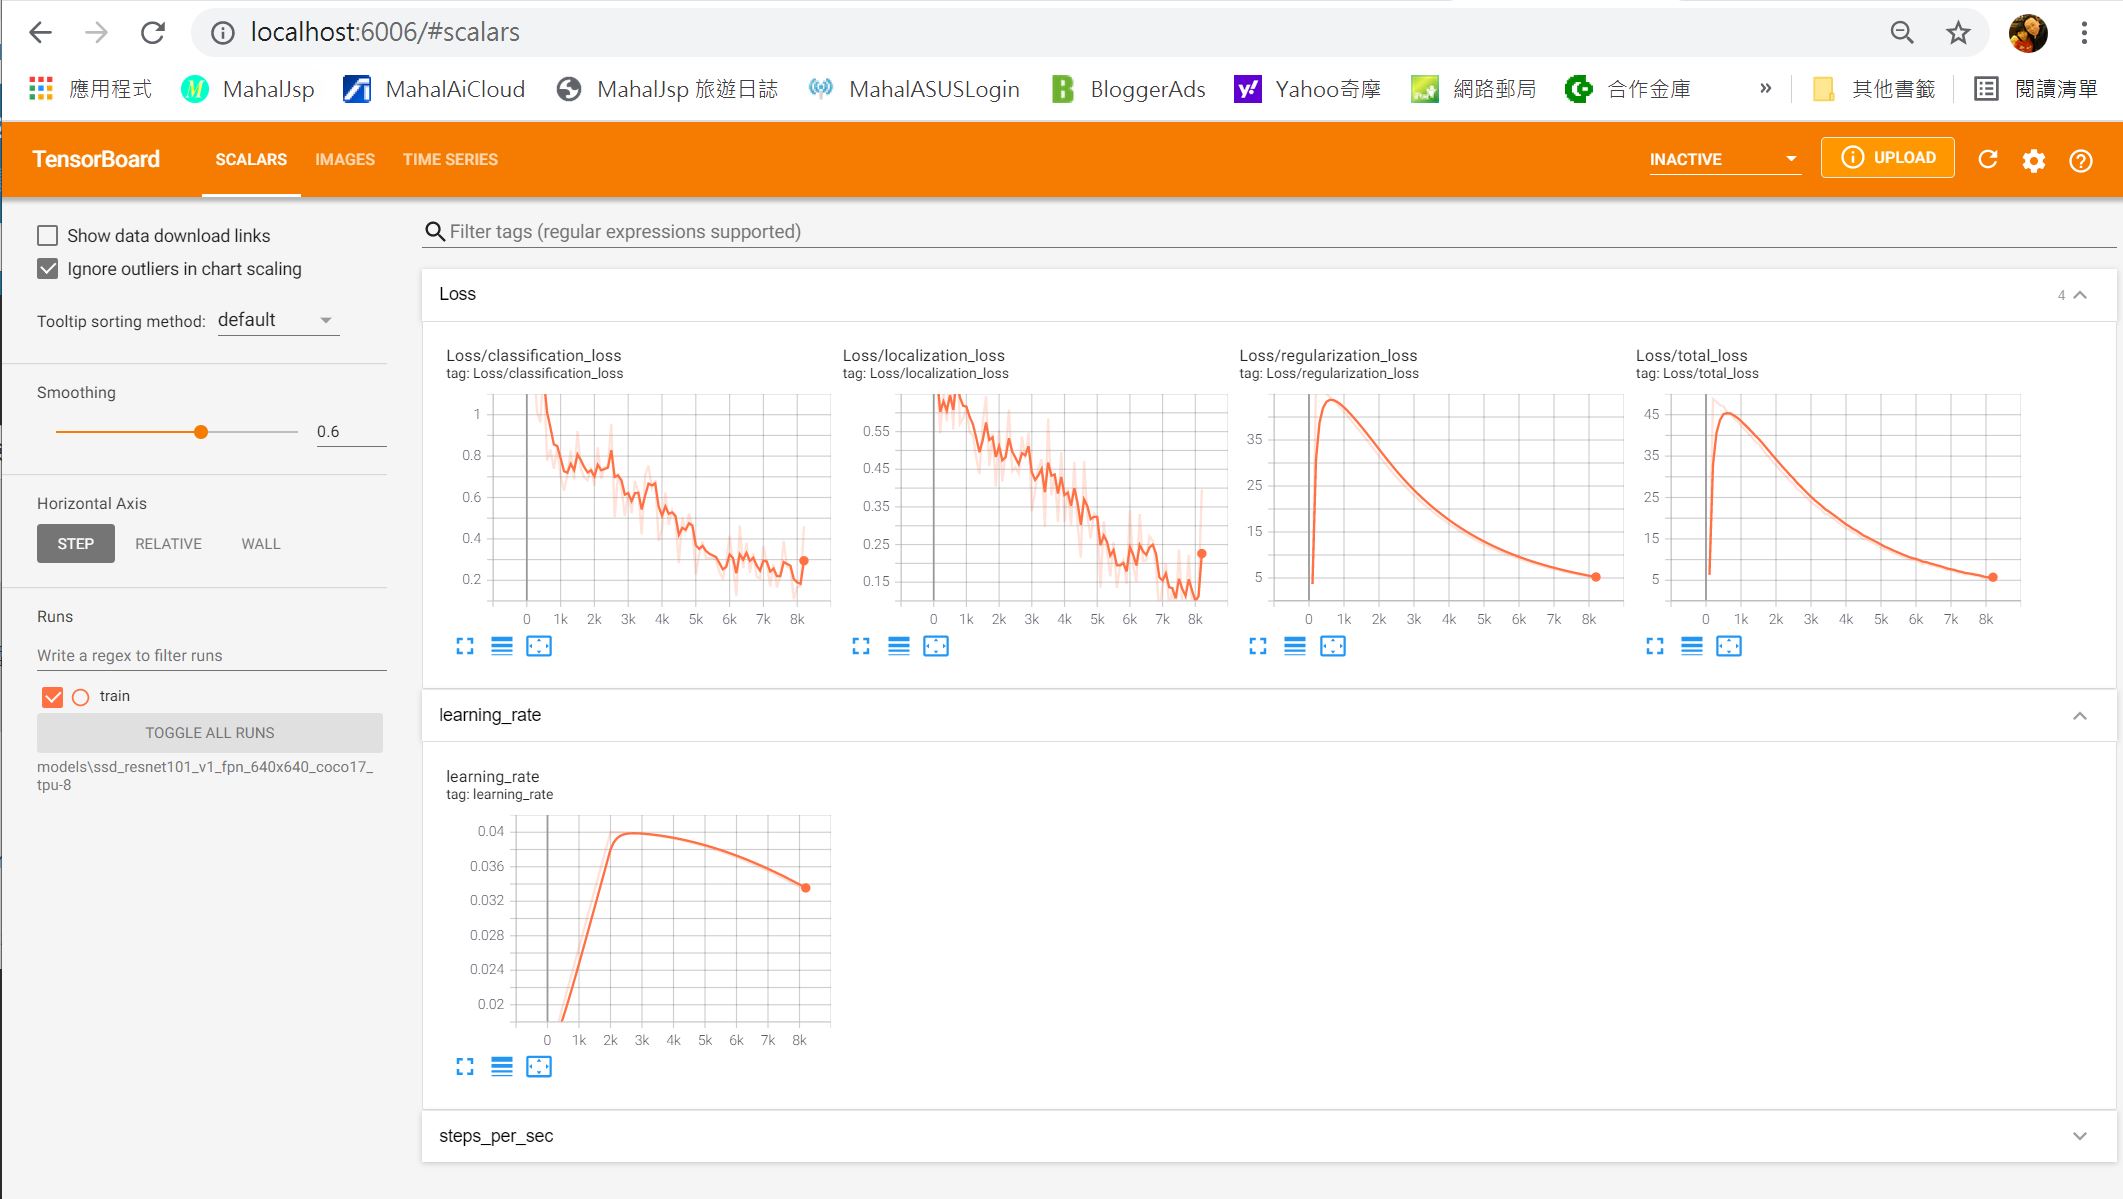
上述的網頁重整後,如果TotalLoss少於 1,就可以中斷訓練程式了,然後繼續下面的說明,匯出模型。
匯出模型
接下來把我們訓練的模型匯出,就可以開始應用了。匯出模型.py 的代碼如下
import tensorflow as tf
from google.protobuf import text_format
from object_detection import exporter_lib_v2
from object_detection.protos import pipeline_pb2
input_type='image_tensor'
pipeline_config_path='workspace/trainning_road/pre-trained-models/ssd_resnet101_v1_fpn_640x640_coco17_tpu-8/pipeline.config'
trained_checkpoint_dir='workspace/trainning_road/models/ssd_resnet101_v1_fpn_640x640_coco17_tpu-8'
output_directory='workspace/trainning_road/exported-models/trainning_road'
config_override=''
use_side_inputs=False
side_input_shapes=''
side_input_types=''
side_input_names=''
def main():
  pipeline_config = pipeline_pb2.TrainEvalPipelineConfig()
  with tf.io.gfile.GFile(pipeline_config_path, 'r') as f:
    text_format.Merge(f.read(), pipeline_config)
  text_format.Merge(config_override, pipeline_config)
  exporter_lib_v2.export_inference_graph(
      input_type, pipeline_config, trained_checkpoint_dir,
      output_directory, use_side_inputs, side_input_shapes,
      side_input_types, side_input_names)
if __name__ == '__main__':
    main()
匯出若成功,會產生如下藍色部份的目錄
專案
├─ venv #專案虛擬環境
├─ workspace
│  ├─ trainning_road #訓練的種類 -- 動物模型訓練
│  │  ├─ annotation #標識區,包含 TFRecord檔,csv檔,label_map.pbtxt
│  │  ├─ images
│  │  ├─ models #自訂模型訓練設定組態 *.config
│  │  ├─ pre-trained-models #預先模型
│  │  ├─ xml
│  │  ├─ exported-models #匯出模型的目錄
│  │  │  ├─ trainning_road #我們的專案目錄
│  │  │  │  ├─ checkpoint
│  │  │  │  ├─ saved_model #匯出的模型,也就是我們要的東西
│  │  │  │  ├─ pipeline.config
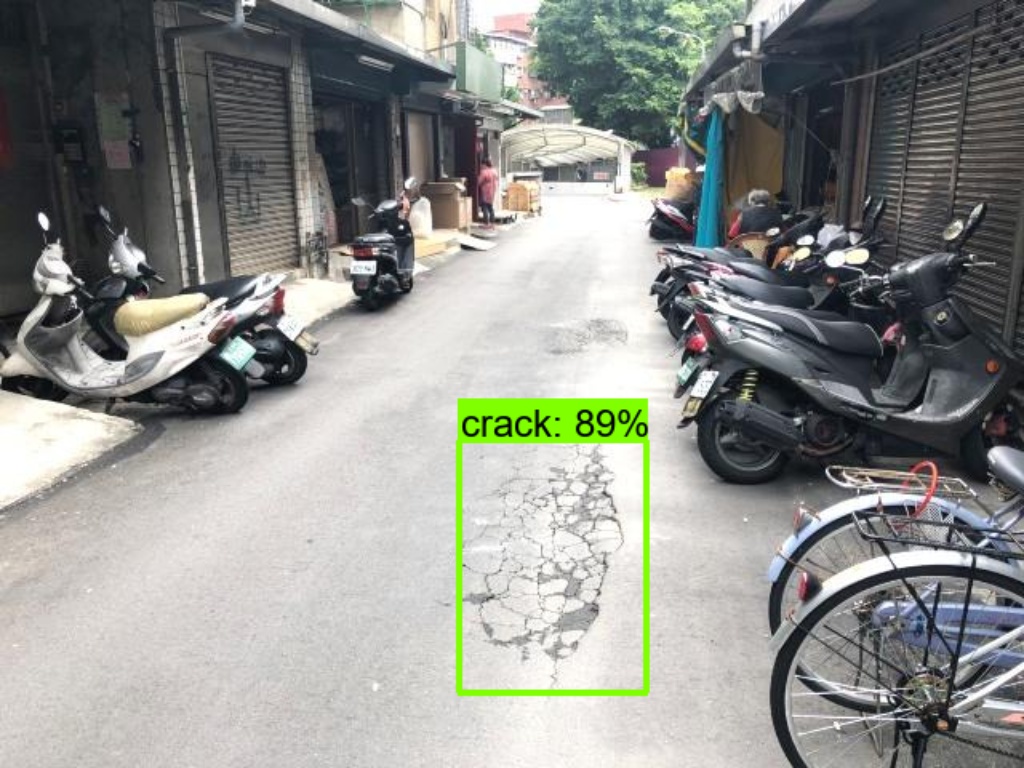
預測圖片應用
新增一個Python file, 命名為 圖片偵測.py 檔。請注意,此程式會發生如下奇怪的錯誤
cv2.error: OpenCV(4.6.0) D:\a\opencv-python\opencv-python\opencv\modules\highgui\src\window.cpp:1267
要解決此問題,需新增如下套件
pip install opencv-contrib-python
完整代碼如下
import os
os.environ['TF_CPP_MIN_LOG_LEVEL'] = '2'
import tensorflow as tf
import cv2
import time
from object_detection.utils import label_map_util
from object_detection.utils import visualization_utils as viz_utils
import numpy as np
img_path='crack_00011.jpg'

def predict(image_np):
    # 最前面增加一維,變為 (筆數, 寬, 高, 顏色)
    input_tensor = np.expand_dims(image_np, 0)
    t1 = time.time()
    detections = model(input_tensor)
    t2 = time.time()
    print(f'預測共花費 : {t2 - t1} 秒.')

    num_detections = int(detections.pop('num_detections'))  # 偵測到的數量

    # detections:物件資訊 內含 (候選框, 類別, 機率)
    print(f'物件個數:{num_detections}')
    detections = {key: value[0, :num_detections].numpy()
                  for key, value in detections.items()}

    detections['num_detections'] = num_detections

    print(f'物件資訊 (候選框, 類別, 機率):')
    for detection_boxes, detection_classes, detection_scores in zip(detections['detection_boxes'], detections['detection_classes'], detections['detection_scores']):
        try:
            print(np.around(detection_boxes, 4), detection_classes, category_index[detection_classes], round(detection_scores * 100, 2))
        except:
            print("error : "+str(detection_classes))

    image_np_with_detections = image_np.copy()
    viz_utils.visualize_boxes_and_labels_on_image_array(
        image_np_with_detections,
        detections['detection_boxes'],
        detections['detection_classes'].astype(np.int64),
        detections['detection_scores'],
        category_index,
        use_normalized_coordinates=True,
        max_boxes_to_draw=200,
        min_score_thresh=.15,
        groundtruth_box_visualization_color='red',
        agnostic_mode=False)
    return image_np_with_detections

gpus = tf.config.experimental.list_physical_devices('GPU')
if gpus:
    tf.config.experimental.set_virtual_device_configuration(gpus[0], [tf.config.experimental.VirtualDeviceConfiguration(memory_limit=1024*2)])

model_path='workspace/trainning_road/exported-models/trainning_road/saved_model'
label_path='workspace/trainning_road/annotations/label_map.pbtxt'
print('載入模型...', end='')
t1 = time.time()
# 開始由本地端載入模型,會很久
model = tf.saved_model.load(model_path)
t2 = time.time()
print(f'載入共花費 : {t2-t1} 秒.')

category_index = label_map_util.create_category_index_from_labelmap(label_path, use_display_name=True)

#show 單張圖片
img = cv2.imdecode(np.fromfile(f'{img_path}', dtype=np.uint8), cv2.IMREAD_UNCHANGED)
img = cv2.cvtColor(img, cv2.COLOR_BGR2RGB)
img = predict(img)
img=cv2.cvtColor(img, cv2.COLOR_RGB2BGR)
img=cv2.resize(img, (1024,768), cv2.INTER_LINEAR)
cv2.imshow('test', img)
cv2.waitKey(0)