
陣列的限制
使用陣列時, 必需先宣告, 如
int []array=new int[10];
a 是一個長度為10個元素的陣列. 一經宣告, 長度就不能改變. 重點在於一開始我們怎麼知道是要宣告為 10, 或 100.
比如要記錄每個客人消費的金額, 打從一開門, 到底是要宣告有幾個客人呢. 因為無法預測, 所以無法定長度.
解決方案
上述的問題, 很明顯的使用陣列是無法解決的, 所以就必需另外想辦法.
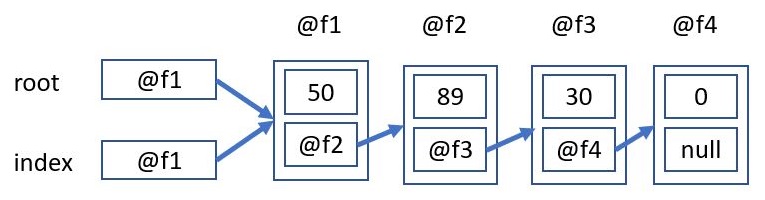
如下圖, 即是資料結構課程裏頂頂有名的單向連結圖. 先產生一個 root及 index, 並產生一個節點 @f1.
當需要記錄某數字, 比如50, 就將 50放入 @f1中, 然後再產生一個節點@f2, 此 @f2記錄在@f1的next變數中. 如果當然後記錄某個數字, 就放入最後的節點, 然後再產生一個新的節點 stand by.
如此就可以無限的擴充長度, 只要記憶體不要爆掉就好. 就算記憶體爆了, 還是可以寫個網路連結的方法, 將別台電腦的記憶體納入自已來使用. Terminator 的 Sky Net 不就是採用這種方式嗎.
程式代碼
上述的每一個節點, 都有二個值, 一個是記錄數字用的, 另一個是記錄下一個節點. 所以節點的自訂資料格式為
class Node{
    int d;
    Node next;
}
上面的Node next, 是說class裏有一個變數, 而這個變數是指向一個新的Node的意思. 完整代碼如下
public class SingleLink {
    public static void main(String[] args){
        Node root=new Node();
        Node index=root;
        Scanner in=new Scanner(System.in);
        int x=0;
        while(true){
            System.out.print("請輸入數字(-1離開) : ");
            x=in.nextInt();
            if(x==-1)break;
            index.d=x;
            index.next=new Node();
            index=index.next;
        }
        index=root;
        while(index.next!=null){
            System.out.printf("%d ", index.d);
            index=index.next;
        }
        System.out.println();
    }
}
class Node{
    int d;
    Node next;
}

結果 :
請輸入數字(-1離開) : 10
請輸入數字(-1離開) : 50
請輸入數字(-1離開) : 60
請輸入數字(-1離開) : 70
請輸入數字(-1離開) : 80
請輸入數字(-1離開) : 90
請輸入數字(-1離開) : -1
10 50 60 70 80 90