
PyTorch 就是一台可以啟動 GPU 進行數學運算的計算機。PyTorch 於 2017 年初由 Facebook 開發的開源深度學習框架,語法簡潔優雅,概念直觀,容易上手,再加上烏俄戰爭無人機廣泛使用 Yolo 進行視覺判辨,遂漸瓜分 Tensorflow 的市場。
要讓 PyTorch 啟動 GPU,需要 nVidia 的 Cuda 及 cudnn 套件,但我們並不需要刻意在系統中安裝 Cuda 及 cudnn,因為在安裝 PyTorch 時,就會自帶安裝最適合的 Cuda/cudnn 到虛擬環境中,系統有沒有安裝 Cuda/cudnn 並不重要。不過為了在 Linux 下啟動 tensorflow GPU,還是建議手動裝一下 Cuda/cudnn
Ubuntu 2404 安裝 PyTorch
在 ubuntu 中,只要裝好顯卡驅動程式,系統不需安裝 Cuda/cudnn。安裝 PyTorch 時就會選取最高的 cu 版本,安裝指令如下如下
pip install torch torchvision torchaudio
Windows 安裝 PyTorch
在 Windows 下安裝 PyTorch 需指定 –index-url 參數,並指定 cu (cuda)版本,如下所示
pip install torch torchvision torchaudio --index-url https://download.pytorch.org/whl/cu130 --no-cache-dir
最新可用的 cu 版本請到官網查看 https://download.pytorch.org/whl/
如果電腦的記憶体只有 16 G 以下,又同時開啟二個專案以上,安裝上面的 Pytorch 時會出現 Memory error例外,甚至當機連滑鼠鍵盤都不會動,加上 “–no-cache-dir” 即可解決。
測試是否有安裝成功,可使用如下指令,如果印出 “True”,表示安裝成功。如果沒有 nVidia 顯卡,就算 torch 安裝 cu 版本,結果還是 False。
import torch
print(torch.cuda.is_available())
結果:
True
基本格式
numpy 的基本格式是 np.array,中文稱”陣列”,資料型態可以為 np.int8, np.int32, np.float32…。
torch 的基本格式為 torch.tensor,中文叫”張量”, 資料型態可以是 torch.int8. int32, float32….。
陣列
np 使用 array 產生 np 陣列,torch 使用 tensor 產生 torch 陣列
import torch
import numpy as np
a=np.array([1,2,3])
print(a)
b=torch.tensor([1,2,3])
print(b)

結果:
[1 2 3]
tensor([1, 2, 3])
一維一元素
一維一元素也是陣列,只不過只有一維,而且只有一個元素。
import torch
import numpy as np
c=np.array([5])
print(c)
print(c[0])
d=torch.tensor([5])
print(d)
print(d[0])

結果:
[5]
5
tensor([5])
tensor(5)
純量
純量只是一個數字,不是陣列,官方又稱為「標量(Scalar)」。上述的一維一元素可以使用 d[0],但下面的純量不可以使用 f[0]。
import torch
import numpy as np
e=np.array(5)
print(e)
f=torch.tensor(5)
print(f)

結果 :
5
tensor(5)
資料型態
整數
不論是 Python、np 或 torch,整數預設為 int64
import torch
import numpy as np
a=np.array([1,2,3])
print(a.dtype)
b=torch.tensor([1,2,3])
print(b.dtype)

結果:
int64
torch.int64
小數
Python 或 np 的小數預設為 float64,但 torch 小數預設為 float32。
import torch
import numpy as np
c=np.array([1.,2,3])
print(c.dtype)
d=torch.tensor([1.,2,3])
print(d.dtype)

結果:
float64
torch.float32
指定型態
torch 跟 np 一樣,可以指定 dtype,也同樣有 int8、int16、int32、int64、float32、float64 等型態
import torch
import numpy as np
e=np.array([1,2,3], dtype=np.int32)
print(e.dtype)
f=np.array([1,2,3], dtype=np.float64)
print(f.dtype)

結果:
int32
float64
todo
啟用GPU
為了偵測是否有GPU,需先設定 deive
device = torch.device("cuda:0" if torch.cuda.is_available() else "cpu")
然後在產生 tensor 時,使用 device 參數宣告要儲存在 GPU 中,那麼以後的計算都會由 GPU 執行。
device = torch.device("cuda:0" if torch.cuda.is_available() else "cpu")
array=torch.zeros([2,batch], dtype=torch.float32, device=device)
請注意,如果 x 是 GPU 裏的變數,那麼只要跟 x 有關的變數,也都會自動變成 GPU 變數。
如下代碼中,y 並未指定 device=”cuda:0″,但列印出來的結果還是 GPU 的變數
import torch as tc
x=tc.linspace(0,10,10, device='cuda:0')
y=x.square()
print("x: ", x)
print("y :", y)
結果 :
x:  tensor([ 0.0000,  1.1111,  2.2222,  3.3333,  4.4444,  5.5556,  6.6667,  7.7778,
         8.8889, 10.0000], device='cuda:0')
y : tensor([  0.0000,   1.2346,   4.9383,  11.1111,  19.7531,  30.8642,  44.4444,
         60.4938,  79.0124, 100.0000], device='cuda:0')
移入移出 GPU
torch 變數如果儲在 RAM 中,可以使用 .cuda() 移入 VRAM(Video RAM),亦可使用 .cpu() 再次由 VRAM 中移到 RAM。
import torch
x=torch.tensor([1,2,3,4,5])
print(x)
x=x.cuda()
print(x)
x=x.cpu()
print(x)


結果:
tensor([1, 2, 3, 4, 5])
tensor([1, 2, 3, 4, 5], device='cuda:0')
tensor([1, 2, 3, 4, 5])
但建議使用如下
x = x.to("cuda:0", dtype=torch.float16)
因為.to() 可以改變型態,但 .cuda() 無法變更。
torch.Tensor()
資料型態為 torch.float32,參數只能是陣列,而且不可以指定 dtype。
import torch
a=torch.Tensor([1,2,3])
print(a)
結果:
tensor([1., 2., 3.])
torch.FloatTensor()
跟 torch.Tensor([]) 一模一樣,型態為 float32。
import torch
a=torch.Tensor([2,10])
b=torch.FloatTensor([2,10])
print(a)
print(b)

結果:
tensor([ 2., 10.])
tensor([ 2., 10.])
但如果是 torch.FloatTensor(2, 10),則是產生 2*10 二維的陣列,裏面預設值為 0,但卻有小數點誤差的問題,所以不常用且建議不要用。一般都會使用 torch.zeros([2,10],dtype=torch.float32)。
c=torch.FloatTensor(2,10)
print(c)

結果 :
tensor([[8.7244e-39, 9.2755e-39, 1.0653e-38, 1.0837e-38, 1.0102e-38, 8.4490e-39,
         9.6429e-39, 8.4490e-39, 9.6429e-39, 9.2755e-39],
        [1.0286e-38, 9.0919e-39, 8.9082e-39, 9.2755e-39, 8.4490e-39, 8.9082e-39,
         1.0286e-38, 1.0194e-38, 9.9184e-39, 9.0000e-39]])
torch.DoubleTensor()
資料型態為 torch.float64。
import torch
a=torch.DoubleTensor([1,2,3])
print(a)
結果 :
tensor([1., 2., 3.], dtype=torch.float64)
同樣的,如果參數為 torch.DoubleTensor(2,10),則產生 2*10 的二維陣列。
四則運算
Tensor 可以作四則運算,包含 +-*/%,不同型態可以相互運算。運算後的結果,為最大的資料型態。
但如果整數/整數,結果是 torch.float32。
import torch
a=torch.tensor([1,2,3], dtype=torch.int32)
b=torch.DoubleTensor([1,2,3])
c=torch.tensor([2,4,5], dtype=torch.int32)
print(a*b)
print(a/c)
結果:
tensor([1., 4., 9.], dtype=torch.float64)
tensor([0.5000, 0.5000, 0.6000])
型態轉換
torch 的型態可以互相轉換,常用的有 .char(), .byte()….,也可以使用 .type(),如下代碼說明
import torch as tc
a=tc.tensor([1., 2., 3.])
print(a.char())#int8
print(a.byte())#uint8
print(a.short())#int16
print(a.int())#int32
print(a.long())#int64
print(a.float())#float32
print(a.double())#float64

print(a.type(tc.int8))
結果 :
tensor([1, 2, 3], dtype=torch.int8)
tensor([1, 2, 3], dtype=torch.uint8)
tensor([1, 2, 3], dtype=torch.int16)
tensor([1, 2, 3], dtype=torch.int32)
tensor([1, 2, 3])
tensor([1., 2., 3.])
tensor([1., 2., 3.], dtype=torch.float64)
tensor([1, 2, 3], dtype=torch.int8)

Process finished with exit code 0
矩陣相乘
矩陣相乘可用 torch.mm(a, b),請注意 a, b 二者必需滿足矩陣相乘的規則,也就是維度的中間必需相同。
比如 [5, 3] * [3,5] ,第一個矩陣維度是 5*3,第二個矩陣維度是 3*5,中間都是 3 才能相乘。
另外請特別注意,二者的型態必需相同。由下面的代碼中,a 變數沒有指定型態時,預設就是 int64。
import torch
a=torch.tensor([[1,2],[3,4],[5,6]])
b=torch.tensor([[1,2,3],[4,5,6]], dtype=torch.int64)
print(torch.mm(a,b))
結果 :
tensor([[ 9, 12, 15],
[19, 26, 33],
[29, 40, 51]])
numpy 互轉
Tensor 轉成 numpy,只需使用 numpy()即可,如下
import torch
a=torch.tensor([[1,2,3],[4,5,6]], dtype=torch.float32)
print(a.numpy())
結果 :
[[1. 2. 3.]
[4. 5. 6.]]
numpy 轉成 Tensor,必需使用 torch.from_numpy()
import torch
import numpy as np
a=np.array([[1,2,3],[4,5,6]], dtype=np.float64)
b=torch.from_numpy((a))
print(b)
結果 :
tensor([[1., 2., 3.],
[4., 5., 6.]], dtype=torch.float64)
維度
取得 Tensor 的維度,可以 shape 或 size(),二者的結果都是 torch.Size([2,3])。
shape 是 Tensor 的屬性,取得某一維的資料需使用 shape[index]。
size() 是 Tensor 裏的方法,取得某一維的資料需使用 size(index)
import torch
a=torch.tensor([[1,2,3],[4,5,6]], dtype=torch.float64)
print(a.shape, a.shape[0])
print(a.size(), a.size(0))
結果 :
torch.Size([2, 3]) 2
torch.Size([2, 3]) 2
陣列工具
產生陣列的工具有 torch.zeros(),torch.ones(),torch.rand(),torch.randn()。
每個工具中的 shape 可以是多參數、list 或是 tuple
import torch
a=torch.zeros(2,5)#多參數
print(a)
b=torch.zeros([2,5])#list
print(b)
c=torch.zeros((2,5))#tuple
print(c)
結果:
tensor([[0., 0., 0., 0., 0.],
[0., 0., 0., 0., 0.]])
tensor([[0., 0., 0., 0., 0.],
[0., 0., 0., 0., 0.]])
tensor([[0., 0., 0., 0., 0.],
[0., 0., 0., 0., 0.]])
torch.randint
randint 會產生整數亂數,參數如下 troch.randint(最低,最高, [維度])
import torch
a=torch.randint(0, 100, [10])
print(a)
結果 :
tensor([50, 46, 12, 75, 19, 45, 62, 91, 91, 86])
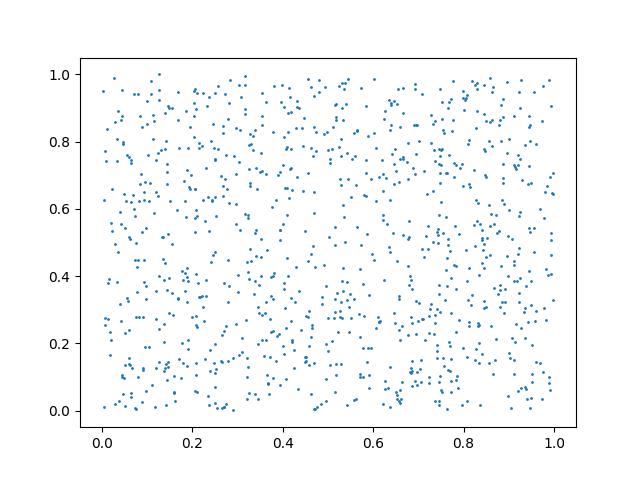
torch.rand
產生平均分佈亂數,其值介於 0~1之間
import torch
import pylab as plt
a=torch.rand(2,1000)
plt.scatter(a[0,:], a[1,:], s=1)
plt.show()
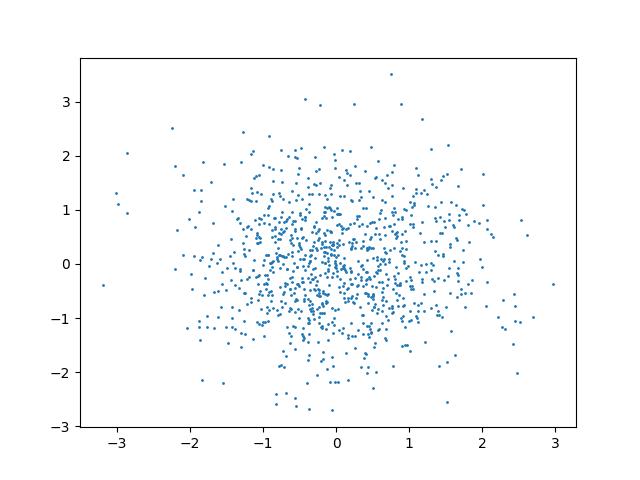
torch.randn
torch.randn 是標準常態分佈,接近 0 的地方機率愈大。
import torch
import pylab as plt
a=torch.randn(2,1000)
plt.scatter(a[0,:], a[1,:], s=1)
plt.show()
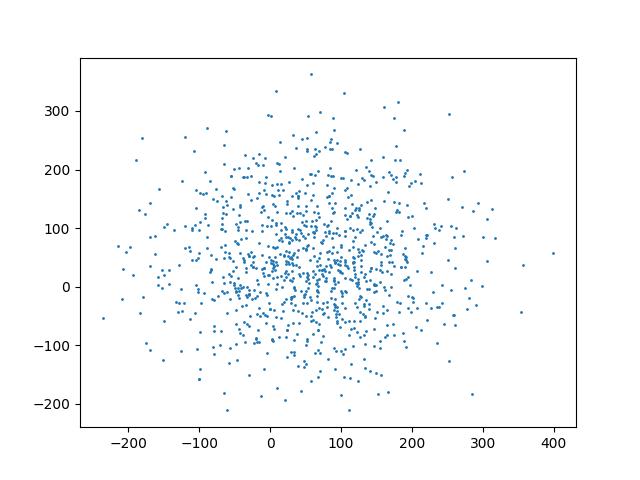
torch.normal
torch.normal (平均值, 標準差, shape) 同 torch.randn,但可以更改中心值及變異數的正負範圍。
底下的代碼中,接近 50 的幾率最大,左右二邊的邊界是 -150 及 150。
import torch
import pylab as plt
a=torch.normal(50,100,(2,1000))
plt.scatter(a[0, :], a[1, :], s=1)
plt.show()
torch.linspace
同 np.linspace(起始值, 結束值, 切割數)
import torch
a=torch.linspace(0,10,10)
print(a)
結果 :
tensor([ 0.0000, 1.1111, 2.2222, 3.3333, 4.4444, 5.5556, 6.6667, 7.7778,
8.8889, 10.0000])
torch.arange
同 np.arange(起始值, 結束值, 步進值),其值可以是浮點數,但最後不包含結束值。
import torch
a=torch.arange(0,5,0.1)
print(a)
結果 :
tensor([0.0000, 0.1000, 0.2000, 0.3000, 0.4000, 0.5000, 0.6000, 0.7000, 0.8000,
0.9000, 1.0000, 1.1000, 1.2000, 1.3000, 1.4000, 1.5000, 1.6000, 1.7000,
1.8000, 1.9000, 2.0000, 2.1000, 2.2000, 2.3000, 2.4000, 2.5000, 2.6000,
2.7000, 2.8000, 2.9000, 3.0000, 3.1000, 3.2000, 3.3000, 3.4000, 3.5000,
3.6000, 3.7000, 3.8000, 3.9000, 4.0000, 4.1000, 4.2000, 4.3000, 4.4000,
4.5000, 4.6000, 4.7000, 4.8000, 4.9000])
平均數及標準差
計算平均數,注意要計算的數值必需是小數(float32, float64)。
import torch
a=torch.randint(0, 100, [10], dtype=torch.float32)
print(a)
print(f'平均數 : {torch.mean(a)}, {a.mean()}')
print(f'標準差 : {torch.std(a)}, {a.std()}')

結果 :
tensor([27., 48., 87., 74.,  4., 60., 97., 94., 50., 43.])
平均數 : 58.400001525878906
標準差 : 30.152206420898438