
insightface 是目前公認人臉辨識準確度最高的套件之一,支援 GPU 硬体加速,據官方說法準確度可達 99.8%。
安裝 Visual Studio
如果是 Linux 系統可以忽略此步驟。
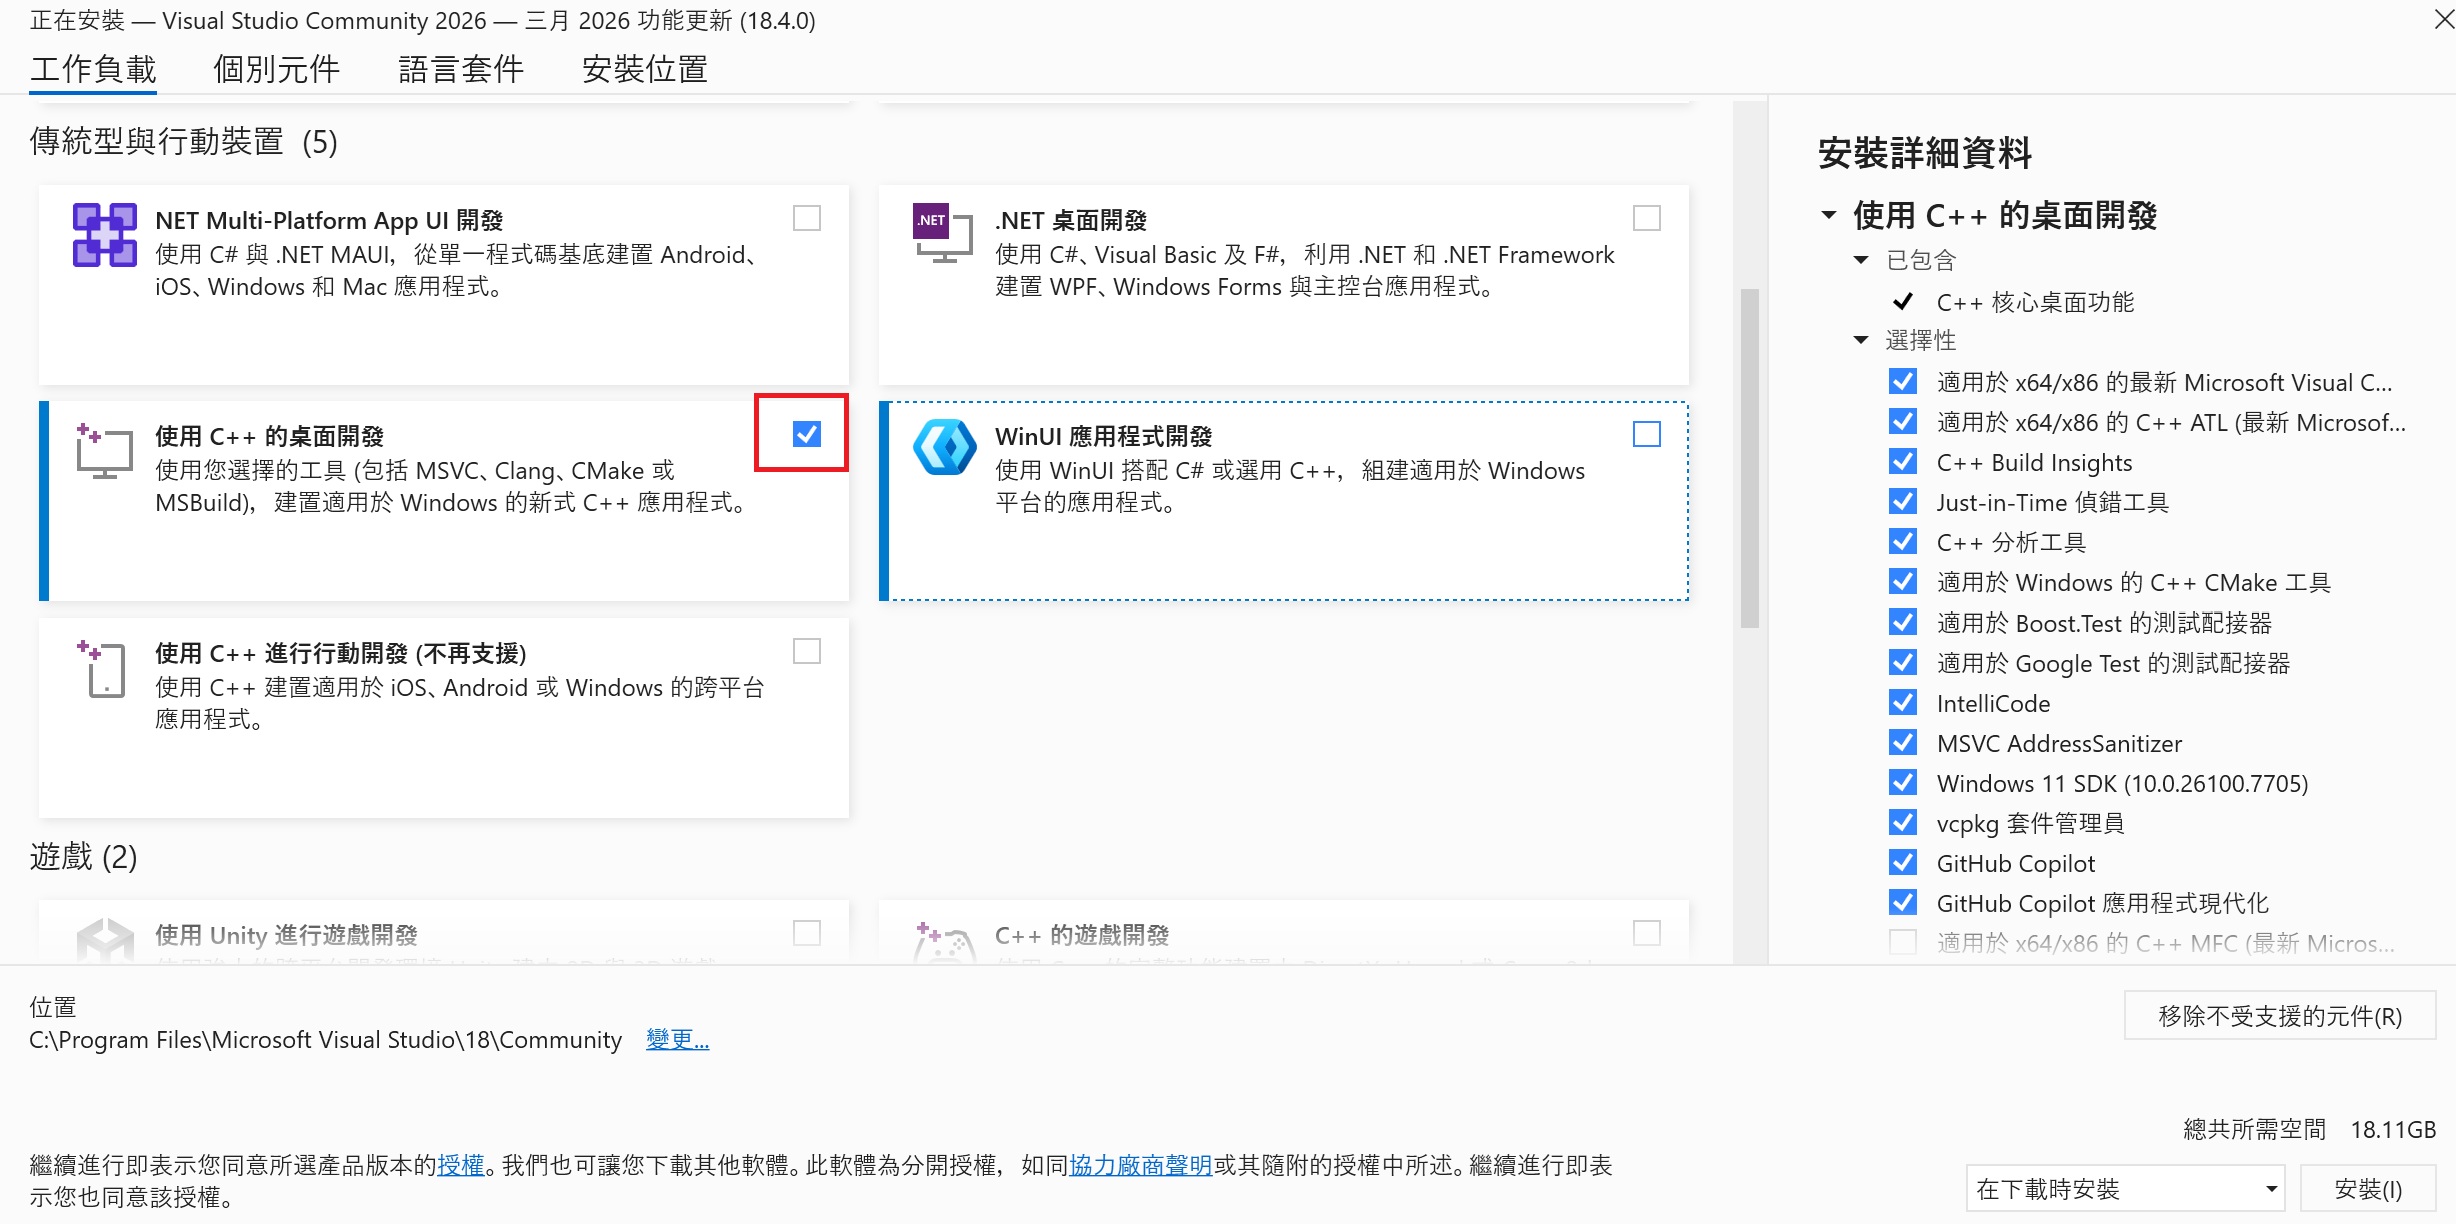
若是 Windows 系統,需先安裝編譯 insightface 時所需要的 Visual Studio「C++ 桌面開發」函數庫。請由 https://visualstudio.microsoft.com/zh-hant/free-developer-offers/ 下載 Visual Studio Community。
安裝時把「使用 C++ 的桌面開發」打勾,然後開始下載安裝, 安裝大小有18G 左右,請耐心下等待。
安裝套件
使用如下指令安裝套件
pip install insightface onnxruntime-gpu #有顯示卡
# pip install insightface onnxruntime #無顯示卡
pip install opencv-python matplotlib mysql-connector-python
人臉偵測
底下是多人臉辨識完整代碼,如果有顯卡,ctx_id 指定要使用的顯卡,編號由 0 開始。若沒顯卡,或不想使用顯卡,編號為 -1。
import insightface
import time
from cv import cv
import cv2
import pylab as plt
img=cv.read("a.jpg")
model = insightface.app.FaceAnalysis()
model.prepare(ctx_id=0) #使用GPU 0

t1=time.time()
faces = model.get(img)
t2=time.time()
print(f"花費時間 : {t2-t1}秒")
for face in faces:
    x1, y1, x2, y2 = face.bbox.astype(int)
    img=cv2.rectangle(img, (x1, y1), (x2, y2), (0, 255, 0), 2, cv2.LINE_AA)
plt.imshow(img[..., ::-1].copy())
plt.axis("off")
plt.show()
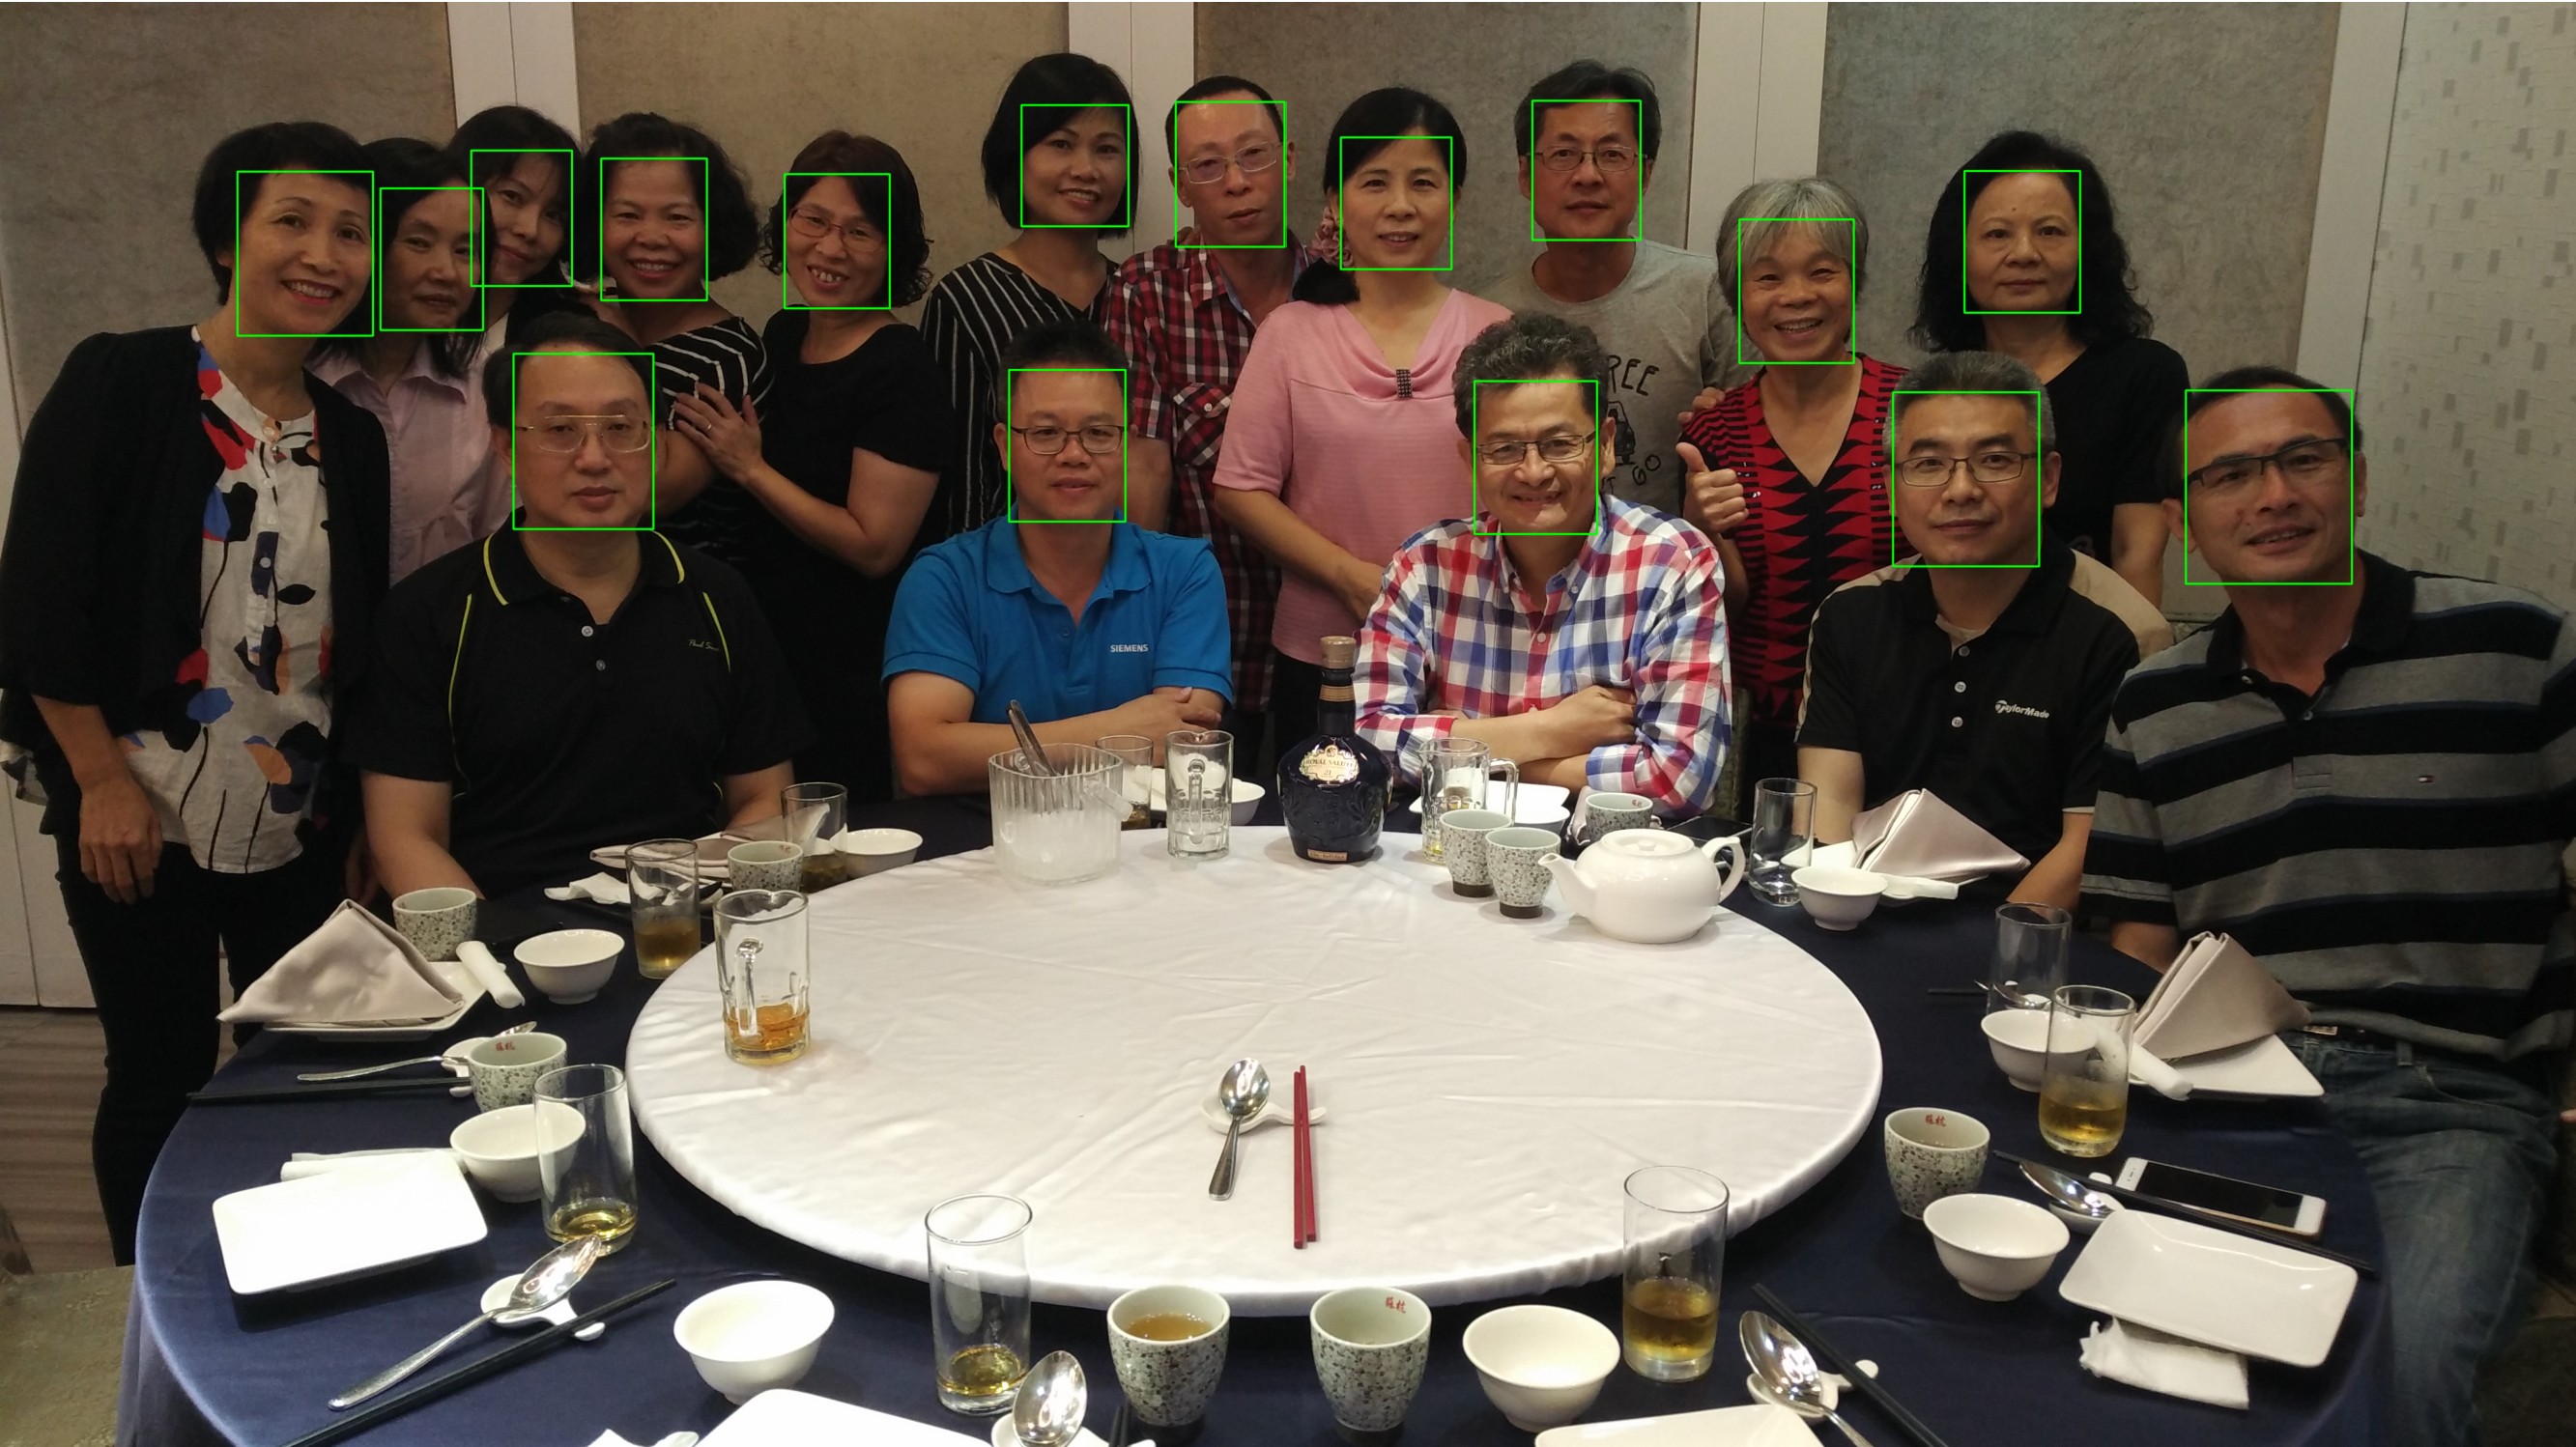
上述如果 ctx_id = -1 約 2 秒多。若使用 RTX 3080 Ti,ctx_id = 0 只需 0.7 秒。
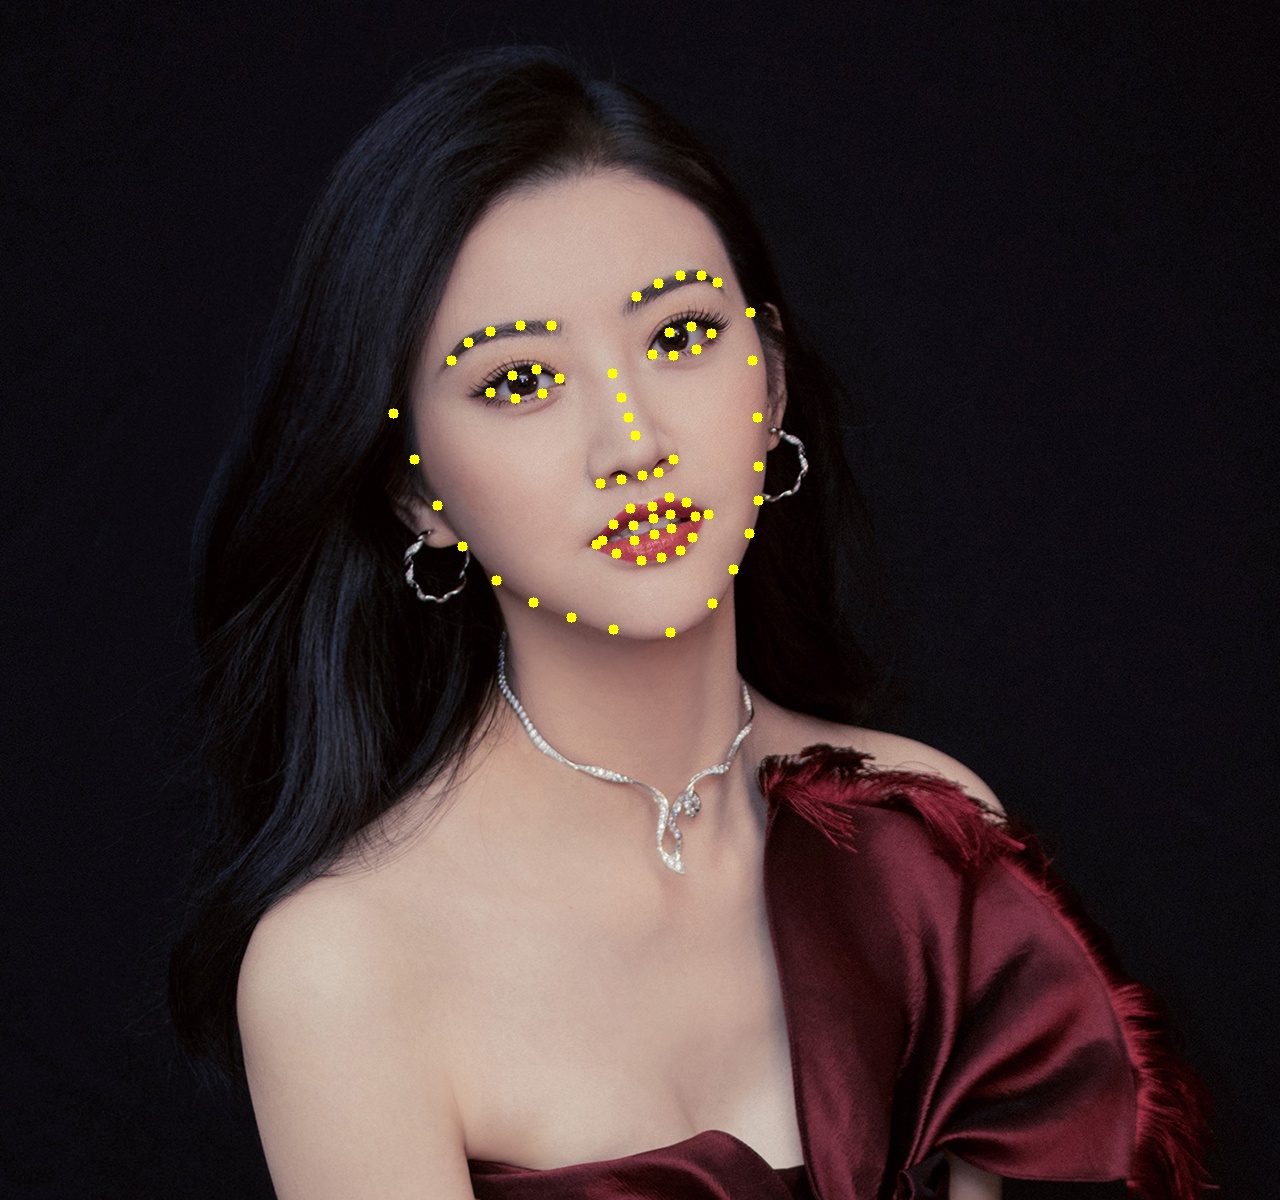
68 特徵點 landmark
landmark 又稱為臉部特徵點,共有 68 個臉部特徵座標點,主要用途作為人臉對齊、表情分析、臉部幾何分析。68 特徵點的位置如下所示。
0–16   下巴輪廓
17–21  左眉毛
22–26  右眉毛
27–30  鼻樑
31–35  鼻子
36–41  左眼
42–47  右眼
48–59  嘴巴外圈
60–67  嘴巴內圈
請下載如下圖片至專案中

使用如下代碼將 68 個特徵點列出。FaceAnalysis 需載入 buffalo_1 模型,第一次執行會連網下載模型到C:\Users\mahal\.insightface\models 之下。
import time
import insightface
from cv import cv
import cv2
import pylab as plt
import cv2
from insightface.app import FaceAnalysis

img=cv.read("景甜.jpg")
app = FaceAnalysis(name="buffalo_l")  # 模型支援68 landmarks
app.prepare(ctx_id=0, det_size=(640,640))
faces = app.get(img)

for face in faces:
    print("5 keypoints:", face.kps)
    print("68 landmarks shape:", face.landmark_3d_68.shape)
    print("68 landmarks shape:", face.landmark_3d_68)
    for x, y,_ in face.landmark_3d_68:
        cv2.circle(img, (int(x), int(y)), 5, (0, 255, 255), -1)
#cv.write(img, "特徵.jpg")
plt.imshow(img[...,::-1].copy())
plt.axis('off')
plt.show()
結果如下
線性代數
在一個二維的平面上,一條線的方程式為 ax+by=c (一階方程式)。所以在三維的立体空間中,一條線的方程式為 ax+by+cz=d。x, y, z代表三個維度的軸。
那麼在n維度的空間中,一條線的方程式為 $(a_{1}x_{1}+a_{2}x_{2}+a_{3}x_{3}+….=k)$
四維
空間明明就只有 x(左右)、y(前後)、z(上下) 三個方向,也就是所謂的三度(Dimension)空間。那為什麼還要多一個莫名奇妙的四維空間呢 ? 第四維是什麼?
但很多不懂數學或物理的人,發明了四度空間這個名詞。在這邊要修正一下,空間就只有 x、y、z 三度空間,沒有四度空間。
四維是只加入另一項條件,比如加入時間這個條件。當在第1秒時,位置位於(1,1,1), 而在第二秒時位置位於(1, 1, 2),那麼二者的距離單位就不是公尺,而是速度(m/s)。因此當人類跨入四維時,就能感受到移動的速度。
歐幾里得直線距離
歐幾里得距離就是二點之間的直線距離, 源自於歐幾里得空間計算演算法。
二維空間的歐氏距離公式
$(\rho =\sqrt{{(x_{2}-x_{1})}^{2}+(y_{2}-y_{1})^{2}})$ , ρ為點(x2, y2)與點(x1, y1)之間的歐幾里得距離
三維空間的歐幾里得距離公式
$(\rho =\sqrt{{(x_{2}-x_{1})}^{2}+(y_{2}-y_{1})^{2}+(z_{2}-z_{1})^{2}})$
n維空間的歐幾里得距離公式
$(\rho =\sqrt{{(x_{1}-y_{1})}^{2}+(x_{2}-y_{2})^{2}+…+(x_{n}-y_{n})^{2}} = \sqrt{\sum_{i=1}^{n}(x_{i}-y_{i})^{2}})$
np.linalg.norm
numpy 的 lin 即為線性的意思,alg即為代數,norm則是求得 n 維空間的歐幾里得距離,又稱為範數。比如在四維中,有一點的座標為 [1,1,1,1] ,另一點的座標為 [1,2,3,4],則二點的直線距離則為
$(\sqrt{(1-1)^{2}+(2-1)^{2}+(3-1)^{2}+(4-1)^{2})}=\sqrt{1+4+9}=\sqrt{14}=3.7416573867739413)$
這麼複雜的算式,可以用 np.linalg.norm()來計算
import numpy as np
a=np.array([1, 1, 1, 1])
b=np.array([1, 2, 3, 4])
c=np.linalg.norm(b-a)
print(c)
結果 :
3.7416573867739413
特徵向量 embedding
dlib 使用 ResNet 深度神經網路 將人臉計算成 128 維向量,在 dlib 中稱為 描述子(descriptor),其實就是人臉的特徵向量(embedding),用來表示這張臉的特徵。比對時,通常使用歐幾里得距離找到最相似的人,整體準確率約 99.3%。
InsightFace 則使用 ArcFace 深度卷積神經網路(CNN)計算 512 維向量作為人臉特徵向量,計算流程為
圖片 → 人臉偵測 → 人臉對齊 → CNN 網路 → embedding
由於 ArcFace 模型使用了更大規模的訓練資料,512 維 embedding 通常比 128 維描述子更準確。insightface 官網建議使用 cosine similarity 計算比對二張臉的相似度,分數愈高代表可能是同一個人。
score=np.dot(test_embedding, embed) / (cv2.norm(test_embedding)*cv2.norm(embed))
產生的分數可能性如下
0.8~1.0 → 同一個人
0.5~0.7 → 可能
<0.4 → 不同人
人臉辨識專案
請下載 face.zip,解開後將 test、train 置於專案之下。底下代碼先計算 ./train 每張圖片的特徵向量並存於 embeddings 變數中,然後取得 ./test 的一張人臉計算特徵向量,再與 embeddings 中的資料逐筆比對。
import os
from cv import cv
import cv2
import pylab as plt
import cv2
from insightface.app import FaceAnalysis
import numpy as np
app = FaceAnalysis(name="buffalo_l")  # 模型支援68 landmarks
app.prepare(ctx_id=0, det_size=(640,640))
embeddings=[]
names=[]

path="./train"
for file in os.listdir(path):
    names.append(file.split(".")[0].split("_")[0])
    img=cv.read(os.path.join(path,file))
    faces = app.get(img)
    e=faces[0].embedding
    embeddings.append(e/np.linalg.norm(e))
path="./test"
for file in os.listdir(path):
    img=cv.read(os.path.join(path,file))
    faces = app.get(img)

    #cosine similarity
    embedding=faces[0].embedding/np.linalg.norm(faces[0].embedding)
    scores=embeddings @ embedding
    idx=np.argmax(scores)
    score=scores[idx]
    name=names[idx]
    if score <=0.4 : name="查無此人"
    print(f"{file} : {name},{score:.6f}")

結果 :
劉亦菲_1.jpg : 劉亦菲,0.532001
劉亦菲_2.jpg : 劉亦菲,0.688530
劉亦菲_3.jpg : 劉亦菲,0.590871
劉浩存_1.jpg : 劉浩存,0.750559
唐嫣_1.jpg : 唐嫣,0.486599
唐嫣_2.jpg : 唐嫣,0.553667
唐嫣_3.jpg : 唐嫣,0.534827
景甜_1.jpg : 景甜,0.522782
景甜_2.jpg : 景甜,0.721469
景甜_3.jpg : 景甜,0.621045
李小冉_1.jpg : 李小冉,0.559545
李小冉_2.jpg : 李小冉,0.496194
李小冉_3.jpg : 李小冉,0.493204
李沁_1.png : 李沁,0.498419
柳岩_1.jpg : 柳岩,0.698833
楊冪_1.jpg : 楊冪,0.571157
田馥甄_1.jpg : 田馥甄,0.524016
虞書欣_1.jpg : 虞書欣,0.466840
虞書欣_2.jpg : 虞書欣,0.505071
虞書欣_3.jpg : 虞書欣,0.434246
許茹芸_1.jpg : 許茹芸,0.546798
趙麗穎_1.jpg : 趙麗穎,0.599677
辛芷蕾_1.jpg : 辛芷蕾,0.616558
辛芷蕾_2.jpg : 辛芷蕾,0.598436
辛芷蕾_3.jpg : 辛芷蕾,0.542310
辛芷蕾_4.jpg : 辛芷蕾,0.676726
陳喬恩_1.jpg : 陳喬恩,0.483464
陳映彤_1.jpg : 陳映彤,0.572368
embeddings @ embedding 等同 np.dot(embeddings, embedding),也就是求算矩陣的內積。
向量正規化
上述代碼出現
embedding=faces[0].embedding/np.linalg.norm(faces[0].embedding),
為什麼還要除以 np.linalg.norm(faces[0].embedding)?
這個稱為向量正規化,512 個向量都除以向量長度總合後,可以讓正規化後的所有向量長度總合變成 1,這樣可以讓 threshold 比較好設定。
比如
    e=faces[0].embedding
    print(np.linalg.norm(e))

    結果 : 長度總合為 19.58334
正規化後
    e=e/np.linalg.norm(e)
    print(np.linalg.norm(e))

    結果 : 長度總合為 1
np.dot
為什麼矩陣內積可以成為評分分數呢,請耐心思考底下的說明。
降低維度
原本是 [3,4] 維度,乘上 [4,1] 維度,就會變成 [3,1] 維度
$(\begin{bmatrix}
1 & 1 & 1 & 1\\
2 & 2 & 2 &2\\
3 & 3 & 3 &3\\
\end{bmatrix}*\begin{bmatrix}
1 \\
2 \\
3 \\
4 \\
\end{bmatrix}=\begin{bmatrix}
1*1+1*2+1*3 + 1*4 \\
2*1+2*2+2*3 +2*4 \\
3*1+3*2+3*3 + 3*4 \\
\end{bmatrix}=\begin{bmatrix}
10 \\
20 \\
30 \\
\end{bmatrix})$
平方總合為 1
上述的特徵向量經過向量正規化了,總長度為 1 。
所以若跟另一個相同的數字相乘,結果就是 1。每維數字愈相近,相乘總合就會愈接近 1,所以可由這觀念計算分數。
代碼
下面 a、b、c 三個 list 的平方總合都是 1
import numpy as np

a=[0.80067053,0.23724876,0.55012701]
print("a 的長度 : ",np.linalg.norm(a))

b=[0.07254064,0.66784015,0.74076136]
print("b 的長度 : ",np.linalg.norm(b))

c=[0.92561731,0.36374998,0.10449183]
print("c 的長度 : ",np.linalg.norm(c))
跟相同的 list 相乘就會等於 1,跟不同的數字相乘就會小於 1
import numpy as np

a=[0.80067053,0.23724876,0.55012701]
print("a 的長度 : ",np.linalg.norm(a))

b=[0.07254064,0.66784015,0.74076136]
print("b 的長度 : ",np.linalg.norm(b))

c=[0.92561731,0.36374998,0.10449183]
print("c 的長度 : ",np.linalg.norm(c))

es=np.array([a,b,c])

print(es@a)
print(es@b)
print(es@c)

結果 :
a 的長度 :  0.9999999994317793
b 的長度 :  1.0000000014363408
c 的長度 :  0.9999999975291927
[1.         0.62403823 0.88489751]
[0.62403823 1.         0.38747522]
[0.88489751 0.38747522 1.        ]
$(\begin{bmatrix}
0.80067053&0.23724876&0.55012701\\
0.07254064&0.66784015&0.74076136\\
0.92561731&0.36374998&0.10449183\\
\end{bmatrix}*\begin{bmatrix}
0.80067053\\
0.23724876\\
0.55012701\\
\end{bmatrix}=\begin{bmatrix}
1\\
0.62403823\\
0.88489751\\
\end{bmatrix})$
$(\begin{bmatrix}
0.80067053&0.23724876&0.55012701\\
0.07254064&0.66784015&0.74076136\\
0.92561731&0.36374998&0.10449183\\
\end{bmatrix}*\begin{bmatrix}
0.07254064\\
0.66784015\\
0.74076136\\
\end{bmatrix}=\begin{bmatrix}
0.62403823\\
1\\
0.38747522\\
\end{bmatrix})$
$(\begin{bmatrix}
0.80067053&0.23724876&0.55012701\\
0.07254064&0.66784015&0.74076136\\
0.92561731&0.36374998&0.10449183\\
\end{bmatrix}*\begin{bmatrix}
0.92561731\\
0.36374998\\
0.10449183\\
\end{bmatrix}=\begin{bmatrix}
0.88489751\\
0.38747522\\
1\\
\end{bmatrix}
)$
歐幾里得距離
官方建議使用 cosine similarity 計算二張臉的相似度,但其實也可以使用歐幾里得計算二張臉的向量距離,距離愈小,愈接近同一個人,距離若大於 1.2 就可能不是同一個人。不過還是使用 cosine similarity 比較容易設定 threshold。
import os
from cv import cv
import cv2
import pylab as plt
import cv2
from insightface.app import FaceAnalysis
import numpy as np
app = FaceAnalysis(name="buffalo_l")  # 模型支援68 landmarks
app.prepare(ctx_id=0, det_size=(640,640))
embeddings=[]
names=[]

path="./train"
for file in os.listdir(path):
    name=file.split(".")[0].split("_")[0]
    img=cv.read(os.path.join(path,file))
    faces = app.get(img)
    names.append(name)
    embedding=faces[0].embedding/np.linalg.norm(faces[0].embedding)
    embeddings.append(embedding)
print(embeddings)
path="./test"
for file in os.listdir(path):
    img=cv.read(os.path.join(path,file))
    faces = app.get(img)

    #歐幾里得距離
    embedding=faces[0].embedding/np.linalg.norm(faces[0].embedding)
    dist=np.linalg.norm(embeddings - embedding, axis=1)
    idx=np.argmin(dist)
    score=dist[idx]
    name=names[idx]
    if score >= 1.2 : name="查無此人"
    print(f"{file} : {name},{score:.6f}")
特徵向量寫入資料庫
如果要訓練的人臉很多,就會花費很多時間,所以把訓練好的特徵向量寫入資料庫,是一個很好的方法。特徵向量有 512 個 float32 數字,需使用 .tobyte() 轉成 btye 資料,再寫入 blob 欄位。
import os
from cv import cv
import cv2
import pylab as plt
import cv2
from insightface.app import FaceAnalysis
import numpy as np
import mysql.connector as mysql

conn=mysql.connect(host="localhost",user="帳號",password="密碼",database="cloud")
cursor=conn.cursor()
cursor.execute("truncate table 人臉辨識")
cmd="insert into 人臉辨識 (姓名,embedding) values (%s,%s)"

app = FaceAnalysis(name="buffalo_l")  # 模型支援68 landmarks
app.prepare(ctx_id=0, det_size=(640,640))

path="./train"

#一筆一筆寫入資料庫
for file in os.listdir(path):
    name=file.split(".")[0].split("_")[0]
    img=cv.read(os.path.join(path,file))
    faces = app.get(img)
    embedding=faces[0].embedding/np.linalg.norm(faces[0].embedding)
    data=(name,embedding.tobytes())
    cursor.execute(cmd,data)
    conn.commit()
conn.close()

# #一次寫入資料庫
# datas=[]
# for file in os.listdir(path):
#     name=file.split(".")[0].split("_")[0]
#     img=cv.read(os.path.join(path,file))
#     faces = app.get(img)
#     embedding=faces[0].embedding/np.linalg.norm(faces[0].embedding)
#     datas.append((name, embedding.tobytes()))
# cmd="insert into 人臉辨識 (姓名,embedding) values (%s,%s)"
# cursor.executemany(cmd,datas)
# conn.commit()
# conn.close()
讀取資料庫特徵向量
自資料表讀取特徵向量,需使用 np.frombuffer 把 blob 欄位轉成 float32 格式。
讀取後的特徵向量就可以跟新圖片進行人臉辨識。
import os
from cv import cv
import cv2
import pylab as plt
import cv2
from insightface.app import FaceAnalysis
import numpy as np
import mysql.connector as mysql
conn=mysql.connect(host="localhost",user="帳號",password="密碼",database="cloud")
cursor=conn.cursor()
cmd="select 姓名, embedding from 人臉辨識"
cursor.execute(cmd)
rs=cursor.fetchall()
names=[]
embeddings=[]
for r in rs:
    names.append(r[0])
    embeddings.append(np.frombuffer(r[1], dtype=np.float32))
conn.close()
app = FaceAnalysis(name="buffalo_l")  # 模型支援68 landmarks
app.prepare(ctx_id=0, det_size=(640,640))

path="./test"
for file in os.listdir(path):
    img=cv.read(os.path.join(path,file))
    faces = app.get(img)
    embedding=faces[0].embedding/np.linalg.norm(faces[0].embedding)
    scores=embeddings @ embedding
    score=np.max(scores)
    name=names[np.argmax(scores)]
    if score <= 0.4 : name="查無此人"
    print(f"{file} : {name},{score:.6f}")