
早期 dlib 是常見的人臉辨識套件,但現今已停止維護,再加上新版 cmake 編譯出支援 GPU 的函數庫,所以不建議使用,本篇僅作記錄用。
dlib Windows系統
dlib 使用 C++ 編寫,應用在機器學習、影像處理以及影像辨識等功能。此套件為 Open Source 且 free ,license 基於 BSD 授權條款。安裝 dlib 套件時是下載原始檔,必需經過編譯才能使用。所以在 Windows 需安裝 cmake 及 Visual Studio 2022 c++桌面開發。
2024/09/01 實際測試,dlib 可以在 Python 3.12.6/Cuda 12.6 正常執行,而且在 Windows10 及 ubunt 24.04 皆沒問題。
CMake : https://cmake.org/download/
Cmake 只有 3.24 版本可以正確編譯,3.25/3.26/3.27皆無法編譯出 GPU 版本。請注意 CMake安裝完後 Pycharm 需退出重新執行。
Visual Studio 2019/2022 : 工具/取得工具與功能, 需安裝 使用 C++的桌面開發,注意一定要使用 VS2019 或 VS2022的版本。VS2020 好像無法編譯出 GPU的版本。

Ubuntu
sudo apt-get install cmake python3-pip
安裝套件
dlib 自 19.21.0 版開始,不論在 Windows 或 Linux , 只要有安裝 Cuda/cudnn,直接使用如下指令即可編出支援 GPU 的 Dlib 版本。
pip install dlib --no-cache-dir
測試 GPU
測試是否支援 GPU 的代碼如下
import dlib
print(dlib.DLIB_USE_CUDA)
print(dlib.cuda.get_num_devices())
結果 :
True
1
上述結果如果為 True,表示能啟動 GPU 執行
如果 Cmake 或 VS 版本錯誤,卻又安裝了 dlib,則需先移除 Cmake 及 VS ,改裝正確版本。
然後重裝 dlib 時,又會使用 Python cache 安裝先前 dlib 錯誤版本。所以在 PyCharm 重新安裝 dlib 時,要執行如下指令
pip uninstall dlib
pip install dlib --no-cache-dir
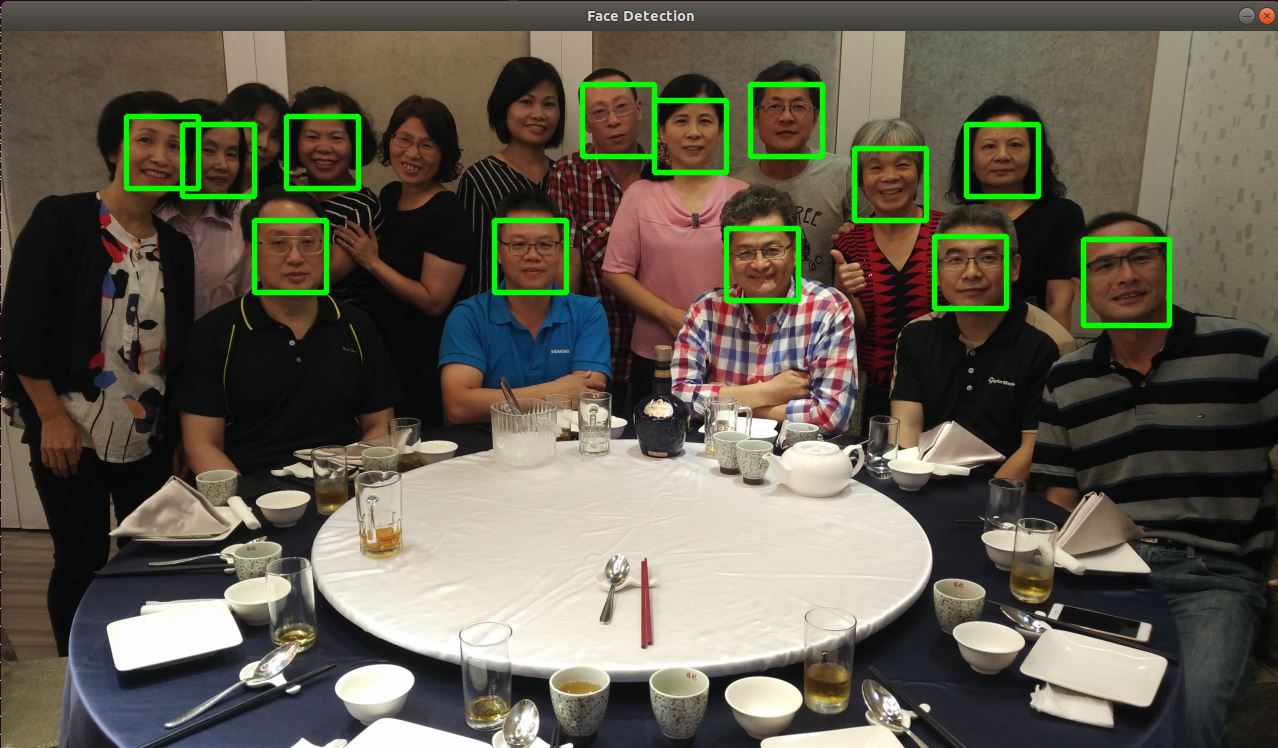
Python程式碼
讀取圖片後丟給 dlib.get_frontal_face_detector 人臉偵測器(detector),即會傳回相關人臉的資訊。
detector 函數的第二個參數是指定反取樣 (unsample) 次數,預設值為 0。如果圖片太小,可將其設高一點以提高偵測精準度,當然也較耗時間。
圖檔解析度愈高當然愈精準,但更加耗時。若縮小圖片再偵測,速度較快但較不精準。此時就可以考慮提高反取樣參數。
detector 傳回的人臉資訊為 dlib.rectangle 資料結構, 如
[(256,61) (654,100)]
此結構分別是左上角座標及右下角座標, 可以用 left(), right() 等函數分別取出
import cv2
import dlib
import numpy as np
def resize(src, w=None, h=None, scale=1):
    if w is None or h is None:
        h, w = src.shape[:2]
        w = int(w * scale)
        h = int(h * scale)
    dst = cv2.resize(src, (w, h), interpolation=cv2.INTER_LINEAR)
    return dst
img=cv2.imdecode(np.fromfile('face4.jpg', dtype=np.uint8), cv2.IMREAD_COLOR)
img=resize(img, scale=0.2)
detector = dlib.get_frontal_face_detector()
faces=detector(img, 1)
for f in faces:
    x1=f.left()
    y1=f.top()
    x2=f.right()
    y2=f.bottom()
    img=cv2.rectangle(img, (x1, y1), (x2, y2), (0,255,0), 2, cv2.LINE_AA)
cv2.imshow("Image", img)
cv2.waitKey(0)
cv2.destroyAllWindows()
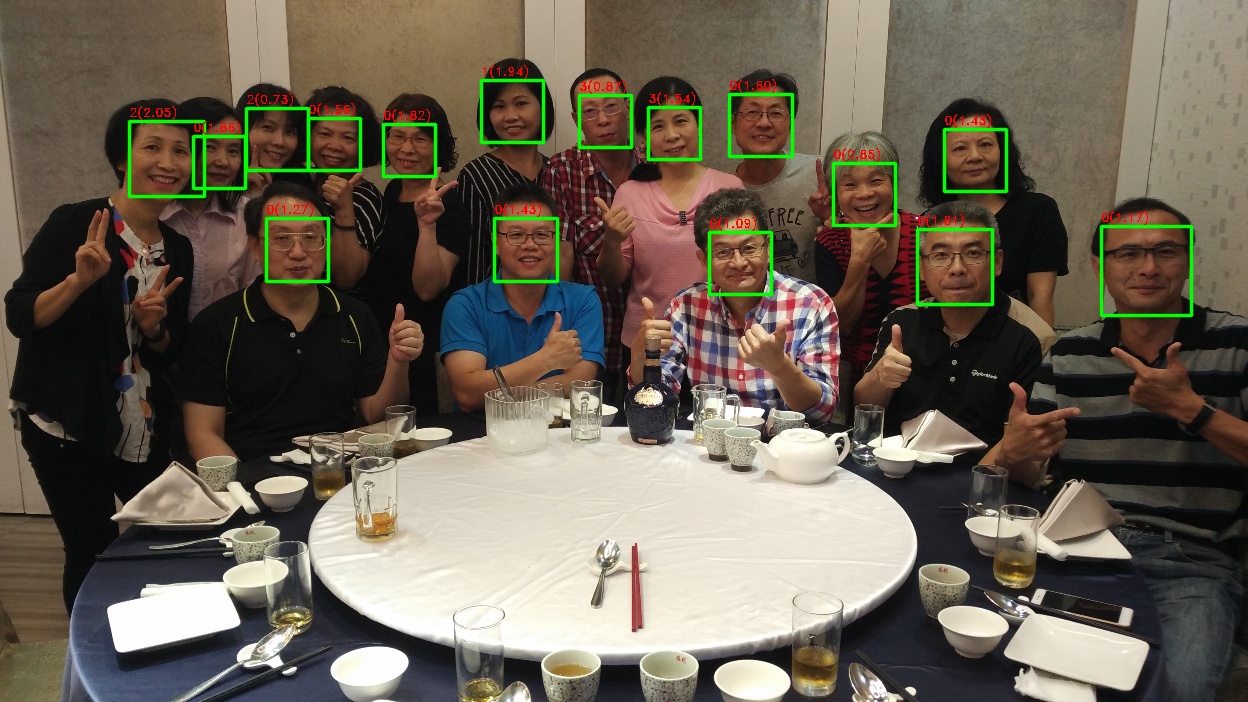
偵測分數
dlib 人臉偵測演算法使用方向梯度直方圖(HOG) 的特徵, 加上線性分類器(linear classifier)、影像金字塔(image pyramid) 與滑動窗格 (sliding window) 計算出來。演算的結果會有一個分數,此分數愈大,表示愈接近人臉。分數愈低表示愈接近誤判。調用 detector.run() 即可取得分數
faces, scores, indexs = detector.run(img, 1, 0.5)
上述第二個參數為反取樣次數,第三個參數為分數的門檻值,要超過 0.5 才會列出。至於返回值 indexs 為子偵測器的編號,用來判斷人臉的方向,詳細說明請看官網
完整代碼如下
import cv2
import dlib
def resize(src, w=None, h=None, scale=1):
    if w is None or h is None:
        h, w = src.shape[:2]
        w = int(w * scale)
        h = int(h * scale)
    dst = cv2.resize(src, (w, h), interpolation=cv2.INTER_LINEAR)
    return dst
img=cv2.imdecode(np.fromfile('face4.jpg', dtype=np.uint8), cv2.IMREAD_COLOR)
img=resize(img, scale=0.3)
detector = dlib.get_frontal_face_detector()
faces, scores, indexs=detector.run(img, 1, 0.5)
print(faces)
print(scores)
print(indexs)
for i, f in enumerate(faces):
    x1=f.left()
    y1=f.top()
    x2=f.right()
    y2=f.bottom()
    img=cv2.rectangle(img, (x1, y1), (x2, y2), (0,255,0), 2, cv2.LINE_AA)
    text = f"{indexs[i]}({scores[i]:2.2f})"
    cv2.putText(img, text, (x1, y1-5), cv2.FONT_HERSHEY_DUPLEX, 0.4, (0, 0, 255), 1,)
cv2.imshow("Image", img)
cv2.waitKey(0)
cv2.destroyAllWindows()
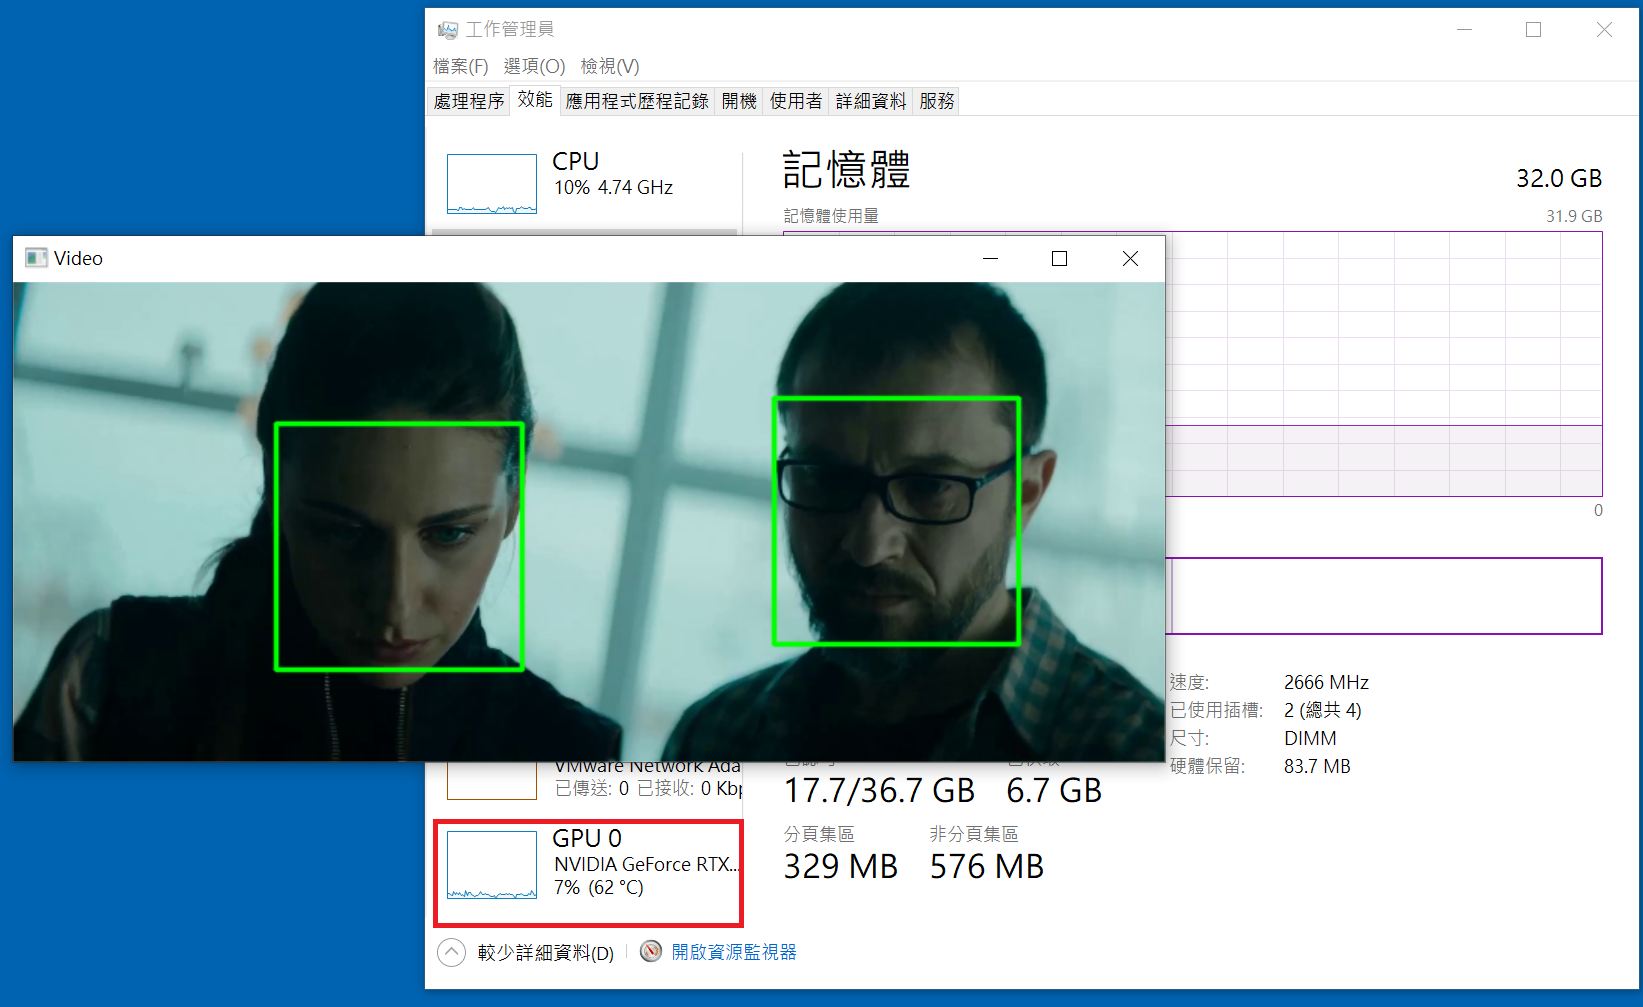
Web Came 人臉偵測 – GPU版
偵測人臉位置的偵測器,使用 dlib.cnn_face_detection_model_v1 卷積神經網路人臉偵測器,此偵測器需載入 mmod_human_face_detector.data 人臉訓練資料。下網址下載 : mmod_human_face_detector.bz2 。下載完後請將 .bz2 檔解壓縮成 .dat 檔
cnn_face_detection_model_v1 比get_frontal_face_detector 更加的精準,且因使用 GPU 運算,就算偵測影片也非常順暢,感覺不到任何延遲,但如果沒有 GPU 的話就論當別論。
import cv2
import dlib
print(dlib.DLIB_USE_CUDA)
print(dlib.cuda.get_num_devices())
cam=cv2.VideoCapture(0)
cam.set(cv2.CAP_PROP_FRAME_WIDTH, 1920)
cam.set(cv2.CAP_PROP_FRAME_HEIGHT, 1080)
#cam.set(cv2.CAP_PROP_POS_MSEC, 900000)
#detector = dlib.get_frontal_face_detector()
detector=dlib.cnn_face_detection_model_v1('mmod_human_face_detector.dat')
while True:
    _,frame=cam.read()
    rate=4
    h, w, _=frame.shape
    x = cv2.resize(
        frame,
        (int(w/rate), int(h/rate)),
        interpolation=cv2.INTER_LINEAR
    )
    faces=detector(x, 1)
    for face in faces:
        f=face.rect
        x1=f.left()*rate
        y1=f.top()*rate
        x2=f.right()*rate
        y2=f.bottom()*rate
        cv2.rectangle(
            frame,
            (x1, y1),
            (x2, y2),
            (0,255,0), 2, cv2.LINE_AA)
    img=cv2.resize(
        frame,
        (1280,720),
        interpolation=cv2.INTER_LINEAR
    )
    cv2.imshow("Face",img)
    key=cv2.waitKey(1)
    if key==ord('q') or key==27:break;
cam.release()
cv2.destroyAllWindows()
安裝套件
pip install dlib opencv-python
辨識流程
1. 首先在FaceBase目錄下, 存放多張人臉照片, 每張照片只能有一個人, 且影像愈清晰愈好, 然後使用此人的名字當作檔名, 副檔名為jpg or png皆可
2. 在主目錄下, 存放其他不同的照片, 檔名可以隨便命名, 比如img1.jpg, img2.jpg
3. 執行python程式, 並輸入要判別的照片檔名, 比如python face.py img1.jpg. 此時就會到FaceBase目錄下把所有照片載入, 再跟img1.jpg裏的人物進行比對, 找到最符合的照片, 然後把圖片檔名標示在img1.jpg裏
訓練模型
人臉外型68個特徵訓練模型
shape_predictor_68_face_landmarks.dat.bz2
ResNet人臉辨識訓練模型,ResNet用於影像辨識深度學習,非常簡潔的網路框架
dlib_face_recognition_resnet_model_v1.dat.bz2
將上面二個下載解開後, 置於跟程式碼同一目錄即可. 這二個訓練模型都是由dlib免費提供的
線性代數
在一個二維的平面上,一條線的方程式為 ax+by=c (一階方程式)。所以在三維的立体空間中,一條線的方程式為 ax+by+cz=d。x, y, z代表三個維度的軸。
那麼在n維度的空間中,一條線的方程式為 $(a_{1}x_{1}+a_{2}x_{2}+a_{3}x_{3}+….=k)$
四維
空間明明就只有 x(左右), y(前後), z(上下)三個方向,也就是所謂的三度(Dimension)空間,每一維度都是公尺這個單位來計算。那為什麼還要多一個莫名奇妙的四維空間呢 ? 那第四維的單位是什麼?? 如果單位也是公尺的話,那三軸不就可以表示出來了嗎,為什麼還要多一個煩人的軸??
但很多不懂數學或不懂物理的人,發明了四度空間這個名詞。所以在這邊修正一下,空間就只有 x, y, z三度空間,沒有四度空間。
那麼四維又是什麼?? 請再注意一下,是四維,不是四度空間。
四維是只加入另一項條件,比如加入時間這個條件,如下圖,當在第1秒時,位置位於(1,1,1), 而在第二秒時,位置位於(1, 1, 2),那麼二者的距離單位就不是公尺,而是速度(m/s)。
圖例–todo
因此當人類跨入四維時,就能感受到~~移動的速度(好快喔,好恐怖。或者是好慢喔,真無聊。或者是明天早上9:00am 時要去那麼遠的地方上班,好焦慮)
todo
歐幾里得直線距離
歐幾里得距離就是二點之間的直線距離, 源自於歐幾里得空間計算演算法。
二維空間的歐氏距離公式
$(\rho =\sqrt{{(x_{2}-x_{1})}^{2}+(y_{2}-y_{1})^{2}})$ , ρ為點(x2, y2)與點(x1, y1)之間的歐幾里得距離
三維空間的歐幾里得距離公式
$(\rho =\sqrt{{(x_{2}-x_{1})}^{2}+(y_{2}-y_{1})^{2}+(z_{2}-z_{1})^{2}})$
n維空間的歐幾里得距離公式
$(\rho =\sqrt{{(x_{1}-y_{1})}^{2}+(x_{2}-y_{2})^{2}+…+(x_{n}-y_{n})^{2}} = \sqrt{\sum_{i=1}^{n}(x_{i}-y_{i})^{2}})$
np.linalg.norm
numpy 的 lin 即為線性的意思,alg即為代數,norm則是求得 n 維空間的歐幾里得距離,又稱為範數。比如在四維中,有一點的座標為 [1,1,1,1] ,另一點的座標為 [1,2,3,4],則二點的直線距離則為
$(\sqrt{(1-1)^{2}+(2-1)^{2}+(3-1)^{2}+(4-1)^{2})}=\sqrt{1+4+9}=\sqrt{14}=3.7416573867739413)$
這麼複雜的算式,可以用 np.linalg.norm()來計算
import numpy as np
a=np.array([1, 1, 1, 1])
b=np.array([1, 2, 3, 4])
c=np.linalg.norm(b-a)
print(c)
結果 :
3.7416573867739413
人臉辨識原理
Dlib將人臉分成 68 種特徵。然後再使用這 68 種特徵計算產生 128 個數字(維度),稱為描述子(description)。其實描述子就是將每個人的臉量化的意思。
現在開始要辨識路人甲了,那麼就先計算路人甲這個人的描述子,再與資料庫目錄預先計算的描述子比對,計算這128維度之間的歐幾里得距離,然後取得最小距離的那一張,就判定為同一個人。所以啦,資料庫裏的資料量愈多,就會愈準確。相對的,資料庫就那麼幾個人,判斷出來的就是那幾個鬼囉。
描述子的取得很耗時,需先取得臉部位置,再由此位置取得68組特徵,最後由這68組特徵計算出128組描述子。
請注意,128組描述子並不是陣列格式,所以要使用 np.array(描述子) 將之轉成陣列格式,才可以使用 np.linalg.norm計算歐幾里得距離。
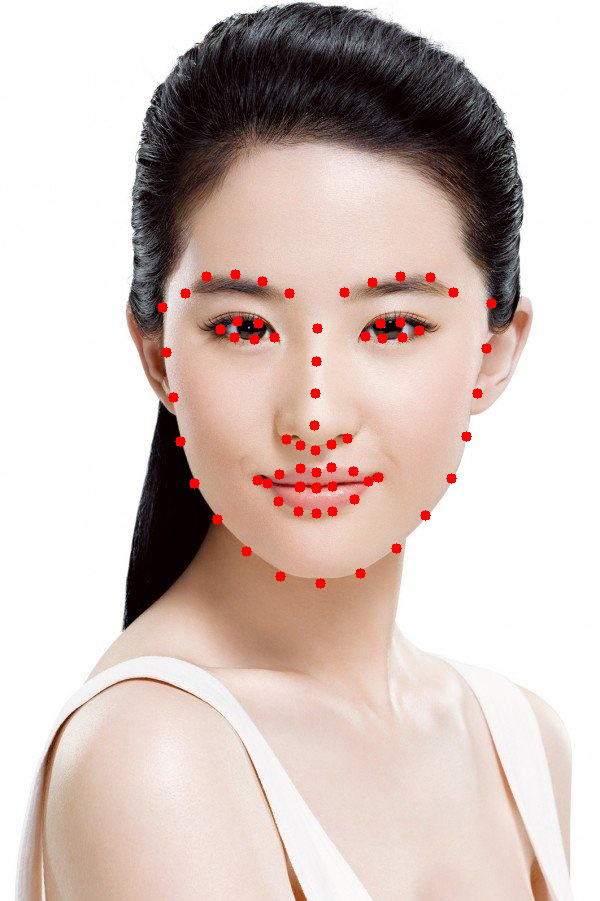
人臉特徵
人臉特徵可以由 dlib.shape_predictor(shape_pattern) 取得偵測器 detector_shape,再把影像及臉部矩型框傳入偵測器後,取得68個特徵點(shape)。
shape.num_parts 變數為特徵數,shape.part(0).x 為第0個特徵點的x座標。所以可以由底下的代碼,將每個特徵列出來。
import cv2
import numpy as np
import dlib
path_face_shape_pattern = "shape_predictor_68_face_landmarks.dat"
detector_face = dlib.get_frontal_face_detector()
detector_shape = dlib.shape_predictor(path_face_shape_pattern)
path_img='./photodb/劉亦菲.jpg'

img=cv2.imdecode(np.fromfile(path_img, dtype=np.uint8), cv2.IMREAD_COLOR)
faces = detector_face(img, 1)
for face in faces:
    shape = detector_shape(img, face)
    print(f'特徵數 : {shape.num_parts}')
    for i in range(shape.num_parts):
        x=shape.part(i).x
        y=shape.part(i).y
        cv2.circle(img, (x,y), 5, (0,0,255), -1)
cv2.imshow('shape', img)
cv2.waitKey(0)
cv2.destroyAllWindows()
描述子 – descriptor
描述子是將人臉量化、數位化的128組數字,為float32形態。
使用 dlib.face_recognition_model_v1傳入人臉辨識訓練模型,取得辨識偵測器 detector_recognition,然後將影像及特徵傳入偵測器,再用np.array()轉成陣列,即可取得這128組數字。
import cv2
import numpy as np
import dlib
path_face_shape_pattern = "shape_predictor_68_face_landmarks.dat"
path_face_recognition_pattern = "dlib_face_recognition_resnet_model_v1.dat"
detector_face = dlib.get_frontal_face_detector()
detector_shape = dlib.shape_predictor(path_face_shape_pattern)
detector_recognition= dlib.face_recognition_model_v1(path_face_recognition_pattern)
path_img='./photodb/劉亦菲.jpg'

img=cv2.imdecode(np.fromfile(path_img, dtype=np.uint8), cv2.IMREAD_COLOR)
faces = detector_face(img, 1)
for face in faces:
    shape = detector_shape(img, face)
    descriptor = detector_recognition.compute_face_descriptor(img, shape)
    print(np.asarray(descriptor))

結果 :
[-0.14054909 0.04426124 0.08866009 -0.0849032 -0.17231978 -0.03550968
-0.15141572 -0.16156833 0.12718649 -0.22248644 0.19372776 -0.10991256
-0.11338115 0.00483301 -0.10927599 0.26251966 -0.17240573 -0.15166888
-0.05355994 0.01177765 0.04092671 0.00246176 -0.02759925 0.05761251
-0.07394576 -0.30236602 -0.12749141 -0.00441253 -0.04730844 -0.10283802
-0.06325873 0.0747205 -0.18921919 0.0166836 0.00195603 0.11021935
0.01045647 -0.0985786 0.09239286 0.03786279 -0.27675414 0.10946561
0.07342842 0.18624522 0.19396684 -0.01562991 -0.0532582 -0.17993636
0.14952007 -0.19124591 0.0392213 0.10646417 0.06729751 0.02661212
0.05451194 -0.09769237 0.0426989 0.17178766 -0.13173173 0.0407474
0.1132625 -0.05298508 -0.010373 -0.15945846 0.16453081 0.22108312
-0.07539183 -0.24093667 0.11156385 -0.0860472 -0.09242575 0.07128195
-0.14813027 -0.18270497 -0.26679739 -0.01346047 0.381686 0.13438062
-0.18776414 0.02520162 0.00945836 -0.0469052 0.0667956 0.14827496
-0.00562041 -0.03608906 -0.03143981 0.01517139 0.22938004 -0.00084011
-0.00534477 0.21878409 -0.05320067 0.0191325 -0.03385412 -0.01841521
-0.11414495 0.03488658 -0.1423299 -0.09943943 -0.05250841 -0.01163368
-0.04529496 0.11440216 -0.13531663 0.14290756 -0.04970808 0.02698578
-0.01652338 0.0266864 -0.06138025 0.03710267 0.12207066 -0.16386668
0.2027695 0.11833911 0.11762075 0.07386067 0.1340881 0.09716622
-0.01273496 0.00316571 -0.18475032 0.00855643 0.10987271 -0.09012618
0.08601305 0.02782671]
人臉辨識專案完整程式碼
底下的代碼,先取得多張圖片的所有描述子(R)。再取得要測試圖片的描述子(A)。然後A與R的所有描述子計算歐幾里德距離,取得最小距離的那一組,就是相近的人臉。
請將已知姓名的照片,置於專案下 images 目錄,並將圖片名稱命名如下
許茹芸.jpg
許茹芸_1.jpg
許茹芸_2.jpg
#pip install opencv-python pillow matplotlib dlib --no-cache-dir
from MahalSdk.cv import cv
import os
import pylab as plt
import numpy as np
import dlib
def face_descriptor(img):
    faces = detector_face(img, 1)
    face=faces[0]
    return(
        np.asarray(
            detector_recognition.compute_face_descriptor(
                img,
                detector_shape(img, face)
            )
        )
    )
detector_face = dlib.get_frontal_face_detector()
detector_shape = dlib.shape_predictor(
    "shape_predictor_68_face_landmarks.dat"
)
detector_recognition= dlib.face_recognition_model_v1(
    "dlib_face_recognition_resnet_model_v1.dat"
)
path="./train"
descriptors=[]
names=[]
for file in os.listdir(path):
    names.append(file.split("_")[0])
    img=cv.read(os.path.join(path, file))
    descriptors.append(face_descriptor(img))
print(names)
img=cv.read("./test/劉浩存.jpg")
target=face_descriptor(img)
distance=[np.linalg.norm(d-target) for d in descriptors]
index=np.argmin(distance)
name=names[index]
img=cv.text(img, name,color=(0,255,0), size=50)
cv.imshow(img)
plt.show()

資料庫
前一篇的人臉辨識中,其步驟為 : 載入圖片 -> 取得臉部區域 -> 取得特微 -> 辨識取得描述子。光一張圖片就要經過4個步驟,耗費了好多秒。然後如果有1000張圖片呢,就再乘以1000倍。
每次要驗証一張新的臉孔,就要先耗費上述的幾千秒,然後再驗証,這乾脆把電腦丟掉好了。但如果把上述耗費幾千秒計算所得到的描述子存在資料庫,需要時由資料庫取回,不就是秒殺級的了嗎!!
請注意,目前 dlib 19.22.01版本,千萬不要使用dlib.cnn_face_detection_model_v1 來取得人臉偵測位置。因為圖片只要超過4000*3000=12,000,000相素,就算是 RTX 3080Ti 12G的 Ram,都會發生 out of memory的錯誤,而且誤判會更嚴重。
訓練模型
一樣要下載人臉外型68個特徵訓練模型 shape_predictor_68_face_landmarks.dat.bz2 及ResNet人臉辨識訓練模型 dlib_face_recognition_resnet_model_v1.dat.bz2 ,將上面二個下載解開後, 置於跟程式碼同一目錄。
資料表欄位
人臉辨識描述子是numpy的array格式,有128個 float32 數字,要如何存到資料庫中呢? 其實不論有多少個浮點數,在資料表中只要有三個欄位即可
id : int
姓名 : varchar(20)
描述子 : blob
blob是長文字資料形態。所以請先在MySQL中建立一個資料庫(cloud),再建立一個資料表(人臉辨識),然後建立上述三個欄位即可
numpy轉換
描述子是numpy的array格式,裏面的資料是 float32 形態,那又要怎麼存入資料庫的 blob 欄位呢? 此時需先使用 numpy.dumps()。請注意,因為資料格式為 blob,所以需使用 cursor.execute(cmd, args),這樣就不會去檢查字元碼而出現非unicode的錯誤。args必需為tuple,如下所示
npDescriptor = numpy.array(face_descriptor)
dump= npDescriptor.dumps()
cmd = "insert into face (name, descriptor) values (%s, %s)"
cursor.execute(cmd, (name, dump))
那怎麼由資料庫的blob還原成 numpy的array呢? 網路上大都是教你使用 np.loads(),但這方式已被捨棄了,所以正確的方式是要使用 pickle.loads()。請記得需先 import pickle, 如下所示
import pickle
feature=pickle.loads(row[1])
寫入資料庫
底下代碼,可以把photodb資料夾內的圖片,取得描述子數位化後,將描述子寫入資料庫。
注意 : 寫入資料庫的 name 欄位是抓取照片檔名而來,所以照片只能是單獨照,也就是只能有一張臉。
from MahalSdk.cv import cv
from MahalSdk.cloud import cloud
import os
import numpy as np
import dlib
def face_descriptor(img):
    faces = detector_face(img, 1)
    face=faces[0]
    return(
        np.asarray(
            detector_recognition.compute_face_descriptor(
                img,
                detector_shape(img, face)
            )
        )
    )
detector_face = dlib.get_frontal_face_detector()
detector_shape = dlib.shape_predictor(
    "shape_predictor_68_face_landmarks.dat"
)
detector_recognition= dlib.face_recognition_model_v1(
    "dlib_face_recognition_resnet_model_v1.dat"
)
conn=cloud.connect("cloud")
cursor=conn.cursor()
cursor.execute("truncate table 人臉辨識")
cmd="insert into 人臉辨識 (姓名, 描述子) values (%s, %s)"
path="./train"
for file in os.listdir(path):
    name=file.split("_")[0]
    img=cv.read(os.path.join(path, file))[:,:,::-1].copy()
    dump=face_descriptor(img).dumps()
    cursor.execute(cmd, (name, dump))
    conn.commit()
conn.close()
人臉辨識
上述的資料庫都寫好了,那麼就可以由下面的代碼來測試新圖片的辨識效能。請將要偵測的圖片置於專案目錄下的 ./test目錄
from MahalSdk.cv import cv
from MahalSdk.cloud import cloud
import os
import dlib
import numpy as np
import pylab as plt
import pickle

def face_descriptor(img):
    faces = detector_face(img, 1)
    face=faces[0]
    return(
        np.asarray(
            detector_recognition.compute_face_descriptor(
                img,
                detector_shape(img, face)
            )
        )
    )
detector_face = dlib.get_frontal_face_detector()
detector_shape = dlib.shape_predictor(
    "shape_predictor_68_face_landmarks.dat"
)
detector_recognition= dlib.face_recognition_model_v1(
    "dlib_face_recognition_resnet_model_v1.dat"
)
conn=cloud.connect("cloud")
cursor=conn.cursor()
cursor.execute('select * from 人臉辨識')
rows = cursor.fetchall()
names = [r[1] for r in rows]
descriptors = [pickle.loads(r[2]) for r in rows]
conn.close()

path="./test"
plt.rcParams['font.sans-serif'] = ['Microsoft JhengHei']
for i, file in enumerate(os.listdir(path)):
    img=cv.read(os.path.join(path, file))[:,:,::-1].copy()
    target=face_descriptor(img)
    distance=[np.linalg.norm(d-target) for d in descriptors]
    index=np.argmin(distance)
    if distance[index]<=0.45:
        name = names[index]
    else:
        name = "查無此人"
    ax=plt.subplot(3, 4, i+1)
    ax.set_title(name)
    ax.imshow(img[:,:,::-1].copy())
    ax.axis("off")
plt.show()
後話
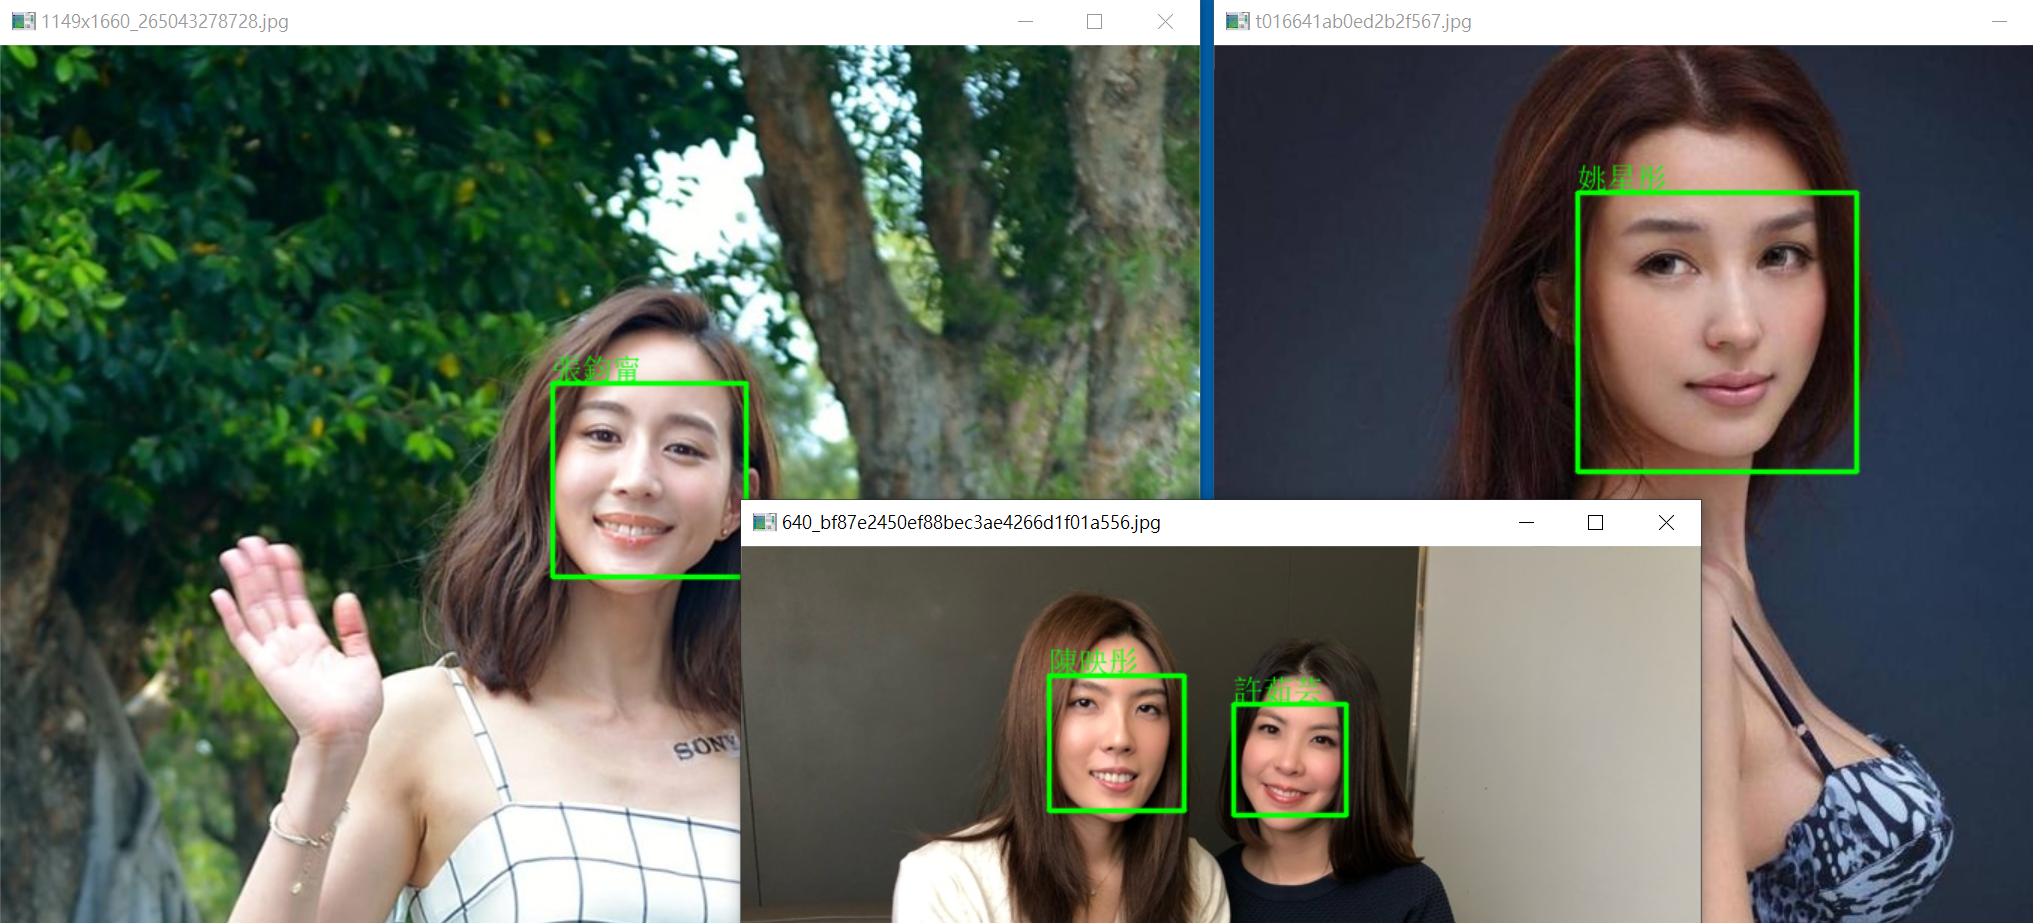
理科太太(陳映彤) 與許茹芸長的實在太像,我真的分不出來,但上述的人臉辨識,可以輕易的辨識出來。
辛芷蕾現代及古裝照,完全是不同的二種人,但騙不過上面的人臉辨識,劉亦菲也是如此。
Web Cam 人臉辨識
底下代碼,可以使用 Web Cam 拍攝影像並辨識人臉,亦可播放 .mp4 影片。
train 目錄下的照片請從如下網址下扯 : train.zip
import pickle

import cv2
import dlib
import numpy as np
from MahalSdk.cv import cv
from MahalSdk.cloud import cloud
def face_descriptor(img, face, detector_shape, detector_recognition):
    return (
        np.asarray(
            detector_recognition.compute_face_descriptor(
                img,
                detector_shape(img, face)
            )
        )
    )

#detector_face = dlib.get_frontal_face_detector()
detector_face = dlib.cnn_face_detection_model_v1(
    'mmod_human_face_detector.dat'
)
detector_shape = dlib.shape_predictor(
    "shape_predictor_68_face_landmarks.dat"
)
detector_recognition= dlib.face_recognition_model_v1(
    "dlib_face_recognition_resnet_model_v1.dat"
)
conn=cloud.connect("cloud")
cursor=conn.cursor()
cursor.execute("select * from 人臉辨識")
rs=cursor.fetchall()
names=[r[1] for r in rs]
descriptors=[pickle.loads(r[2]) for r in rs]
cam=cv2.VideoCapture("c.mp4")
#cam.set(cv2.CAP_PROP_POS_MSEC, 930000)#a.mp4
#cam.set(cv2.CAP_PROP_POS_MSEC, 30000)#a.mp4
#cam.set(cv2.CAP_PROP_POS_MSEC, 120_000)#b.mp4
cam.set(cv2.CAP_PROP_POS_MSEC, 200_000)#c.mp4
while True:
    success, img1=cam.read()
    if success:
        h1, w1, _=img1.shape
        img2=cv.resize(img1, width=800)
        h2, w2, _ = img2.shape
        rate=w1/w2
        faces=detector_face(img2, 1)
        for f in faces:
            f=f.rect
            x1=int(f.left()*rate);y1=int(f.top()*rate)
            x2=int(f.right()*rate);y2=int(f.bottom()*rate)
            img1=cv.rectangle(img1, (x1, y1), (x2, y2), color=(0,255,0))
            target=face_descriptor(img2, f, detector_shape, detector_recognition)
            distance=[np.linalg.norm(d-target) for d in descriptors]
            index=np.argmin(distance)
            if distance[index]<=0.40:
                name=names[index]
                img1 = cv.text(img1, names[index], xy=(x1, y1-50), color=(0, 0, 255), size=50)
        cv2.imshow("Video", img1)
        if cv2.waitKey(1)==27:break
    else:
        break
cam.release()