DocumentView, XpsDocuemnt, FlowDocument, Table, Paragraph, Section
基本概論
在 C# 中要啟用列印功能, 工程實在浩大, 方法也很多. 在此僅列出本人實作的方式.
DocumentViewer <- XpsDocument <- FlowDocument <- Blocks <- Paragraph/Table/Section
DocumentViewer
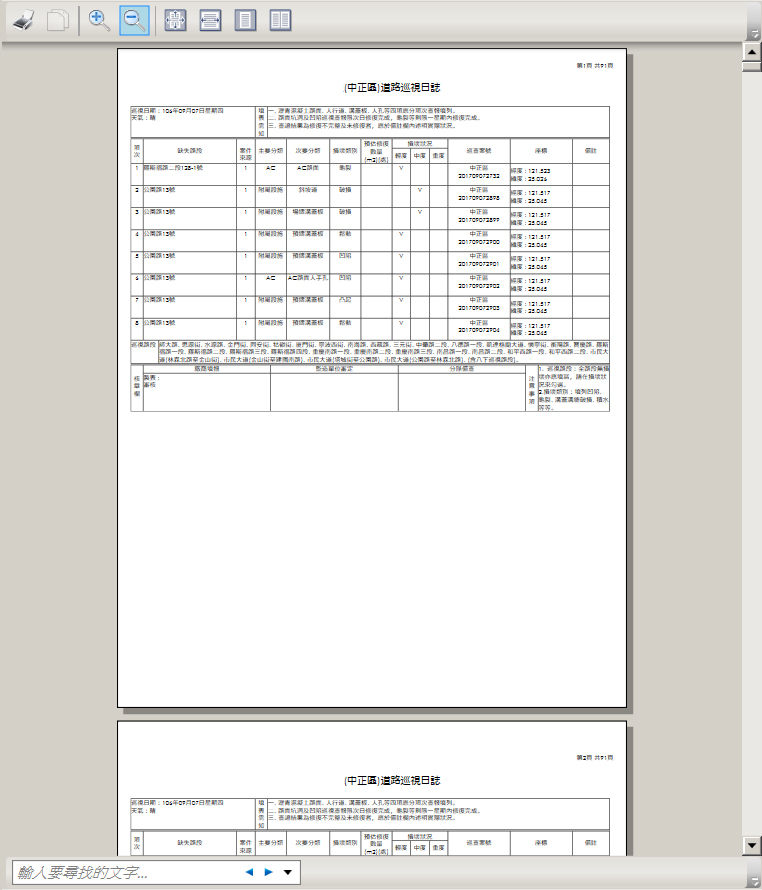
DocumentViewer是最外圍預覽列印的元件, 同時也具有列印工具列
上圖灰色背景的部份, 即為DocumentViewer的範圍, 具有最上方的工具列, 中間的資料顯示區, 及最下方的搜尋詢功能
此元件可直接使用 DocumentViewer docViewer = new DocumentViewer() 產生物件, 然後將此元件崁入到 Grid之中. 崁入到Grid的方法為 grid.Children.Add(docViewer)
XpsDocument
有了DocumentViewer後, 接下來就是把要顯示的資料崁入其中. 負責處理資料顯示的元件為XpsDocument, , 是由微軟自行開發處理列印的專用格式.
在啟用XPS時, 需於專案按右鍵/加入/參考, 將ReachFramework及System.Printing打勾
XpsDocument其實不是資料的存放處, 真正存放資料的元件是FlowDocument. 也就是說, 要先把資料都安排在FlowDocument之中, 然後再利用XpsDocumentWriter 轉換成XpsDocument.
製作XpsDocument 會花費相當長的時間, 所以需使用執行緒進行此工作, 如下程式碼為製作XpsDocument的方法
Dispatcher.BeginInvoke(new LoadXpsMethod(LoadXps), DispatcherPriority.ApplicationIdle);
上面程式碼中, 產生LoadXpsMethod物件, 並呼叫了LoadXps方法. 所以需於class之中宣告如下
public partial class WindowPatrolLog : Window
{
    private delegate void LoadXpsMethod();
}
至於LoadXps的方法如下
public void LoadXps()
{
    MemoryStream ms = new MemoryStream();
    Package package = Package.Open(ms, FileMode.Create, FileAccess.ReadWrite);
    Uri DocumentUri = new Uri("pack://InMemoryDocument.xps");
    PackageStore.RemovePackage(DocumentUri);
    PackageStore.AddPackage(DocumentUri, package);
    XpsDocument xpsDocument = new XpsDocument(package, CompressionOption.Fast, DocumentUri.AbsoluteUri);
    XpsDocumentWriter writer = XpsDocument.CreateXpsDocumentWriter(xpsDocument);
    writer.Write(((IDocumentPaginatorSource)m_doc).DocumentPaginator);
    docViewer.Document = xpsDocument.GetFixedDocumentSequence();
    xpsDocument.Close();
}
上方程式碼只要照抄就可. 其中藍色的 m_doc, 即為 FlowDocument, 也就是要列印的資料存放處. 利用XpsDocumentWriter的Write方法, 將m_doc寫入XpsDocument之中, 然後再把DocumentViewer的Document屬性指向XpsDocuemnt.
FlowDocument
FlowDocument為資料的存放元件, 可以存放Paragraph, Table, 換頁符等元件, 每個元件都使用Blocks的屬性加入.
FlowDocument m_doc=new FlowDocument() 即可產生物件. m_doc.FontFamily = new FontFamily(“Century Gothic”) 可控制FlowDocument的字型.
若將表格置於FlowDocument中, 僅能佔滿一半的寬度, 此時需設定如下
m_doc.ColumnWidth = 999999;
Paragraph
Paragraph為段落的意思, 使用 new Paragraph()即可產生段落物件. FlowDocument.Blocks.Add()將此物件置於 FlowDocument之中
Paragraph 常用的屬性方法如下
FontSize = 10; //設定字型大小
TextAlignment = TextAlignment.Center; //設定段落對齊方式, 有靠左, 置中, 靠右三種
Inlines.Add("顯示的文字"); //設定要顯示的文字
Table
表格是列印時常用的元件之一. 製作表格的流程如下
設定表格屬性 -> 定義欄位 -> TableRowGroup -> TableRow -> TableCell
設定表格屬性
表格屬性包含了框線顏色, 粗細, 字型大小. 需特別注意的是, 每個儲存格的間距, 也是在Table的屬性中設定
Table table=new Table();
table.BorderBrush = Brushes.Black; //框線顏色
table.BorderThickness = new Thickness(0.5,0.5,0.5,0); 框線粗細
table.CellSpacing = 0; //每個儲存格的間距
table.FontSize = 10; //字型大小
table.Margin = new Thickness(0, 1, 0, 0); //表格的邊界
定義欄位
表格有多少個欄位, 需產生TableColumn 物件, 並設定每個欄位的寬度後, 再使用表格的Columns.Add() 將欄位加入
TableColumn[] cols = new TableColumn[3];
cols[0] = new TableColumn(); cols[0].Width = new GridLength(200);
cols[1] = new TableColumn(); cols[1].Width = new GridLength(20);
cols[2] = new TableColumn(); cols[2].Width = new GridLength(550);
for (int i = 0; i < cols.Length; i++)
{
    this.Columns.Add(cols[i]);
}
TableRowGroup
每一列的資料是存放在TableRow之中, 但TableRow並不能直接放置在Table裏, 而是要先置於TableRowGroup之中, 再把TableRowGroup放置在Table之中.
請注意, 一個表格可以加入多個TableRowGroup
TableRowGroup g = new TableRowGroup();
g.Rows.Add(row);
TableRow
TableRow 是定義每一列的物件, 然後將每一個TableCell物件加入到TableRow之中
TableRow row = new TableRow();
row.Cells.Add(cells[i]);
TableCell
TableCell是每個儲存格物件, 可以在每個儲存格中設定框線大小, 對齊方式, 及儲存格內的邊界. TableCell只能設定水平的對齊方式, 無法設定垂直對齊, 只能先計算出儲存格的高度, 再利用Padding屬性來達成垂直置中的需求.
TableRowGroup g = new TableRowGroup();
TableRow row = new TableRow();
cells[0] = new TableCell(new Paragraph(new Run("輕度")));
cells[1] = new TableCell(new Paragraph(new Run("中度")));
cells[2] = new TableCell(new Paragraph(new Run("重度")));
for (int i = 0; i < 3; i++)
{
    cells[i].BorderBrush = Brushes.Black;
    cells[i].BorderThickness = new Thickness(0.5);
    cells[i].TextAlignment = TextAlignment.Center;
    cells[i].Padding = new Thickness(0, 5, 0, 0);
    row.Cells.Add(cells[i]);
}
g.Rows.Add(row);
this.RowGroups.Add(g);
Section
Session最常用到的, 就是換頁符. 在FlowDocument中, 若要達到換頁的效果, 除了資料超出了FlowDocument的高度之外, 也可以於FlowDocument加入Section.
需注意的是, 每一個換頁符, 都必需是一個新的物件
Section section = new Section();//換頁符, 一定要是新的物件
section.BreakPageBefore = true;
m_doc.Blocks.Add(section);
補充 – 由xaml 取得物件
FlowDocument m_doc = (FlowDocument)Application.LoadComponent(new Uri("FlowDocumentPatrol.xaml", UriKind.RelativeOrAbsolute));
列印指定頁數, 橫向列印
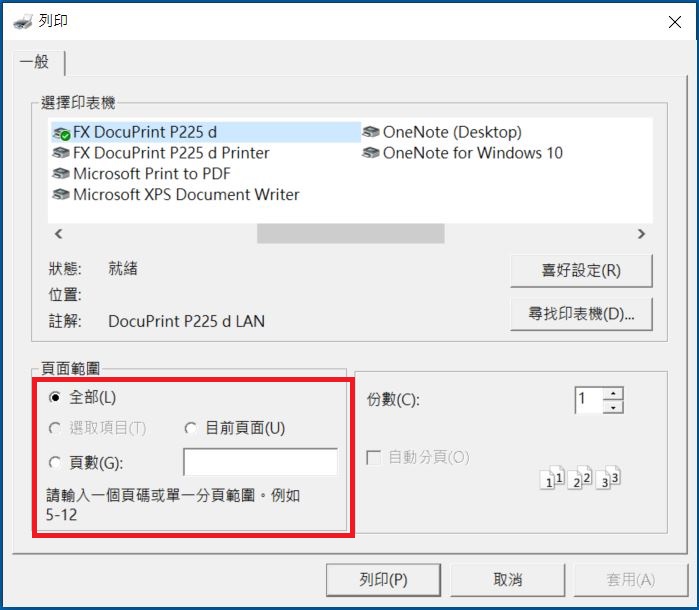
列印時, 預設無法指定要列印的頁數, 此時必需撰寫自訂的DocumentViewer, 也可以由下指定列印的方向
class MahalDocumentViewer : DocumentViewer
    {
        protected override void OnPrintCommand()
        {
            PrintDialog printDialog = new PrintDialog();
            //printDialog.SelectedPagesEnabled = true;
            printDialog.UserPageRangeEnabled = true;
            printDialog.CurrentPageEnabled = true;
            //printDialog.PrintTicket.PageOrientation = System.Printing.PageOrientation.Landscape;
            if (printDialog.ShowDialog() == true)
            {
                DocumentPaginator paginator;
                if (printDialog.PageRangeSelection == PageRangeSelection.UserPages)
                {
                    paginator = new PageRangeDocumentPaginator(this.Document.DocumentPaginator, printDialog.PageRange);
                }
                else if (printDialog.PageRangeSelection == PageRangeSelection.CurrentPage)
                {
                    int currentPage = this.MasterPageNumber;
                    PageRange pageRange = new PageRange();
                    pageRange.PageFrom = currentPage;
                    pageRange.PageTo = currentPage;
                    paginator = new PageRangeDocumentPaginator(this.Document.DocumentPaginator, pageRange);
                }
                else
                {
                    paginator = this.Document.DocumentPaginator;
                }
                printDialog.PrintDocument(paginator, "立向營造");
            }
        }
    }

